
This guide assumes that you have read and understood the readme.md, downloaded the official images or installed Skywire from source and do every step exactly the way it is described. Misconduct will lead to an inability to connect and to potential reflashing. It is very important that there is no IP collision with your existing home router subnet. The default settings of the official images, as well as the router of the Skyminer, are using the 192.168.0.0/24 subnet.
This guide will teach you how to deploy a script, that will backup all .skywire folders of your nodes. The .skywire folder contains the public key of your node, as well as the several app keys. Backing them up allows you to easily restore them in case your sd cards get corrupted etc.
The script in this guide can be used without any adjustment if you are using the official prepared images. If you are not using the prepared images, you have to adjust it just a little bit, but that is fairly easy and will be explained in here as well.
- Running Skywire manager & node(s)
- SSH access, i.e. port forwarding rules dependent on your network topology (see this [guide])
- sftp client like FileZilla
- SSH client like putty if you're on Windows
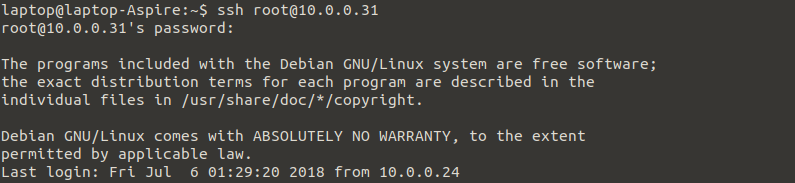
Please login to your manager pi via SSH/using putty. To accomplish this you need the IP of your Skyminer router, if you don't know how to get it look here.
Login via SSH:
Then you execute
nano backup.sh
and paste this content
#!/bin/bash

#create backup folder
backup_folder="backup_$(date +%Y_%m_%d-%H:%M:%S)";
mkdir $backup_folder

#backup .skywire folder of the manager
cp -r /usr/local/skywire/go/bin/.skywire /root/$backup_folder/192.168.0.2

#backup .skywire folder of the secondary pi's
USERNAME=root
HOSTS="192.168.0.3 192.168.0.4 192.168.0.5 192.168.0.6 192.168.0.7 192.168.0.8 192.168.0.9"
for HOSTNAME in ${HOSTS} ; do
    if ping -W5 -i0.5 -c 1 &> /dev/null
    then
        echo 1
        echo "no connection to host" ${HOSTNAME}
    else
        echo "ping received from" ${HOSTNAME}
        scp -r ${USERNAME}@${HOSTNAME}:/usr/local/skywire/go/bin/.skywire /root/$backup_folder/"${HOSTNAME}"
    fi
done
Save the file via ctrl+x and yes.
Next make the file executable via chmod +x backup.sh.
Once that is done you can execute the script via
./backup.sh
This will create a folder with the name backup_date where date gets changed as time goes by.
You then will be queried to enter the passwords of your nodes 1-7 one after another.
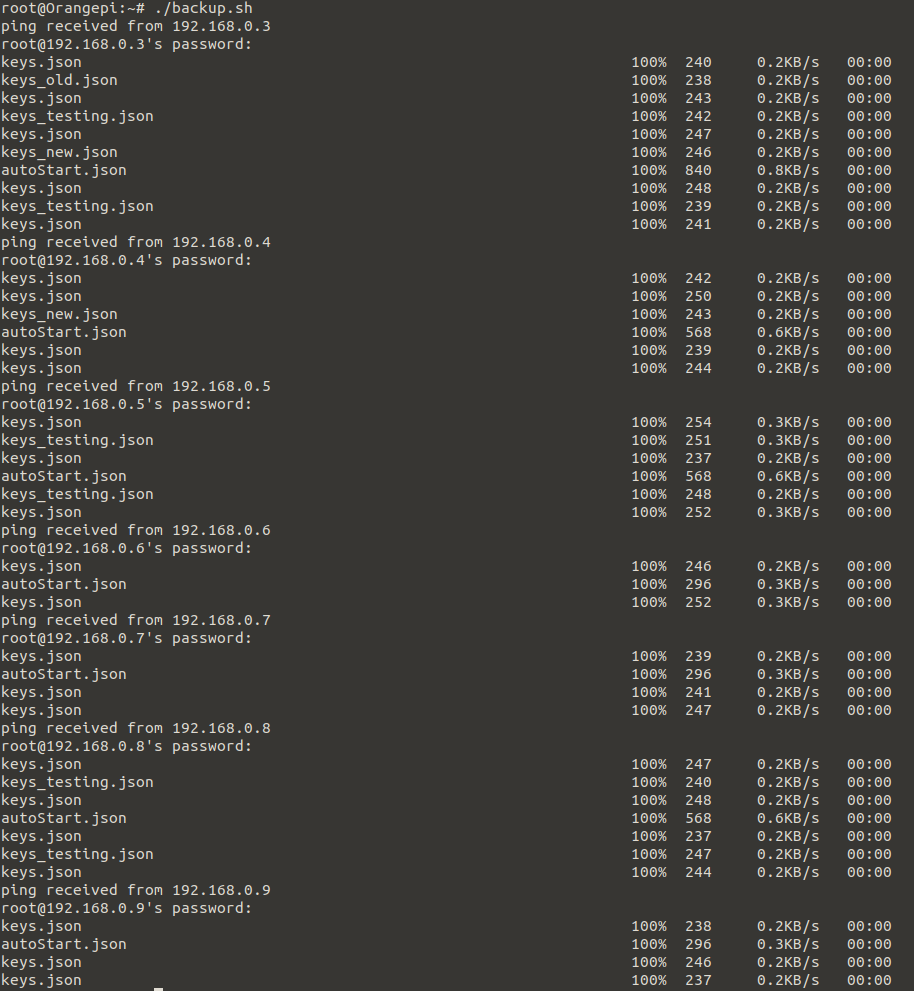
As you can see there is a different amount of files getting transfered for each node. This is due to the fact, that for example if you never have started the SSH Server within the manager you will not have a sshs or sshc folder etc.
After that check if it was successful by executing ls
You should see a folder called backup_date
'date' is of course just a placeholder for the actual system time, that gets concatenated to the folder's default name ('backup'). You need to replace it and/or use the tab key for auto-completion
Open it via
cd backup_date
followed by ls:
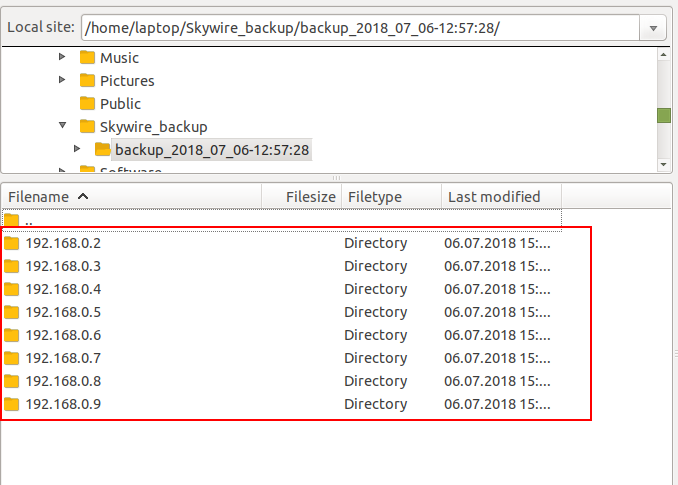
Inside the backup_date folder you should see the folders 192.168.0.2 192.168.0.3 etc. up to 192.168.0.9.

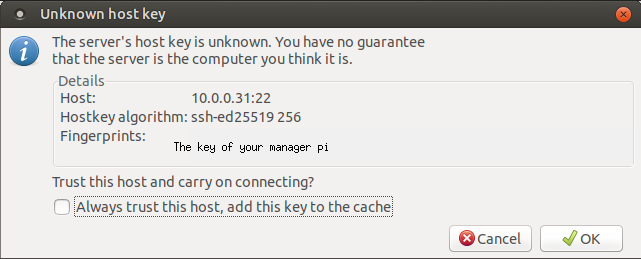
Please open the FileZilla client and connect to the manager pi by entering the IP of the Skyminer router just like above in Putty, user is root,the port and password stays the same.

Answer with 'yes':
FileZilla will look like this:
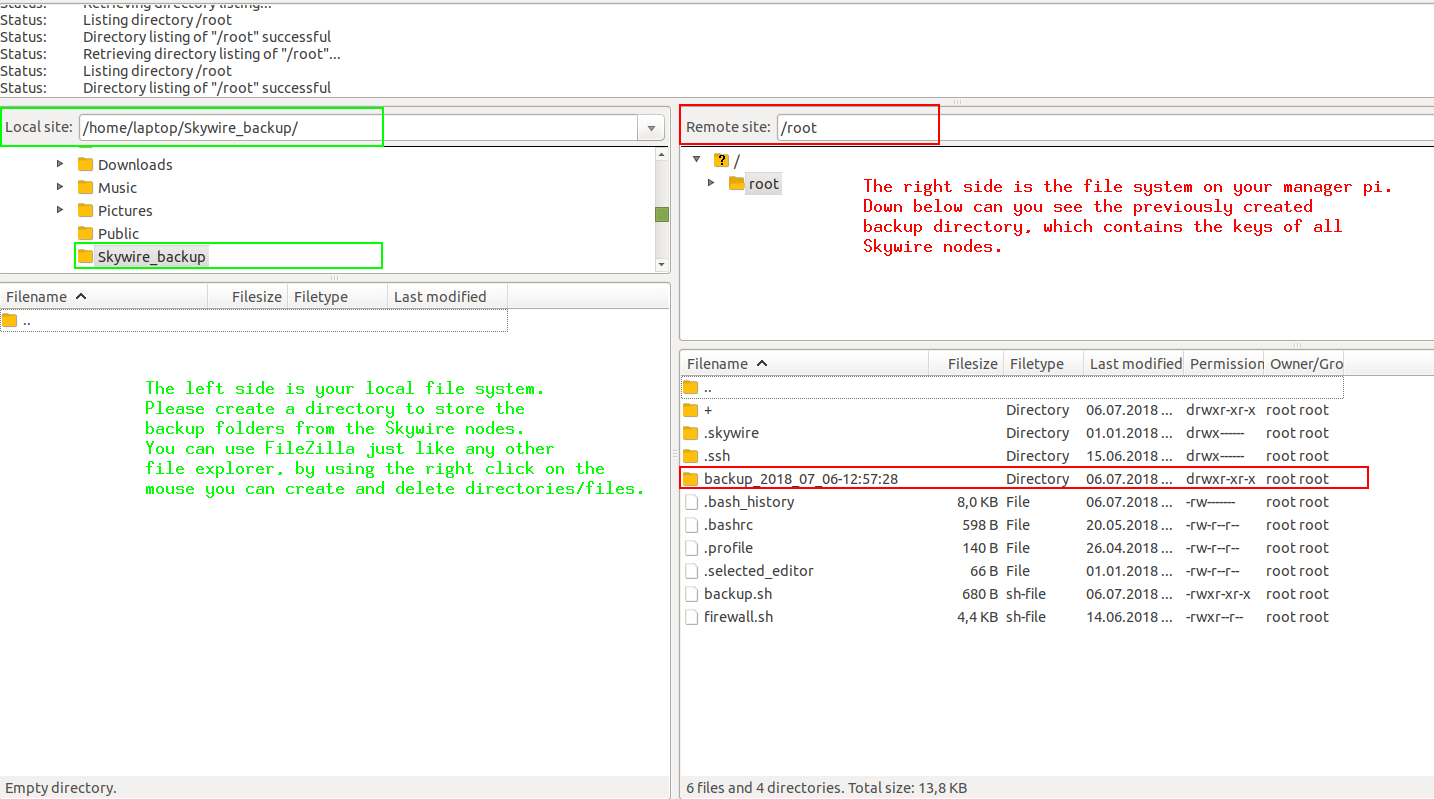
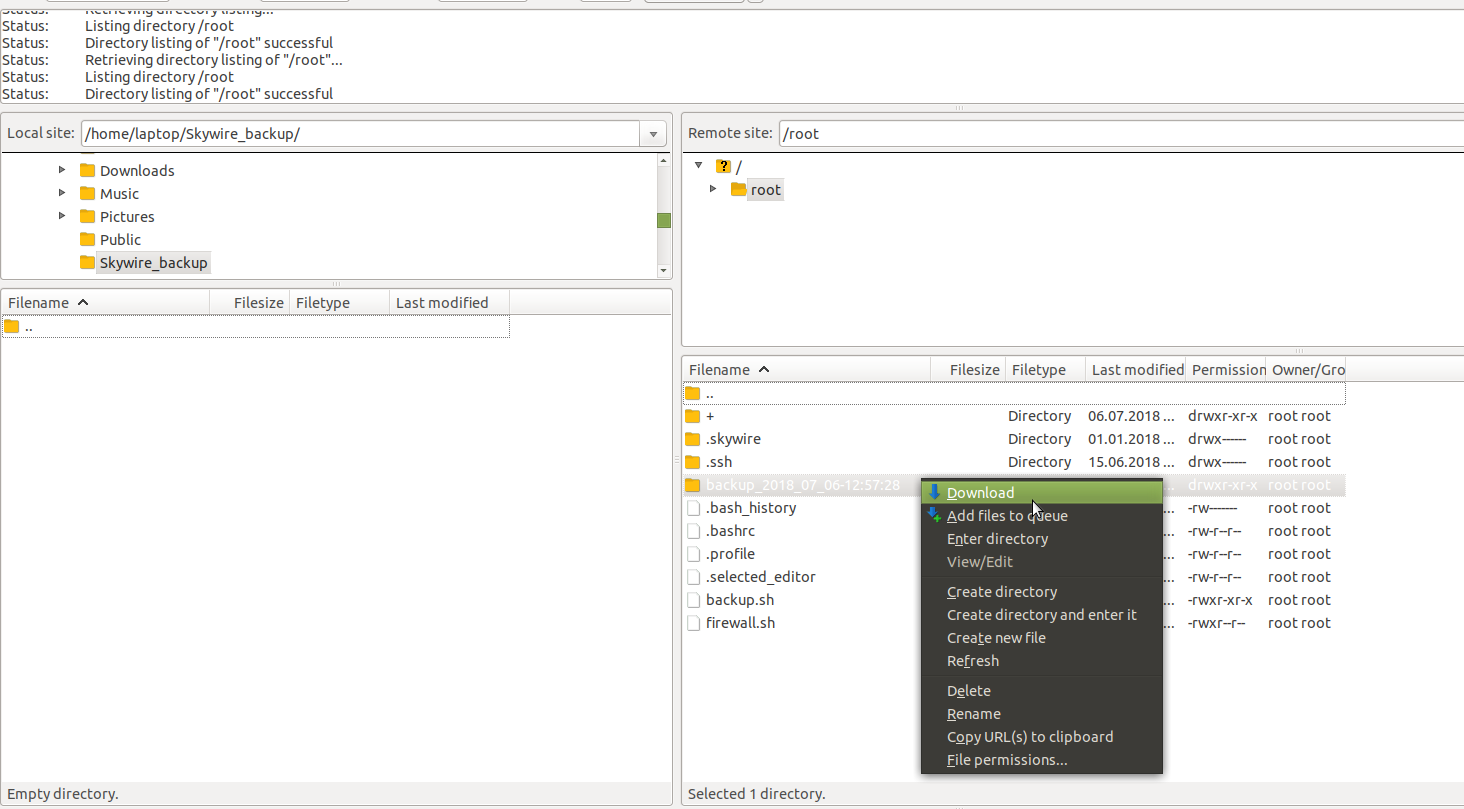
Once you have (created &) navigated to the dedicated directory that shall store the backup folders, you can download the backup folder by using a right click and then click on 'Download'.
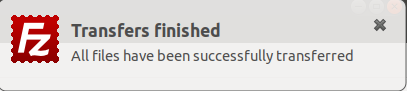
After the downloaded is done you should see a popup looking like this in the top right corner of your screen:
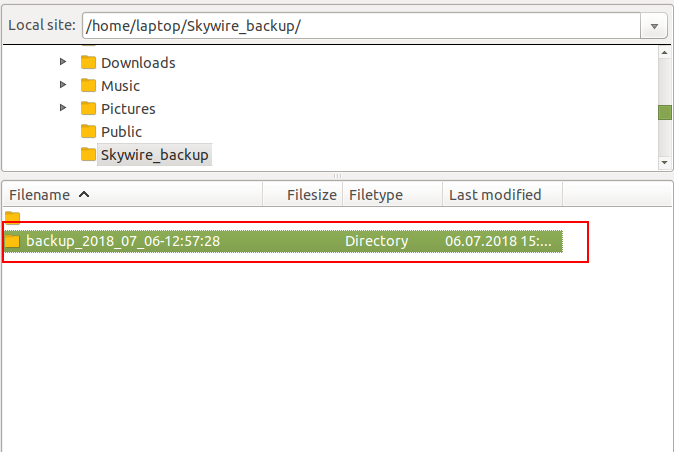
Double check the transmission:
and see if all a backup of all pi's was received:
If everything is there you're done. All keys of your Skywire nodes have been saved on your computer.
This should be used only if you reflashed the image and you want to restore the old keys.
Foreword: To be able to restore back the contents previously backed up from a node you should have the computer connected on the same network as the node you want to restore to, e.g. skyminer router.
The backup folder structure looks like this: backup_dat×tamp\IP_of_backedup_node\node(discovery, manager, ss)\keys.json(user.json, autoStart.json). So each IP folder from the backup folder contains the contents of the respective node IP .skywire folder which in turn contains the keys.json, user.json (used by the manager to store the password) and autoStart.json. Knowing this when in need, we can restore only the keys file or the whole contents of the .skywire folder.
You can restore each node's .skywire contents using FileZilla only if you have access to all the nodes on the network otherwise if you are behind the forwarded port of the manager node youll need to restore the whole backup folder and from there restore to whatever node the data that you need via putty and command line.
First we will show how to restore using FileZilla to any node if yo are connected to the skyminer router network.
Open previously program that you used to copy the backed up folders to your local computer, FileZilla.
In the top bar put in the IP of the node to which you want to restore, username (for the official image is root) and password (for the official image is samos) and press the ENTER key on your keyboard. See the picture below.

After you successfuly connected to the node that you need, navigate in the Local pane (left side) to the local folder on your computer where you have stored the backup data and select the node IP folder you want to restore.
Now navigate in the Remote pane (right side) on the node on which you are connected, to the .skywire folder that is located in /usr/local/skywire/go/bin/.skywire/ and simply drag the from the Local pane the folders you need in the Remote pane like in the example picture below.

An Error message should appear if in the remote location there are already the same folders. Just select Overwrite and select OK like in the picture below.

To validate that youve restored the old keys, simply go in the manager web ui and you should see the old key there.
Also if you just restored the data from the manager node you should have the old password that you set on the manager web ui.
This should be used only if you reflashed the image and you want to restore the old keys.
Foreword: This method is used when you have access only to the manager node through the port forwarding done on the skyminer router. So this is done while you are connected to the home router.
Open FileZilla and in the top bar put in the IP of the manager node from your home network, username (for the official image is root) and password (for the official image is samos) and press the ENTER key on your keyboard. See the picture below.
After you successfuly connected on the manager, navigate in the Local pane (left side) to the local folder on your computer where you have stored the backup data and select the whole backup_dat×tamp folder you want to restore.
Now navigate in the Remote pane (right side) on the manager, to the /root folder and simply drag the from the Local pane the backup_dat×tamp folder in the Remote pane like in the example picture below.

Now that you recovered the whole backup folder you need to login on the manager node with putty (if you are using Windows) or with the terminal from Mac. To login use as user: root and password: samos.
After you login type the command ll which will list you all the folders that are located in /root and locate the backup_dat×tamp folder like in the picture below.

OBS.: You can also list the contents of the backup_dat×tamp folder by typing ll backup_dat×tamp/, even deeper with ll backup_dat×tamp/192.168.0.3/ and you can go like this in all the folders. Use TAB key for autocomplete, for example type only backup press TAB and it will autocomplete the name.
Also you can check the key first to be sure you're putting the right one by using cat command, for example cat backup_dat×tamp/192.168.0.3/node/keys.json will show you the contents of that file and you'll be able to check the key.
For our restore node we will take node1 with the IP 192.168.0.3
First we need to create a new folder on node1 where the keys are located then move them in that folder. To do this issue the following command:
ssh root@192.168.0.3 mkdir -p /usr/local/skywire/go/bin/.old;echo $?
This will create remotly the .old folder in the bin folder and it will also return the exit code or error if something went wrong through the echo $? parameter. Exit code 0 is good
And now to move them, type:
ssh root@192.168.0.3 mv /usr/local/skywire/go/bin/.skywire/* /usr/local/skywire/go/bin/.old/;echo $?
Now if you got the whole backup folder in the /root of the manager you need to copy the contents of the IP folder from it to the node with the respective IP. For this we will use the scp command like in the example below.
scp -rp ~/backup_dat×tamp/192.168.0.3/* root@192.168.0.3:/usr/local/skywire/go/bin/.skywire/
To validate that youve restored the old keys, simply go in the manager web ui and you should see the old key there. These steps can be used to recover to any node, just change the IP address of the node.
Open a terminal on the node you want to backup and execute
sudo find / -iname .skywire
This will return the location of the skywire folder. If you installed all your nodes similarly you can be sure that the location is the same on all your nodes. Use this knowledge to adjust the .skywire path in the script as needed.
If you happen to encounter the error message Read from socket failed: connection reset by peer
then you need need to apply the steps describe here
If the location of the .skywire folders is the same and you are also using root as a user then you only have to change the following line:
HOSTS="192.168.0.3 192.168.0.4 192.168.0.5 192.168.0.6 192.168.0.7 192.168.0.8 192.168.0.9"
to
HOSTS="IP_NODE_1 IP_NODE_2 IP_NODE_3 IP_NODE_4 IP_NODE_5 IP_NODE_6 IP_NODE_7 IP_NODE_8 IP_NODE_9"
where you have to replace IP_NODE_1 IP_NODE_2 etc. with the IPs of your nodes.
Keep in mind that the IPs are starting with your first node and not with the IP of the manager!
If the location of the .skywire folders is the same and the IPs are the same (if not go here) then you have to change the following line:
USERNAME = your_username
to the user you are using on the pi's.
If the location of the .skywire folder differs then you just have to adjust the following lines in the script:
cp -r /path/to/folder/.skywire manager_backup
as well as
scp -r ${USERNAME}@${HOSTNAME}:/path/to/folder/.skywire /root/$backup_folder/"${HOSTNAME}"
keep in mind that dependent on the user you're using you might want to change /root/$backup_folder/"${HOSTNAME} as well to fit your needs.
Not tested yet, use at your own risk as long as this message is being displayed.
Assuming your .skywire folder is located in /home/pi/go/bin/.skywire the script would look like this:
#!/bin/bash

#create backup folder
backup_folder="backup_$(date +%Y_%m_%d-%H:%M:%S)";
mkdir $backup_folder

#backup .skywire folder of the manager
cp -r /home/pi/go/bin/.skywire manager_backup
cp -r /home/pi/go/bin/.skywire /home/pi/$backup_folder/192.168.0.2

#backup .skywire folder of the secondary pi's
USERNAME=pi
HOSTS="192.168.0.3 192.168.0.4 192.168.0.5 192.168.0.6 192.168.0.7 192.168.0.8 192.168.0.9"
for HOSTNAME in ${HOSTS} ; do
    if ping -W5 -i0.5 -c 1 &> /dev/null
    then
        echo 1
    else
        echo 0
        scp -r ${USERNAME}@${HOSTNAME}:/home/pi/go/bin/.skywire /home/pi/$backup_folder/"${HOSTNAME}"
    fi

done
The rest of the steps in the guide stay the same.