Deployment of both URL shortener web service and Login web service on the Kube cluster. As a bonus, we implemented the Nginx proxy, where only one entry point can be used to access both services.
To deploy the services, we need to push the docker containers from Assignment 3.1 to the docker hub. We created all three images for the services URL-shortener, Login web service, and One entry point service. Docker is automatically selected as the container run time by the Kubernetes and kubeadm pickups it up by scanning well-known UNIX domain sockets.
url-shortner -> neerajs1995/url-shortner
https://hub.docker.com/repository/docker/neerajs1995/url-shortner
login-web-service -> neerajs1995/authenticator
https://hub.docker.com/repository/docker/neerajs1995/authenticator
ngnix-one-entry-point -> neerajs1995/assignment2
https://hub.docker.com/repository/docker/neerajs1995/assignment2
The architecture we used for the deployment of web services.
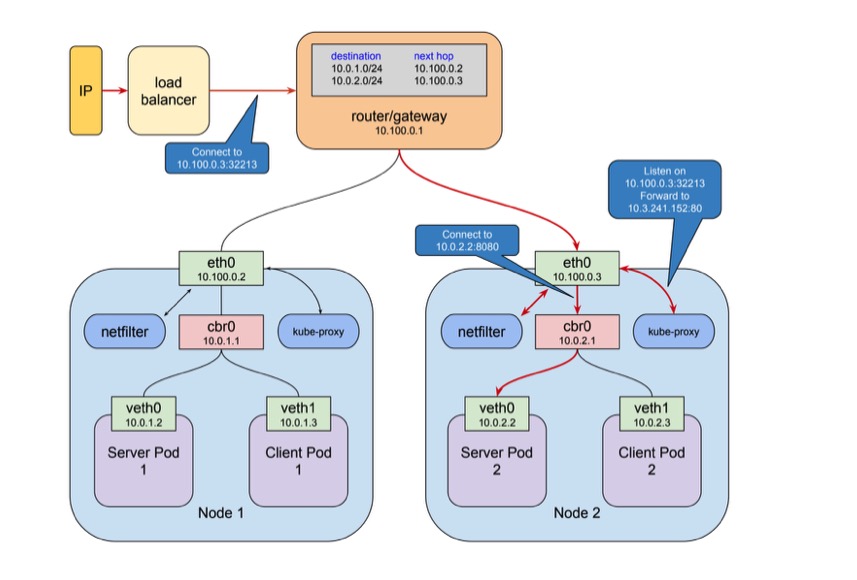
[1]Figure: the client connects to the load balancer via a public IP address
kubeadm is used to manage the clusters. We have one master node (1) and two worker nodes (). To initiate the master and worker nodes, we need some pre configurations to complete [2].
For iptables to see the bridged traffic, we need to set [2] net.bridge.bridge-nf-call-iptables is set to 1 in sysctl config.
cat <<EOF | sudo tee /etc/sysctl.d/k8s.conf
net.bridge.bridge-nf-call-ip6tables = 1
net.bridge.bridge-nf-call-iptables = 1
EOF
The master node is initiated using.
$ sudo kubeadm init --pod-network-cidr=10.0.0.0/24 --apiserver-advertise-address=10.0.0.111 --apiserver-cert-extra-sans= --ignore-preflight-errors Swap
For third-party network addon, we used the Calcio networking and network policy, provider. Calcio takes the --pod-network-cidr mentioned in the kubeadm init
$ kubectl apply -f https://docs.projectcalico.org/v3.11/manifests/calico.yaml
After initiating the kubeadm, we get the token and discovery token hash in this format.
kubeadm join --token <token> <control-plane-host>:<control-plane-port> --discovery-token-ca-cert-hash sha256:<hash>
Worker nodes can be joined using the above command. Master VM can be used for worker node using the taint command, but we did not choose that. After entering the nodes, checking nodes can be done through the following commands.
student11@edu0-vm-11:~$ kubectl get nodes
NAME         STATUS                     ROLES    AGE    VERSION
edu0-vm-11   Ready                      master   3d2h   v1.18.2
edu0-vm-41   Ready,SchedulingDisabled   <none>   3d2h   v1.18.2
edu0-vm-48 Ready <none> 27h v1.18.2To deploy the pods a the images need to be pulled from the docker hub. A service needs to applied with the name of service, and it should target the container port. Following YAML is used for the configuration of three services.
kind: Service
apiVersion: v1
metadata:
  name: NAME-OF-THE-SERVICE
spec:
  selector:
    app: NAME-OF-THE-SERVICE
  ports:
  - protocol: "TCP"
    port: {port}
    targetPort: {containerPort}
  type: LoadBalancer
---
apiVersion: apps/v1
kind: Deployment
metadata:
  name: NAME-OF-THE-SERVICE
spec:
  selector:
    matchLabels:
      app: NAME-OF-THE-SERVICE
  replicas: 3
  template:
    metadata:
      labels:
        app: url-shortner
    spec:
      containers:
      - name: NAME-OF-THE-SERVICE
        image: neerajs1995/IMAGE-NAME
        imagePullPolicy: IfNotPresent
        ports:
        - containerPort: {containerPort}
kubectl is used to deploy the pods on worker nodes
$ kubectl apply -y NAME-OF-THE-SERVICE.yaml
After applying the service configuration and deploying pods, a cluster IP is assigned to the container. This can be accessed internally. But to allocate for the external network, we need an ingress controller or load balancer. This is the YAML for the load balancer regarding all three services.
kind: Service
apiVersion: v1
metadata:
  name: NAME-OF-THE-SERVICE
spec:
  type: LoadBalancer
  externalIPs:
  - {externalIP}
  selector:
    app: NAME-OF-THE-SERVICE
  ports:
  - name: http
    port: {port}
    targetPort: {targetPort}
  clusterIP: {clusterIP}
  type: LoadBalancer
Cluster Ip's can be obtained using this command.
$ kubectl get pods,svc --all-namespaces -o wide
.....
.....
NAMESPACE              NAME                                TYPE           CLUSTER-IP       EXTERNAL-IP       PORT(S)                  AGE    SELECTOR
default                service/kubernetes                  ClusterIP      10.96.0.1        <none>            443/TCP                  3d2h   <none>
default                service/url-shortner                LoadBalancer   10.110.232.189   EXTERNAL-IP     80:30445/TCP             42h    app=url-shortner
default                service/url-shortner-auth           LoadBalancer   10.100.19.232    EXTERNAL-IP     81:31068/TCP             20h    app=url-shortner-auth
default                service/url-shortner-ngnix          LoadBalancer   10.96.154.168    EXTERNAL-IP     8000:31682/TCP           18h    app=url-shortner-ngnix
kube-system            service/kube-dns                    ClusterIP      10.96.0.10       <none>            53/UDP,53/TCP,9153/TCP   3d2h   k8s-app=kube-dns
kubernetes-dashboard   service/dashboard-metrics-scraper   ClusterIP      10.107.113.81    <none>            8000/TCP                 3d2h   k8s-app=dashboard-metrics-scraper
kubernetes-dashboard   service/kubernetes-dashboard        ClusterIP      10.111.181.210   <none>            443/TCP                  3d2h   k8s-app=kubernetes-dashboard
References:
[1] Understanding kubernetes networking: ingress https://medium.com/google-cloud/understanding-kubernetes-networking-ingress-1bc341c84078 Accessed: 12.05.2020
[2] Installing kubeadm https://kubernetes.io/docs/setup/production-environment/tools/kubeadm/install-kubeadm/ Accessed: 12.05.2020