
RTMPose: Real-Time Multi-Person Pose Estimation based on MMPose
English | 简体中文
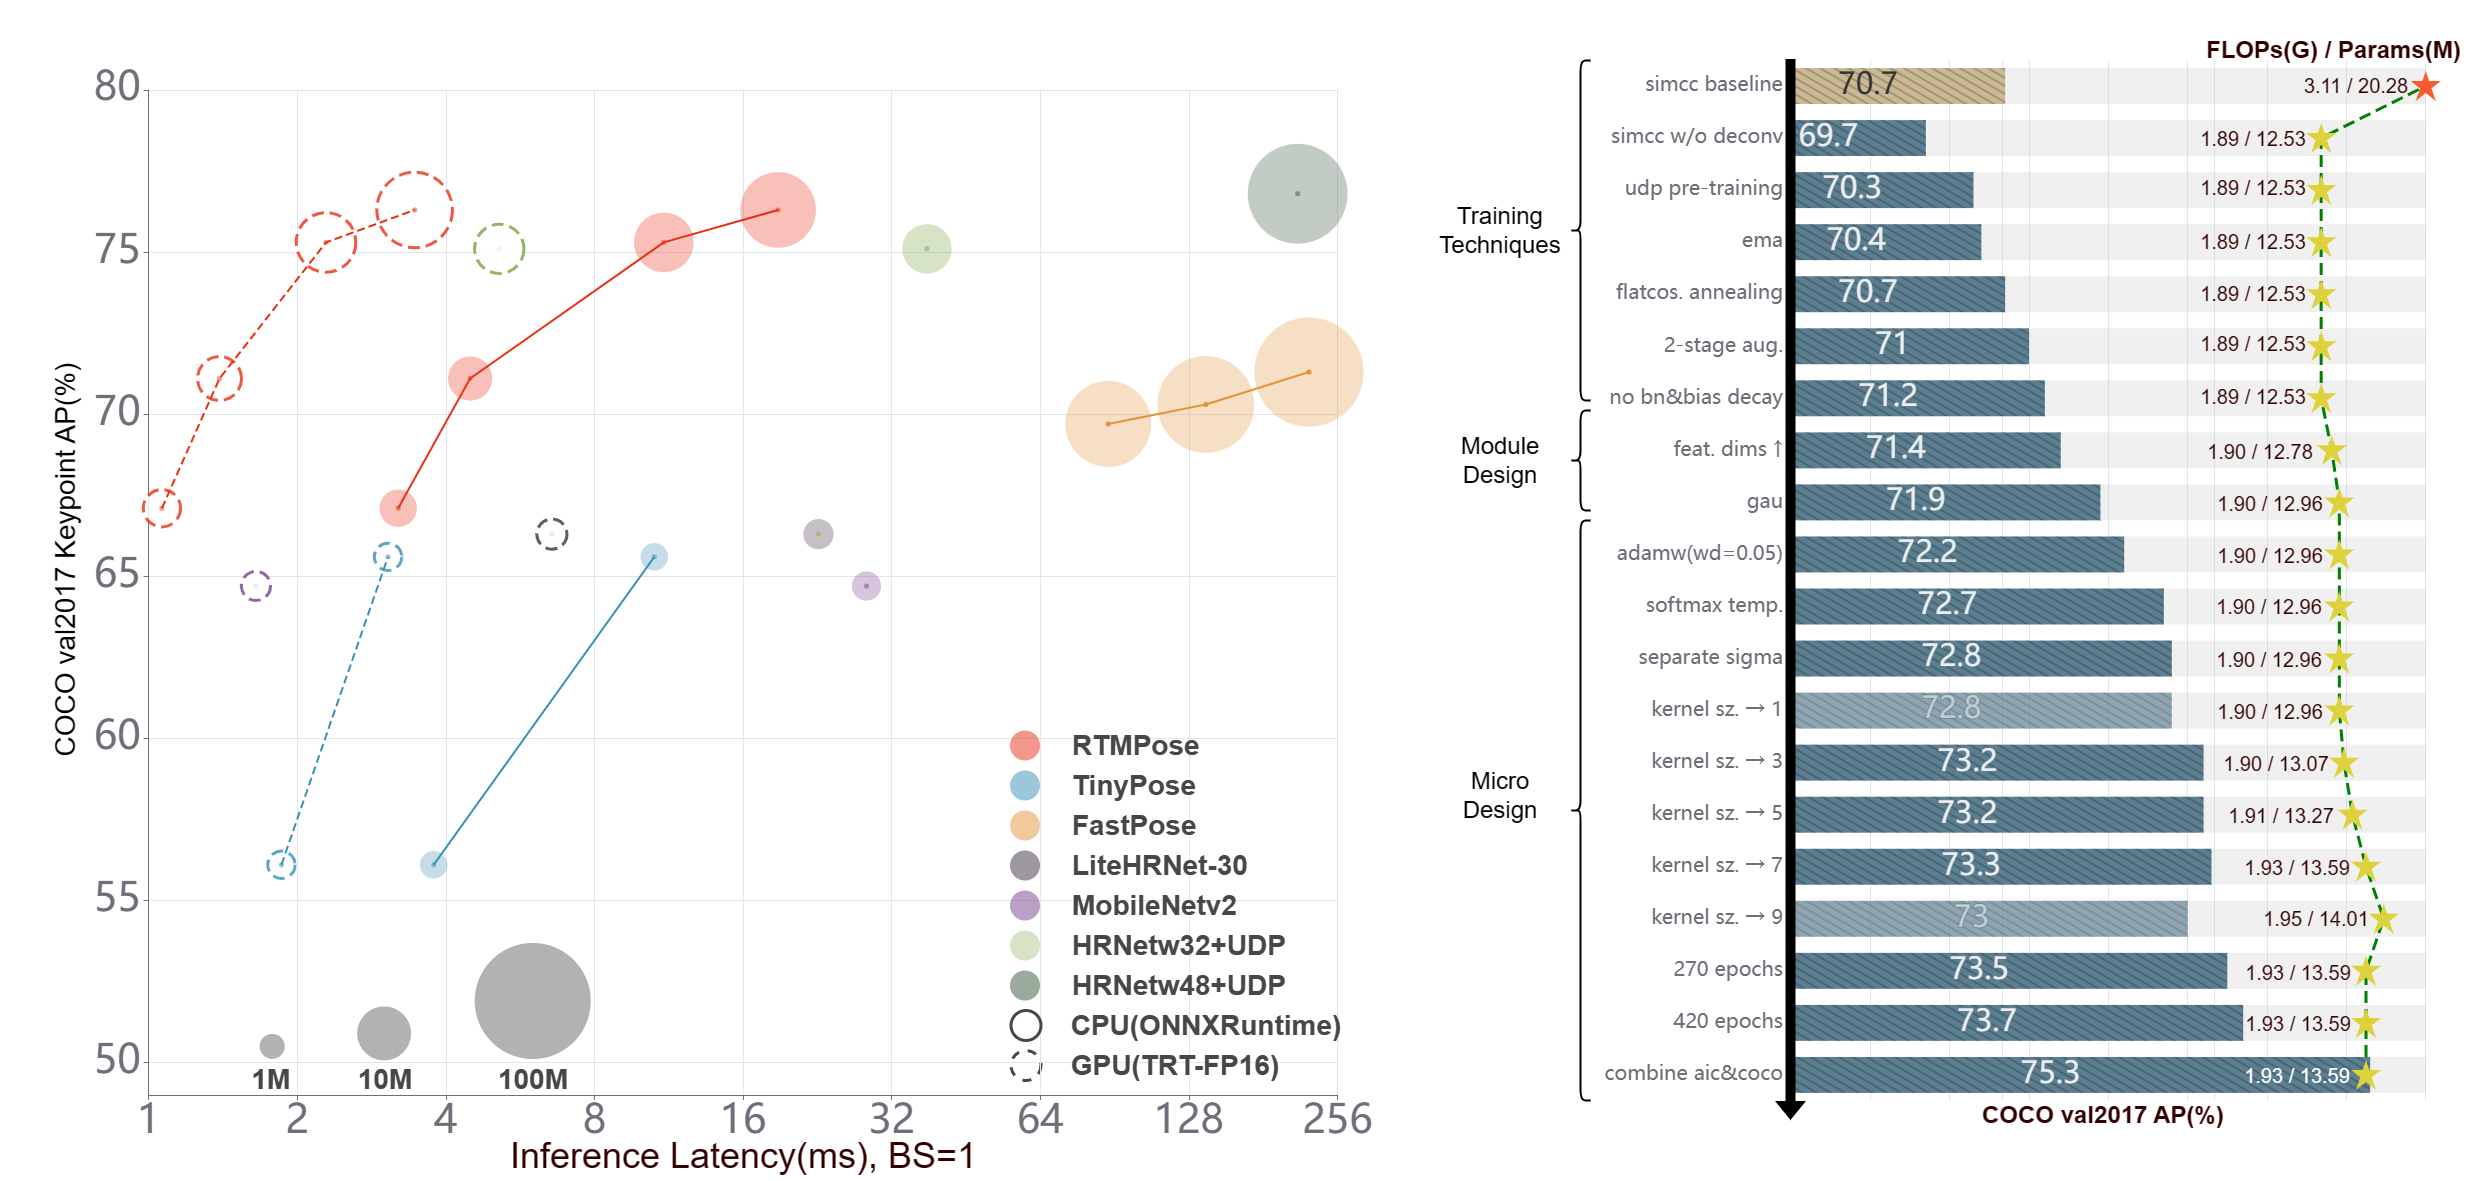
Recent studies on 2D pose estimation have achieved excellent performance on public benchmarks, yet its application in the industrial community still suffers from heavy model parameters and high latency. In order to bridge this gap, we empirically study five aspects that affect the performance of multi-person pose estimation algorithms: paradigm, backbone network, localization algorithm, training strategy, and deployment inference, and present a high-performance real-time multi-person pose estimation framework, RTMPose, based on MMPose. Our RTMPose-m achieves 75.8% AP on COCO with 90+ FPS on an Intel i7-11700 CPU and 430+ FPS on an NVIDIA GTX 1660 Ti GPU. To further evaluate RTMPose's capability in critical real-time applications, we also report the performance after deploying on the mobile device. Our RTMPose-s achieves 72.2% AP on COCO with 70+ FPS on a Snapdragon 865 chip, outperforming existing open-source libraries. With the help of MMDeploy, our project supports various platforms like CPU, GPU, NVIDIA Jetson, and mobile devices and multiple inference backends such as ONNXRuntime, TensorRT, ncnn, etc.
- 🥳 🚀 What's New
- 📖 Introduction
- 🙌 Community
- ⚡ Pipeline Performance
- 📊 Model Zoo
- 👀 Visualization
- 😎 Get Started
- 👨🏫 How to Train
- 🏗️ How to Deploy
- 📚 Common Usage
- 📜 Citation
🥳 🚀 What's New 🔝
- Dec. 2023:
- Update RTMW models. The RTMW-l model achieves 70.1 mAP on COCO-Wholebody val set.
- Sep. 2023:
- Add RTMW models trained on combined datasets. The alpha version of RTMW-x model achieves 70.2 mAP on COCO-Wholebody val set. You can try it Here. The technical report will be released soon.
- Add YOLOX and RTMDet models trained on HumanArt dataset.
- Aug. 2023:
- Support distilled 133-keypoint WholeBody models powered by DWPose.
- You can try DWPose/RTMPose with sd-webui-controlnet now! Just update your sd-webui-controlnet >= v1.1237, then choose
dw_openpose_fullas preprocessor. - You can try our DWPose with this Demo by choosing
wholebody!
- You can try DWPose/RTMPose with sd-webui-controlnet now! Just update your sd-webui-controlnet >= v1.1237, then choose
- Support distilled 133-keypoint WholeBody models powered by DWPose.
- Jul. 2023:
- Add Online RTMPose Demo.
- Support 17-keypoint Body models trained on Human-Art.
- Jun. 2023:
- Release 26-keypoint Body models trained on combined datasets.
- May. 2023:
- Exported SDK models (ONNX, TRT, ncnn, etc.) can be downloaded from OpenMMLab Deploee.
- Online Conversion of
.pthmodels into SDK models (ONNX, TensorRT, ncnn, etc.). - Add code examples of RTMPose, such as:
- Pure Python inference without MMDeploy, MMCV etc.
- C++ examples with ONNXRuntime and TensorRT backends.
- Android examples with ncnn backend.
- Release Hand, Face, Body models trained on combined datasets.
- Mar. 2023: RTMPose is released. RTMPose-m runs at 430+ FPS and achieves 75.8 mAP on COCO val set.
📖 Introduction 🔝


-
🚀 High efficiency and high accuracy
Model AP(COCO) CPU-FPS GPU-FPS t 68.5 300+ 940+ s 72.2 200+ 710+ m 75.8 90+ 430+ l 76.5 50+ 280+ l-384 78.3 - 160+ -
🛠️ Easy to deploy
- Step-by-step deployment tutorials.
- Support various backends including
- ONNX
- TensorRT
- ncnn
- OpenVINO
- etc.
- Support various platforms including
- Linux
- Windows
- NVIDIA Jetson
- ARM
- etc.
-
🏗️ Design for practical applications
- Pipeline inference API and SDK for
- Python
- C++
- C#
- JAVA
- etc.
- Pipeline inference API and SDK for
🙌 Community 🔝
RTMPose is a long-term project dedicated to the training, optimization and deployment of high-performance real-time pose estimation algorithms in practical scenarios, so we are looking forward to the power from the community. Welcome to share the training configurations and tricks based on RTMPose in different business applications to help more community users!
✨ ✨ ✨
- If you are a new user of RTMPose, we eagerly hope you can fill out this Google Questionnaire/Chinese version, it's very important for our work!
✨ ✨ ✨
Feel free to join our community group for more help:
- WeChat Group:

- Discord Group:
⚡ Pipeline Performance 🔝
Notes
- Pipeline latency is tested under skip-frame settings, the detection interval is 5 frames by defaults.
- Flip test is NOT used.
- Env Setup:
- torch >= 1.7.1
- onnxruntime 1.12.1
- TensorRT 8.4.3.1
- ncnn 20221128
- cuDNN 8.3.2
- CUDA 11.3
- Updates: We recommend you to try
Body8models trained on combined datasets, see here.
| Detection Config | Pose Config | Input Size (Det/Pose) |
Model AP (COCO) |
Pipeline AP (COCO) |
Params (M) (Det/Pose) |
Flops (G) (Det/Pose) |
ORT-Latency(ms) (i7-11700) |
TRT-FP16-Latency(ms) (GTX 1660Ti) |
Download |
|---|---|---|---|---|---|---|---|---|---|
| RTMDet-nano | RTMPose-t | 320x320 256x192 |
40.3 67.1 |
64.4 | 0.99 3.34 |
0.31 0.36 |
12.403 | 2.467 | det pose |
| RTMDet-nano | RTMPose-s | 320x320 256x192 |
40.3 71.1 |
68.5 | 0.99 5.47 |
0.31 0.68 |
16.658 | 2.730 | det pose |
| RTMDet-nano | RTMPose-m | 320x320 256x192 |
40.3 75.3 |
73.2 | 0.99 13.59 |
0.31 1.93 |
26.613 | 4.312 | det pose |
| RTMDet-nano | RTMPose-l | 320x320 256x192 |
40.3 76.3 |
74.2 | 0.99 27.66 |
0.31 4.16 |
36.311 | 4.644 | det pose |
| RTMDet-m | RTMPose-m | 640x640 256x192 |
62.5 75.3 |
75.7 | 24.66 13.59 |
38.95 1.93 |
- | 6.923 | det pose |
| RTMDet-m | RTMPose-l | 640x640 256x192 |
62.5 76.3 |
76.6 | 24.66 27.66 |
38.95 4.16 |
- | 7.204 | det pose |
📊 Model Zoo 🔝
Notes
- Since all models are trained on multi-domain combined datasets for practical applications, results are not suitable for academic comparison.
- More results of RTMPose on public benchmarks can refer to Model Zoo
- Flip test is used.
- Inference speed measured on more hardware platforms can refer to Benchmark
- If you have datasets you would like us to support, feel free to contact us/联系我们.

AIC+COCO
| Config | Input Size | AP (COCO) |
PCK@0.1 (Body8) |
AUC (Body8) |
Params (M) |
FLOPS (G) |
ORT-Latency (ms) (i7-11700) |
TRT-FP16-Latency (ms) (GTX 1660Ti) |
ncnn-FP16-Latency (ms) (Snapdragon 865) |
Download |
|---|---|---|---|---|---|---|---|---|---|---|
| RTMPose-t | 256x192 | 68.5 | 91.28 | 63.38 | 3.34 | 0.36 | 3.20 | 1.06 | 9.02 | pth |
| RTMPose-s | 256x192 | 72.2 | 92.95 | 66.19 | 5.47 | 0.68 | 4.48 | 1.39 | 13.89 | pth |
| RTMPose-m | 256x192 | 75.8 | 94.13 | 68.53 | 13.59 | 1.93 | 11.06 | 2.29 | 26.44 | pth |
| RTMPose-l | 256x192 | 76.5 | 94.35 | 68.98 | 27.66 | 4.16 | 18.85 | 3.46 | 45.37 | pth |
| RTMPose-m | 384x288 | 77.0 | 94.32 | 69.85 | 13.72 | 4.33 | 24.78 | 3.66 | - | pth |
| RTMPose-l | 384x288 | 77.3 | 94.54 | 70.14 | 27.79 | 9.35 | - | 6.05 | - | pth |
Body8
*denotes model trained on 7 public datasets:Body8denotes the addition of the OCHuman dataset, in addition to the 7 datasets mentioned above, for evaluation.
| Config | Input Size | AP (COCO) |
PCK@0.1 (Body8) |
AUC (Body8) |
Params (M) |
FLOPS (G) |
ORT-Latency (ms) (i7-11700) |
TRT-FP16-Latency (ms) (GTX 1660Ti) |
ncnn-FP16-Latency (ms) (Snapdragon 865) |
Download |
|---|---|---|---|---|---|---|---|---|---|---|
| RTMPose-t* | 256x192 | 65.9 | 91.44 | 63.18 | 3.34 | 0.36 | 3.20 | 1.06 | 9.02 | pth onnx |
| RTMPose-s* | 256x192 | 69.7 | 92.45 | 65.15 | 5.47 | 0.68 | 4.48 | 1.39 | 13.89 | pth onnx |
| RTMPose-m* | 256x192 | 74.9 | 94.25 | 68.59 | 13.59 | 1.93 | 11.06 | 2.29 | 26.44 | pth onnx |
| RTMPose-l* | 256x192 | 76.7 | 95.08 | 70.14 | 27.66 | 4.16 | 18.85 | 3.46 | 45.37 | pth onnx |
| RTMPose-m* | 384x288 | 76.6 | 94.64 | 70.38 | 13.72 | 4.33 | 24.78 | 3.66 | - | pth onnx |
| RTMPose-l* | 384x288 | 78.3 | 95.36 | 71.58 | 27.79 | 9.35 | - | 6.05 | - | pth onnx |
| RTMPose-x* | 384x288 | 78.8 | - | - | 49.43 | 17.22 | - | - | - | pth onnx |
Human-Art
- RTMPose for Human-Centric Artificial Scenes is supported by Human-Art
-

Detetors:
| Detection Config | Input Size | Model AP (OneHand10K) |
Flops (G) |
ORT-Latency (ms) (i7-11700) |
TRT-FP16-Latency (ms) (GTX 1660Ti) |
Download |
|---|---|---|---|---|---|---|
| RTMDet-tiny | 640x640 | 46.6 | - | - | - | Det Model |
| RTMDet-s | 640x640 | 50.6 | - | - | - | Det Model |
| YOLOX-nano | 640x640 | 38.9 | - | - | - | Det Model |
| YOLOX-tiny | 640x640 | 47.7 | - | - | - | Det Model |
| YOLOX-s | 640x640 | 54.6 | - | - | - | Det Model |
| YOLOX-m | 640x640 | 59.1 | - | - | - | Det Model |
| YOLOX-l | 640x640 | 60.2 | - | - | - | Det Model |
| YOLOX-x | 640x640 | 61.3 | - | - | - | Det Model |
Pose Estimators:
| Config | Input Size | AP (Human-Art GT) |
Params (M) |
FLOPS (G) |
ORT-Latency (ms) (i7-11700) |
TRT-FP16-Latency (ms) (GTX 1660Ti) |
ncnn-FP16-Latency (ms) (Snapdragon 865) |
Download |
|---|---|---|---|---|---|---|---|---|
| RTMPose-t* | 256x192 | 65.5 | 3.34 | 0.36 | 3.20 | 1.06 | 9.02 | pth onnx |
| RTMPose-s* | 256x192 | 69.8 | 5.47 | 0.68 | 4.48 | 1.39 | 13.89 | pth onnx |
| RTMPose-m* | 256x192 | 72.8 | 13.59 | 1.93 | 11.06 | 2.29 | 26.44 | pth onnx |
| RTMPose-l* | 256x192 | 75.3 | 27.66 | 4.16 | 18.85 | 3.46 | 45.37 | pth onnx |
- Keypoints are defined as Halpe26. For details please refer to the meta info.
-

- Models are trained and evaluated on
Body8.
| Config | Input Size | PCK@0.1 (Body8) |
AUC (Body8) |
Params(M) | FLOPS(G) | ORT-Latency (ms) (i7-11700) |
TRT-FP16-Latency (ms) (GTX 1660Ti) |
ncnn-FP16-Latency (ms) (Snapdragon 865) |
Download |
|---|---|---|---|---|---|---|---|---|---|
| RTMPose-t* | 256x192 | 91.89 | 66.35 | 3.51 | 0.37 | - | - | - | pth onnx |
| RTMPose-s* | 256x192 | 93.01 | 68.62 | 5.70 | 0.70 | - | - | - | pth onnx |
| RTMPose-m* | 256x192 | 94.75 | 71.91 | 13.93 | 1.95 | - | - | - | pth onnx |
| RTMPose-l* | 256x192 | 95.37 | 73.19 | 28.11 | 4.19 | - | - | - | pth onnx |
| RTMPose-m* | 384x288 | 95.15 | 73.56 | 14.06 | 4.37 | - | - | - | pth onnx |
| RTMPose-l* | 384x288 | 95.56 | 74.38 | 28.24 | 9.40 | - | - | - | pth onnx |
| RTMPose-x* | 384x288 | 95.74 | 74.82 | 50.00 | 17.29 | - | - | - | pth onnx |
Notes
- Model pruning is supported by MMRazor
| Config | Input Size | AP (COCO) |
Params (M) |
FLOPS (G) |
ORT-Latency (ms) (i7-11700) |
TRT-FP16-Latency (ms) (GTX 1660Ti) |
ncnn-FP16-Latency (ms) (Snapdragon 865) |
Download |
|---|---|---|---|---|---|---|---|---|
| RTMPose-s-aic-coco-pruned | 256x192 | 69.4 | 3.43 | 0.35 | - | - | - | pth |
For more details, please refer to GroupFisher Pruning for RTMPose.
- Keypoints are defined as COCO-WholeBody. For details please refer to the meta info.
-

COCO-WholeBody
| Config | Input Size | Whole AP | Whole AR | FLOPS (G) |
ORT-Latency (ms) (i7-11700) |
TRT-FP16-Latency (ms) (GTX 1660Ti) |
Download |
|---|---|---|---|---|---|---|---|
| RTMPose-m | 256x192 | 58.2 | 67.4 | 2.22 | 13.50 | 4.00 | pth |
| RTMPose-l | 256x192 | 61.1 | 70.0 | 4.52 | 23.41 | 5.67 | pth |
| RTMPose-l | 384x288 | 64.8 | 73.0 | 10.07 | 44.58 | 7.68 | pth |
| RTMPose-x | 384x288 | 65.3 | 73.3 | 18.1 | - | - | pth |
Cocktail14
Cocktail14denotes model trained on 14 public datasets:
| Config | Input Size | Whole AP | Whole AR | FLOPS (G) |
ORT-Latency (ms) (i7-11700) |
TRT-FP16-Latency (ms) (GTX 1660Ti) |
Download |
|---|---|---|---|---|---|---|---|
| RTMW-m | 256x192 | 58.2 | 67.3 | 4.3 | - | - | pth onnx |
| RTMW-l | 256x192 | 66.0 | 74.6 | 7.9 | - | - | pth onnx |
| RTMW-x | 256x192 | 67.2 | 75.2 | 13.1 | - | - | pth |
| RTMW-l | 384x288 | 70.1 | 78.0 | 17.7 | - | - | pth onnx |
| RTMW-x | 384x288 | 70.2 | 78.1 | 29.3 | - | - | pth |
COCO+UBody
- DWPose Models are supported by DWPose
- Models are trained and distilled on:
| Config | Input Size | Whole AP | Whole AR | FLOPS (G) |
ORT-Latency (ms) (i7-11700) |
TRT-FP16-Latency (ms) (GTX 1660Ti) |
Download |
|---|---|---|---|---|---|---|---|
| RTMPose-t | 256x192 | 48.5 | 58.4 | 0.5 | - | - | pth onnx |
| RTMPose-s | 256x192 | 53.8 | 63.2 | 0.9 | - | - | pth onnx |
| RTMPose-m | 256x192 | 60.6 | 69.5 | 2.22 | 13.50 | 4.00 | pth onnx |
| RTMPose-l | 256x192 | 63.1 | 71.7 | 4.52 | 23.41 | 5.67 | pth onnx |
| RTMPose-l | 384x288 | 66.5 | 74.3 | 10.07 | 44.58 | 7.68 | pth onnx |

| Config | Input Size | AP (AP10K) |
FLOPS (G) |
ORT-Latency (ms) (i7-11700) |
TRT-FP16-Latency (ms) (GTX 1660Ti) |
Download |
|---|---|---|---|---|---|---|
| RTMPose-m | 256x256 | 72.2 | 2.57 | 14.157 | 2.404 | pth onnx |

Face6
Face6and*denote model trained on 6 public datasets:
| Config | Input Size | NME (LaPa) |
FLOPS (G) |
ORT-Latency (ms) (i7-11700) |
TRT-FP16-Latency (ms) (GTX 1660Ti) |
Download |
|---|---|---|---|---|---|---|
| RTMPose-t* | 256x256 | 1.67 | 0.652 | - | - | pth onnx |
| RTMPose-s* | 256x256 | 1.59 | 1.119 | - | - | pth onnx |
| RTMPose-m* | 256x256 | 1.44 | 2.852 | - | - | pth onnx |
- Keypoints are defined as COCO-WholeBody. For details please refer to the meta info.
-

| Detection Config | Input Size | Model AP (OneHand10K) |
Flops (G) |
ORT-Latency (ms) (i7-11700) |
TRT-FP16-Latency (ms) (GTX 1660Ti) |
Download |
|---|---|---|---|---|---|---|
| RTMDet-nano (alpha version) |
320x320 | 76.0 | 0.31 | - | - | pth onnx |
Hand5
Hand5and*denote model trained on 5 public datasets:
| Config | Input Size | PCK@0.2 (COCO-Wholebody-Hand) |
PCK@0.2 (Hand5) |
AUC (Hand5) |
FLOPS (G) |
ORT-Latency (ms) (i7-11700) |
TRT-FP16-Latency (ms) (GTX 1660Ti) |
Download |
|---|---|---|---|---|---|---|---|---|
| RTMPose-m* (alpha version) |
256x256 | 81.5 | 96.4 | 83.9 | 2.581 | - | - | pth onnx |
We provide the UDP pretraining configs of the CSPNeXt backbone. Find more details in the pretrain_cspnext_udp folder.
AIC+COCO
| Model | Input Size | Params (M) |
Flops (G) |
AP (GT) |
AR (GT) |
Download |
|---|---|---|---|---|---|---|
| CSPNeXt-tiny | 256x192 | 6.03 | 1.43 | 65.5 | 68.9 | pth |
| CSPNeXt-s | 256x192 | 8.58 | 1.78 | 70.0 | 73.3 | pth |
| CSPNeXt-m | 256x192 | 17.53 | 3.05 | 74.8 | 77.7 | pth |
| CSPNeXt-l | 256x192 | 32.44 | 5.32 | 77.2 | 79.9 | pth |
Body8
*denotes model trained on 7 public datasets:Body8denotes the addition of the OCHuman dataset, in addition to the 7 datasets mentioned above, for evaluation.
| Model | Input Size | Params (M) |
Flops (G) |
AP (COCO) |
PCK@0.2 (Body8) |
AUC (Body8) |
Download |
|---|---|---|---|---|---|---|---|
| CSPNeXt-tiny* | 256x192 | 6.03 | 1.43 | 65.9 | 96.34 | 63.80 | pth |
| CSPNeXt-s* | 256x192 | 8.58 | 1.78 | 68.7 | 96.59 | 64.92 | pth |
| CSPNeXt-m* | 256x192 | 17.53 | 3.05 | 73.7 | 97.42 | 68.19 | pth |
| CSPNeXt-l* | 256x192 | 32.44 | 5.32 | 75.7 | 97.76 | 69.57 | pth |
| CSPNeXt-m* | 384x288 | 17.53 | 6.86 | 75.8 | 97.60 | 70.18 | pth |
| CSPNeXt-l* | 384x288 | 32.44 | 11.96 | 77.2 | 97.89 | 71.23 | pth |
| CSPNeXt-x* | 384x288 | 54.92 | 19.96 | 78.1 | 98.00 | 71.79 | pth |
We also provide the ImageNet classification pre-trained weights of the CSPNeXt backbone. Find more details in RTMDet.
| Model | Input Size | Params (M) |
Flops (G) |
Top-1 (%) | Top-5 (%) | Download |
|---|---|---|---|---|---|---|
| CSPNeXt-tiny | 224x224 | 2.73 | 0.34 | 69.44 | 89.45 | pth |
| CSPNeXt-s | 224x224 | 4.89 | 0.66 | 74.41 | 92.23 | pth |
| CSPNeXt-m | 224x224 | 13.05 | 1.93 | 79.27 | 94.79 | pth |
| CSPNeXt-l | 224x224 | 27.16 | 4.19 | 81.30 | 95.62 | pth |
| CSPNeXt-x | 224x224 | 48.85 | 7.76 | 82.10 | 95.69 | pth |
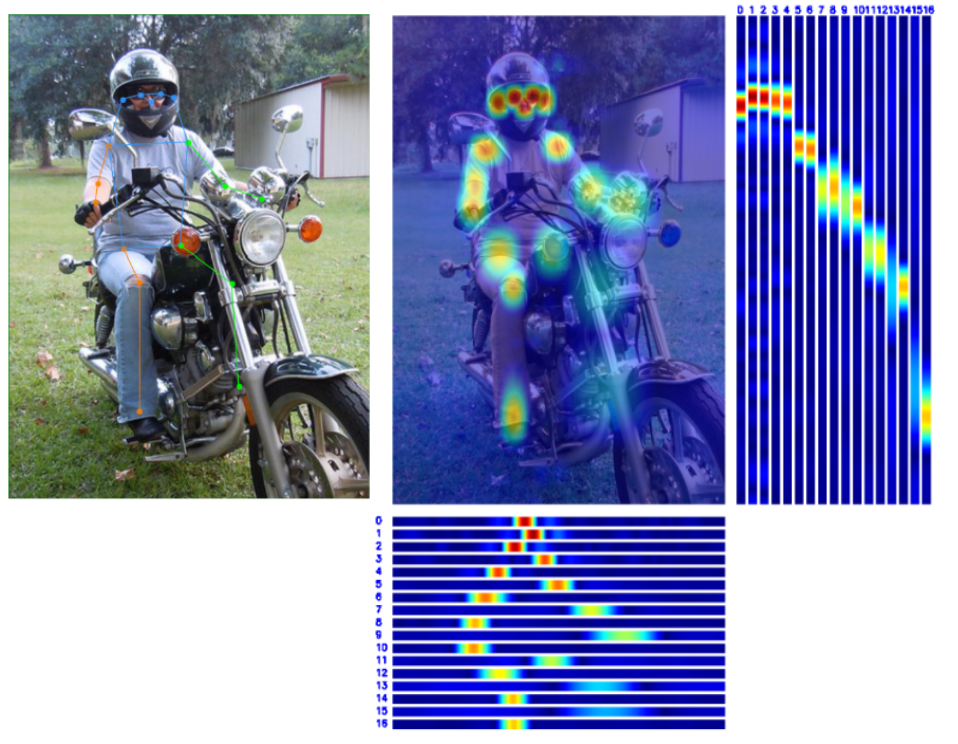
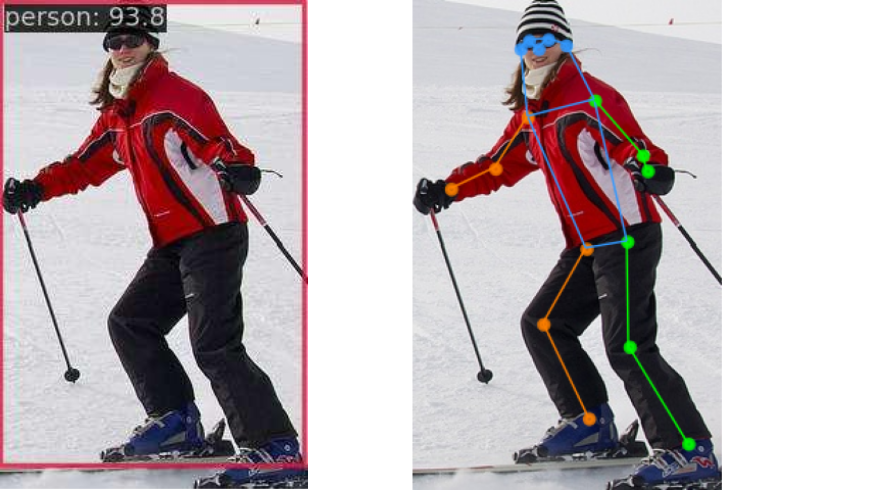
👀 Visualization 🔝
😎 Get Started 🔝
We provide following appoaches to try RTMPose:
- Online RTMPose Demo
- Examples based on Python and ONNXRuntime (without mmcv)
- rtmlib (without mmcv, pytorch)
- MMPose demo scripts (based on Pytorch)
- Pre-compiled MMDeploy SDK (Recommended, 6-10 times faster)
rtmlib provides simple and easy-to-use API for inference with RTMPose models.
- Support OpenCV/ONNXRuntime/OpenVINO inference and does not require Pytorch or MMCV.
- Super user-friendly API for inference and visualization.
- Support both CPU and GPU inference.
- Automatically download onnx models from OpenMMLab model zoo.
- Support all series of RTMPose models (RTMPose, DWPose, RTMO, RTMW etc.)
MMPose provides demo scripts to conduct inference with existing models.
Note:
- Inferencing with Pytorch can not reach the maximum speed of RTMPose, just for verification.
- Model file can be either a local path or a download link
# go to the mmpose folder
cd ${PATH_TO_MMPOSE}

# inference with rtmdet
python demo/topdown_demo_with_mmdet.py \
    projects/rtmpose/rtmdet/person/rtmdet_nano_320-8xb32_coco-person.py \
    https://download.openmmlab.com/mmpose/v1/projects/rtmpose/rtmdet_nano_8xb32-100e_coco-obj365-person-05d8511e.pth \
    projects/rtmpose/rtmpose/body_2d_keypoint/rtmpose-m_8xb256-420e_coco-256x192.py \
    https://download.openmmlab.com/mmpose/v1/projects/rtmposev1/rtmpose-m_simcc-aic-coco_pt-aic-coco_420e-256x192-63eb25f7_20230126.pth \
    --input {YOUR_TEST_IMG_or_VIDEO} \
    --show

# inference with webcam
python demo/topdown_demo_with_mmdet.py \
    projects/rtmpose/rtmdet/person/rtmdet_nano_320-8xb32_coco-person.py \
    https://download.openmmlab.com/mmpose/v1/projects/rtmpose/rtmdet_nano_8xb32-100e_coco-obj365-person-05d8511e.pth \
    projects/rtmpose/rtmpose/body_2d_keypoint/rtmpose-m_8xb256-420e_coco-256x192.py \
    https://download.openmmlab.com/mmpose/v1/projects/rtmposev1/rtmpose-m_simcc-aic-coco_pt-aic-coco_420e-256x192-63eb25f7_20230126.pth \
    --input webcam \
    --show
Result is as follows:

MMDeploy provides a precompiled SDK for Pipeline reasoning on RTMPose projects, where the model used for reasoning is the SDK version.
- All models must by exported by
tools/deploy.pybefore PoseTracker can be used for inference. - For the tutorial of exporting the SDK version model, see SDK Reasoning, and for detailed parameter settings of inference, see Pipeline Reasoning.
- Exported SDK models (ONNX, TRT, ncnn, etc.) can be downloaded from OpenMMLab Deploee.
- You can also convert
.pthmodels into SDK online.
Env Requirements:
- GCC >= 7.5
- cmake >= 3.20
- Install mmdeploy_runtime or mmdeploy_runtime_gpu
# for onnxruntime
pip install mmdeploy-runtime

# for onnxruntime-gpu / tensorrt
pip install mmdeploy-runtime-gpu- Download Pre-compiled files.
# onnxruntime
# for ubuntu
wget -c  https://github.com/open-mmlab/mmdeploy/releases/download/v1.0.0/mmdeploy-1.0.0-linux-x86_64-cxx11abi.tar.gz
# unzip then add third party runtime libraries to the PATH

# for centos7 and lower
wget -c https://github.com/open-mmlab/mmdeploy/releases/download/v1.0.0/mmdeploy-1.0.0-linux-x86_64.tar.gz
# unzip then add third party runtime libraries to the PATH

# onnxruntime-gpu / tensorrt
# for ubuntu
wget -c  https://github.com/open-mmlab/mmdeploy/releases/download/v1.0.0/mmdeploy-1.0.0-linux-x86_64-cxx11abi-cuda11.3.tar.gz
# unzip then add third party runtime libraries to the PATH

# for centos7 and lower
wget -c https://github.com/open-mmlab/mmdeploy/releases/download/v1.0.0/mmdeploy-1.0.0-linux-x86_64-cuda11.3.tar.gz
# unzip then add third party runtime libraries to the PATH- Download the sdk models and unzip to
./example/python. (If you need other models, please export sdk models refer to SDK Reasoning)
# rtmdet-nano + rtmpose-m for cpu sdk
wget https://download.openmmlab.com/mmpose/v1/projects/rtmpose/rtmpose-cpu.zip

unzip rtmpose-cpu.zip- Inference with
pose_tracker.py:
# go to ./example/python

# Please pass the folder of the model, not the model file
# Format:
# python pose_tracker.py cpu {det work-dir} {pose work-dir} {your_video.mp4}

# Example:
python pose_tracker.py cpu rtmpose-ort/rtmdet-nano/ rtmpose-ort/rtmpose-m/ your_video.mp4

# webcam
python pose_tracker.py cpu rtmpose-ort/rtmdet-nano/ rtmpose-ort/rtmpose-m/ 0# Download pre-compiled files
wget https://github.com/open-mmlab/mmdeploy/releases/download/v1.0.0/mmdeploy-1.0.0-linux-x86_64-cxx11abi.tar.gz
# Unzip files
tar -xzvf mmdeploy-1.0.0-linux-x86_64-cxx11abi.tar.gz
# Go to the sdk folder
cd mmdeploy-1.0.0-linux-x86_64-cxx11abi
# Init environment
source set_env.sh
# If opencv 3+ is not installed on your system, execute the following command.
# If it is installed, skip this command
bash install_opencv.sh
# Compile executable programs
bash build_sdk.sh
# Inference for an image
# Please pass the folder of the model, not the model file
./bin/det_pose rtmpose-ort/rtmdet-nano/ rtmpose-ort/rtmpose-m/ your_img.jpg --device cpu
# Inference for a video
# Please pass the folder of the model, not the model file
./bin/pose_tracker rtmpose-ort/rtmdet-nano/ rtmpose-ort/rtmpose-m/ your_video.mp4 --device cpu
# Inference using webcam
# Please pass the folder of the model, not the model file
./bin/pose_tracker rtmpose-ort/rtmdet-nano/ rtmpose-ort/rtmpose-m/ 0 --device cpu# Download pre-compiled files
wget https://github.com/open-mmlab/mmdeploy/releases/download/v1.0.0/mmdeploy-1.0.0-linux-x86_64-cxx11abi-cuda11.3.tar.gz
# Unzip files
tar -xzvf mmdeploy-1.0.0-linux-x86_64-cxx11abi-cuda11.3.tar.gz
# Go to the sdk folder
cd mmdeploy-1.0.0-linux-x86_64-cxx11abi-cuda11.3
# Init environment
source set_env.sh
# If opencv 3+ is not installed on your system, execute the following command.
# If it is installed, skip this command
bash install_opencv.sh
# Compile executable programs
bash build_sdk.sh
# Inference for an image
# Please pass the folder of the model, not the model file
./bin/det_pose rtmpose-ort/rtmdet-nano/ rtmpose-ort/rtmpose-m/ your_img.jpg --device cuda
# Inference for a video
# Please pass the folder of the model, not the model file
./bin/pose_tracker rtmpose-ort/rtmdet-nano/ rtmpose-ort/rtmpose-m/ your_video.mp4 --device cuda
# Inference using webcam
# Please pass the folder of the model, not the model file
./bin/pose_tracker rtmpose-ort/rtmdet-nano/ rtmpose-ort/rtmpose-m/ 0 --device cudaFor details, see Pipeline Inference.
- Install mmdeploy_runtime or mmdeploy_runtime_gpu
# for onnxruntime
pip install mmdeploy-runtime
# download [sdk](https://github.com/open-mmlab/mmdeploy/releases/download/v1.0.0/mmdeploy-1.0.0-windows-amd64.zip) add third party runtime libraries to the PATH

# for onnxruntime-gpu / tensorrt
pip install mmdeploy-runtime-gpu
# download [sdk](https://github.com/open-mmlab/mmdeploy/releases/download/v1.0.0/mmdeploy-1.0.0-windows-amd64-cuda11.3.zip) add third party runtime libraries to the PATH- Download the sdk models and unzip to
./example/python. (If you need other models, please export sdk models refer to SDK Reasoning)
# rtmdet-nano + rtmpose-m for cpu sdk
wget https://download.openmmlab.com/mmpose/v1/projects/rtmpose/rtmpose-cpu.zip

unzip rtmpose-cpu.zip- Inference with
pose_tracker.py:
# go to ./example/python
# Please pass the folder of the model, not the model file
python pose_tracker.py cpu rtmpose-ort/rtmdet-nano/ rtmpose-ort/rtmpose-m/ your_video.mp4

# Inference using webcam
# Please pass the folder of the model, not the model file
python pose_tracker.py cpu rtmpose-ort/rtmdet-nano/ rtmpose-ort/rtmpose-m/ 0- Install CMake.
- Download the pre-compiled SDK.
- Unzip the SDK and go to the
sdkfolder. - open windows powerShell with administrator privileges
set-ExecutionPolicy RemoteSigned- Install OpenCV:
# in sdk folder:
.\install_opencv.ps1- Set environment variables:
# in sdk folder:
. .\set_env.ps1- Compile the SDK:
# in sdk folder:
# (if you installed opencv by .\install_opencv.ps1)
.\build_sdk.ps1
# (if you installed opencv yourself)
.\build_sdk.ps1 "path/to/folder/of/OpenCVConfig.cmake"- the executable will be generated in:
example\cpp\build\ReleaseMMPose provides demo scripts to conduct inference with existing models.
Note:
- Inferencing with Pytorch can not reach the maximum speed of RTMPose, just for verification.
# go to the mmpose folder
cd ${PATH_TO_MMPOSE}

# inference with rtmdet
python demo/topdown_demo_with_mmdet.py \
    projects/rtmpose/rtmdet/person/rtmdet_nano_320-8xb32_coco-person.py \
    {PATH_TO_CHECKPOINT}/rtmdet_nano_8xb32-100e_coco-obj365-person-05d8511e.pth \
    projects/rtmpose/rtmpose/body_2d_keypoint/rtmpose-m_8xb256-420e_coco-256x192.py \
    {PATH_TO_CHECKPOINT}/rtmpose-m_simcc-aic-coco_pt-aic-coco_420e-256x192-63eb25f7_20230126.pth \
    --input {YOUR_TEST_IMG_or_VIDEO} \
    --show

# inference with webcam
python demo/topdown_demo_with_mmdet.py \
    projects/rtmpose/rtmdet/person/rtmdet_nano_320-8xb32_coco-person.py \
    {PATH_TO_CHECKPOINT}/rtmdet_nano_8xb32-100e_coco-obj365-person-05d8511e.pth \
    projects/rtmpose/rtmpose/body_2d_keypoint/rtmpose-m_8xb256-420e_coco-256x192.py \
    {PATH_TO_CHECKPOINT}/rtmpose-m_simcc-aic-coco_pt-aic-coco_420e-256x192-63eb25f7_20230126.pth \
    --input webcam \
    --show
Result is as follows:
👨🏫 How to Train 🔝
Please refer to Train and Test.
Tips:
- Please accordinally reduce
batch_sizeandbase_lrwhen your dataset is small. - Guidelines to choose a model
- m: Recommended and Preferred Use
- t/s: For mobile devices with extremely low computing power, or scenarios with stringent inference speed requirements
- l: Suitable for scenarios with strong computing power and not sensitive to speed
🏗️ How to Deploy 🔝
Here is a basic example of deploy RTMPose with MMDeploy.
- Exported SDK models (ONNX, TRT, ncnn, etc.) can be downloaded from OpenMMLab Deploee.
- You can also convert
.pthmodels into SDK online.
Before starting the deployment, please make sure you install MMPose and MMDeploy correctly.
- Install MMPose, please refer to the MMPose installation guide.
- Install MMDeploy, please refer to the MMDeploy installation guide.
Depending on the deployment backend, some backends require compilation of custom operators, so please refer to the corresponding document to ensure the environment is built correctly according to your needs:
After the installation, you can enjoy the model deployment journey starting from converting PyTorch model to backend model by running MMDeploy's tools/deploy.py.
The detailed model conversion tutorial please refer to the MMDeploy document. Here we only give the example of converting RTMPose.
Here we take converting RTMDet-nano and RTMPose-m to ONNX/TensorRT as an example.
- ONNX
detection_onnxruntime_static.pyfor RTMDet.pose-detection_simcc_onnxruntime_dynamic.pyfor RTMPose.
- TensorRT
detection_tensorrt_static-320x320.pyfor RTMDet.pose-detection_simcc_tensorrt_dynamic-256x192.pyfor RTMPose.
- More
Backend Config ncnn-fp16 pose-detection_simcc_ncnn-fp16_static-256x192.py CoreML pose-detection_simcc_coreml_static-256x192.py OpenVINO pose-detection_simcc_openvino_static-256x192.py RKNN pose-detection_simcc_rknn-fp16_static-256x192.py TorchScript pose-detection_torchscript.py
If you want to customize the settings in the deployment config for your requirements, please refer to MMDeploy config tutorial.
In this tutorial, we organize files as follows:
|----mmdeploy
|----mmdetection
|----mmpose# go to the mmdeploy folder
cd ${PATH_TO_MMDEPLOY}
# run the command to convert RTMDet
# Model file can be either a local path or a download link
python tools/deploy.py \
configs/mmdet/detection/detection_onnxruntime_static.py \
../mmpose/projects/rtmpose/rtmdet/person/rtmdet_nano_320-8xb32_coco-person.py \
https://download.openmmlab.com/mmpose/v1/projects/rtmpose/rtmdet_nano_8xb32-100e_coco-obj365-person-05d8511e.pth \
demo/resources/human-pose.jpg \
--work-dir rtmpose-ort/rtmdet-nano \
--device cpu \
--show \
--dump-info # dump sdk info
# run the command to convert RTMPose
# Model file can be either a local path or a download link
python tools/deploy.py \
configs/mmpose/pose-detection_simcc_onnxruntime_dynamic.py \
../mmpose/projects/rtmpose/rtmpose/body_2d_keypoint/rtmpose-m_8xb256-420e_coco-256x192.py \
https://download.openmmlab.com/mmpose/v1/projects/rtmposev1/rtmpose-m_simcc-aic-coco_pt-aic-coco_420e-256x192-63eb25f7_20230126.pth \
demo/resources/human-pose.jpg \
--work-dir rtmpose-ort/rtmpose-m \
--device cpu \
--show \
--dump-info # dump sdk infoThe converted model file is {work-dir}/end2end.onnx by defaults.
# go to the mmdeploy folder
cd ${PATH_TO_MMDEPLOY}

# run the command to convert RTMDet
# Model file can be either a local path or a download link
python tools/deploy.py \
    configs/mmdet/detection/detection_tensorrt_static-320x320.py \
    ../mmpose/projects/rtmpose/rtmdet/person/rtmdet_nano_320-8xb32_coco-person.py \
    https://download.openmmlab.com/mmpose/v1/projects/rtmpose/rtmdet_nano_8xb32-100e_coco-obj365-person-05d8511e.pth \
    demo/resources/human-pose.jpg \
    --work-dir rtmpose-trt/rtmdet-nano \
    --device cuda:0 \
    --show \
    --dump-info  # dump sdk info

# run the command to convert RTMPose
# Model file can be either a local path or a download link
python tools/deploy.py \
    configs/mmpose/pose-detection_simcc_tensorrt_dynamic-256x192.py \
    ../mmpose/projects/rtmpose/rtmpose/body_2d_keypoint/rtmpose-m_8xb256-420e_coco-256x192.py \
    https://download.openmmlab.com/mmpose/v1/projects/rtmposev1/rtmpose-m_simcc-aic-coco_pt-aic-coco_420e-256x192-63eb25f7_20230126.pth \
    demo/resources/human-pose.jpg \
    --work-dir rtmpose-trt/rtmpose-m \
    --device cuda:0 \
    --show \
    --dump-info  # dump sdk info
The converted model file is {work-dir}/end2end.engine by defaults.
🎊 If the script runs successfully, you will see the following files:
To convert the model with TRT-FP16, you can enable the fp16 mode in your deploy config:
# in MMDeploy config
backend_config = dict(
    type='tensorrt',
    common_config=dict(
        fp16_mode=True  # enable fp16
))We provide both Python and C++ inference API with MMDeploy SDK.
To use SDK, you need to dump the required info during converting the model. Just add --dump-info to the model conversion command.
# RTMDet
# Model file can be either a local path or a download link
python tools/deploy.py \
    configs/mmdet/detection/detection_onnxruntime_dynamic.py \
    ../mmpose/projects/rtmpose/rtmdet/person/rtmdet_nano_320-8xb32_coco-person.py \
    https://download.openmmlab.com/mmpose/v1/projects/rtmpose/rtmdet_nano_8xb32-100e_coco-obj365-person-05d8511e.pth \
    demo/resources/human-pose.jpg \
    --work-dir rtmpose-ort/rtmdet-nano \
    --device cpu \
    --show \
    --dump-info  # dump sdk info

# RTMPose
# Model file can be either a local path or a download link
python tools/deploy.py \
    configs/mmpose/pose-detection_simcc_onnxruntime_dynamic.py \
    ../mmpose/projects/rtmpose/rtmpose/body_2d_keypoint/rtmpose-m_8xb256-420e_coco-256x192.py \
    https://download.openmmlab.com/mmpose/v1/projects/rtmposev1/rtmpose-m_simcc-aic-coco_pt-aic-coco_420e-256x192-63eb25f7_20230126.pth \
    demo/resources/human-pose.jpg \
    --work-dir rtmpose-ort/rtmpose-m \
    --device cpu \
    --show \
    --dump-info  # dump sdk info
After running the command, it will dump 3 json files additionally for the SDK:
|----{work-dir}
     |----end2end.onnx    # ONNX model
     |----end2end.engine  # TensorRT engine file

     |----pipeline.json   #
     |----deploy.json     # json files for the SDK
|----detail.json #Here is a basic example of SDK Python API:
# Copyright (c) OpenMMLab. All rights reserved.
import argparse

import cv2
import numpy as np
from mmdeploy_runtime import PoseDetector


def parse_args():
    parser = argparse.ArgumentParser(
        description='show how to use sdk python api')
    parser.add_argument('device_name', help='name of device, cuda or cpu')
    parser.add_argument(
        'model_path',
        help='path of mmdeploy SDK model dumped by model converter')
    parser.add_argument('image_path', help='path of an image')
    parser.add_argument(
        '--bbox',
        default=None,
        nargs='+',
        type=int,
        help='bounding box of an object in format (x, y, w, h)')
    args = parser.parse_args()
    return args


def main():
    args = parse_args()

    img = cv2.imread(args.image_path)

    detector = PoseDetector(
        model_path=args.model_path, device_name=args.device_name, device_id=0)

    if args.bbox is None:
        result = detector(img)
    else:
        # converter (x, y, w, h) -> (left, top, right, bottom)
        print(args.bbox)
        bbox = np.array(args.bbox, dtype=int)
        bbox[2:] += bbox[:2]
        result = detector(img, bbox)
    print(result)

    _, point_num, _ = result.shape
    points = result[:, :, :2].reshape(point_num, 2)
    for [x, y] in points.astype(int):
        cv2.circle(img, (x, y), 1, (0, 255, 0), 2)

    cv2.imwrite('output_pose.png', img)


if __name__ == '__main__':
main()Here is a basic example of SDK C++ API:
#include "mmdeploy/pose_detector.hpp"
#include "opencv2/imgcodecs.hpp"
#include "opencv2/imgproc.hpp"
#include "utils/argparse.h" // See: https://github.com/open-mmlab/mmdeploy/blob/main/demo/csrc/cpp/utils/argparse.h

DEFINE_ARG_string(model_path, "Model path");
DEFINE_ARG_string(image_path, "Input image path");
DEFINE_string(device_name, "cpu", R"(Device name, e.g. "cpu", "cuda")");
DEFINE_int32(bbox_x, -1, R"(x position of the bounding box)");
DEFINE_int32(bbox_y, -1, R"(y position of the bounding box)");
DEFINE_int32(bbox_w, -1, R"(width of the bounding box)");
DEFINE_int32(bbox_h, -1, R"(height of the bounding box)");

int main(int argc, char* argv[]) {
  if (!utils::ParseArguments(argc, argv)) {
    return -1;
  }

  cv::Mat img = cv::imread(ARGS_image_path);

  mmdeploy::PoseDetector detector(mmdeploy::Model{ARGS_model_path}, mmdeploy::Device{FLAGS_device_name, 0});

  mmdeploy::PoseDetector::Result result{0, 0, nullptr};

  if (FLAGS_bbox_x == -1 || FLAGS_bbox_y == -1 || FLAGS_bbox_w == -1 || FLAGS_bbox_h == -1) {
    result = detector.Apply(img);
  } else {
    // convert (x, y, w, h) -> (left, top, right, bottom)
    mmdeploy::cxx::Rect rect;
    rect.left = FLAGS_bbox_x;
    rect.top = FLAGS_bbox_y;
    rect.right = FLAGS_bbox_x + FLAGS_bbox_w;
    rect.bottom = FLAGS_bbox_y + FLAGS_bbox_h;
    result = detector.Apply(img, {rect});
  }

  // Draw circles at detected keypoints
  for (size_t i = 0; i < result[0].length; ++i) {
    cv::Point keypoint(result[0].point[i].x, result[0].point[i].y);
    cv::circle(img, keypoint, 1, cv::Scalar(0, 255, 0), 2);  // Draw filled circle
  }

  // Save the output image
  cv::imwrite("output_pose.png", img);

  return 0;
}
To build C++ example, please add MMDeploy package in your CMake project as following:
find_package(MMDeploy REQUIRED)
target_link_libraries(${name} PRIVATE mmdeploy ${OpenCV_LIBS})If the user has MMDeploy compiled correctly, you will see the det_pose executable under the mmdeploy/build/bin/.
# go to the mmdeploy folder
cd ${PATH_TO_MMDEPLOY}/build/bin/

# inference for an image
./det_pose rtmpose-ort/rtmdet-nano/ rtmpose-ort/rtmpose-m/ your_img.jpg --device cpu

required arguments:
  det_model           Object detection model path [string]
  pose_model          Pose estimation model path [string]
  image               Input image path [string]

optional arguments:
  --device            Device name, e.g. "cpu", "cuda" [string = "cpu"]
  --output            Output image path [string = "det_pose_output.jpg"]
  --skeleton          Path to skeleton data or name of predefined skeletons:
                      "coco" [string = "coco", "coco-wholoebody"]
  --det_label         Detection label use for pose estimation [int32 = 0]
                      (0 refers to 'person' in coco)
  --det_thr           Detection score threshold [double = 0.5]
  --det_min_bbox_size Detection minimum bbox size [double = -1]
--pose_thr Pose key-point threshold [double = 0]If the user has MMDeploy compiled correctly, you will see the pose_tracker executable under the mmdeploy/build/bin/.
- pass
0toinputcan inference from a webcam
# go to the mmdeploy folder
cd ${PATH_TO_MMDEPLOY}/build/bin/

# inference for a video
./pose_tracker rtmpose-ort/rtmdet-nano/ rtmpose-ort/rtmpose-m/ your_video.mp4 --device cpu

required arguments:
  det_model             Object detection model path [string]
  pose_model            Pose estimation model path [string]
  input                 Input video path or camera index [string]

optional arguments:
  --device              Device name, e.g. "cpu", "cuda" [string = "cpu"]
  --output              Output video path or format string [string = ""]
  --output_size         Long-edge of output frames [int32 = 0]
  --flip                Set to 1 for flipping the input horizontally [int32 = 0]
  --show                Delay passed to `cv::waitKey` when using `cv::imshow`;
                        -1: disable [int32 = 1]
  --skeleton            Path to skeleton data or name of predefined skeletons:
                        "coco", "coco-wholebody" [string = "coco"]
  --background          Output background, "default": original image, "black":
                        black background [string = "default"]
  --det_interval        Detection interval [int32 = 1]
  --det_label           Detection label use for pose estimation [int32 = 0]
                        (0 refers to 'person' in coco)
  --det_thr             Detection score threshold [double = 0.5]
  --det_min_bbox_size   Detection minimum bbox size [double = -1]
  --det_nms_thr         NMS IOU threshold for merging detected bboxes and
                        bboxes from tracked targets [double = 0.7]
  --pose_max_num_bboxes Max number of bboxes used for pose estimation per frame
                        [int32 = -1]
  --pose_kpt_thr        Threshold for visible key-points [double = 0.5]
  --pose_min_keypoints  Min number of key-points for valid poses, -1 indicates
                        ceil(n_kpts/2) [int32 = -1]
  --pose_bbox_scale     Scale for expanding key-points to bbox [double = 1.25]
  --pose_min_bbox_size  Min pose bbox size, tracks with bbox size smaller than
                        the threshold will be dropped [double = -1]
  --pose_nms_thr        NMS OKS/IOU threshold for suppressing overlapped poses,
                        useful when multiple pose estimations collapse to the
                        same target [double = 0.5]
  --track_iou_thr       IOU threshold for associating missing tracks
                        [double = 0.4]
  --track_max_missing   Max number of missing frames before a missing tracks is
removed [int32 = 10]📚 Common Usage 🔝
🚀 Inference Speed Test 🔝
If you need to test the inference speed of the model under the deployment framework, MMDeploy provides a convenient tools/profiler.py script.
The user needs to prepare a folder for the test images ./test_images, the profiler will randomly read images from this directory for the model speed test.
python tools/profiler.py \
    configs/mmpose/pose-detection_simcc_onnxruntime_dynamic.py \
    {RTMPOSE_PROJECT}/rtmpose/body_2d_keypoint/rtmpose-m_8xb256-420e_coco-256x192.py \
    ../test_images \
    --model {WORK_DIR}/end2end.onnx \
    --shape 256x192 \
    --device cpu \
    --warmup 50 \
    --num-iter 200
The result is as follows:
01/30 15:06:35 - mmengine - INFO - [onnxruntime]-70 times per count: 8.73 ms, 114.50 FPS
01/30 15:06:36 - mmengine - INFO - [onnxruntime]-90 times per count: 9.05 ms, 110.48 FPS
01/30 15:06:37 - mmengine - INFO - [onnxruntime]-110 times per count: 9.87 ms, 101.32 FPS
01/30 15:06:37 - mmengine - INFO - [onnxruntime]-130 times per count: 9.99 ms, 100.10 FPS
01/30 15:06:38 - mmengine - INFO - [onnxruntime]-150 times per count: 10.39 ms, 96.29 FPS
01/30 15:06:39 - mmengine - INFO - [onnxruntime]-170 times per count: 10.77 ms, 92.86 FPS
01/30 15:06:40 - mmengine - INFO - [onnxruntime]-190 times per count: 10.98 ms, 91.05 FPS
01/30 15:06:40 - mmengine - INFO - [onnxruntime]-210 times per count: 11.19 ms, 89.33 FPS
01/30 15:06:41 - mmengine - INFO - [onnxruntime]-230 times per count: 11.16 ms, 89.58 FPS
01/30 15:06:42 - mmengine - INFO - [onnxruntime]-250 times per count: 11.06 ms, 90.41 FPS
----- Settings:
+------------+---------+
| batch size |    1    |
|   shape    | 256x192 |
| iterations |   200   |
|   warmup   |    50   |
+------------+---------+
----- Results:
+--------+------------+---------+
| Stats  | Latency/ms |   FPS   |
+--------+------------+---------+
|  Mean  |   11.060   |  90.412 |
| Median |   11.852   |  84.375 |
|  Min   |   7.812    | 128.007 |
|  Max   |   13.690   |  73.044 |
+--------+------------+---------+
If you want to learn more details of profiler, you can refer to the Profiler Docs.
📊 Model Test 🔝
If you need to test the inference accuracy of the model on the deployment backend, MMDeploy provides a convenient tools/test.py script.
python tools/test.py \
    configs/mmpose/pose-detection_simcc_onnxruntime_dynamic.py \
    {RTMPOSE_PROJECT}/rtmpose/body_2d_keypoint/rtmpose-m_8xb256-420e_coco-256x192.py \
    --model {PATH_TO_MODEL}/rtmpose_m.pth \
    --device cpu
You can also refer to MMDeploy Docs for more details.
📜 Citation 🔝
If you find RTMPose useful in your research, please consider cite:
@misc{https://doi.org/10.48550/arxiv.2303.07399,
  doi = {10.48550/ARXIV.2303.07399},
  url = {https://arxiv.org/abs/2303.07399},
  author = {Jiang, Tao and Lu, Peng and Zhang, Li and Ma, Ningsheng and Han, Rui and Lyu, Chengqi and Li, Yining and Chen, Kai},
  keywords = {Computer Vision and Pattern Recognition (cs.CV), FOS: Computer and information sciences, FOS: Computer and information sciences},
  title = {RTMPose: Real-Time Multi-Person Pose Estimation based on MMPose},
  publisher = {arXiv},
  year = {2023},
  copyright = {Creative Commons Attribution 4.0 International}
}

@misc{mmpose2020,
    title={OpenMMLab Pose Estimation Toolbox and Benchmark},
    author={MMPose Contributors},
    howpublished = {\url{https://github.com/open-mmlab/mmpose}},
    year={2020}
}