Project Setup
The page gives instructions on how to setup the 2 different environments. One for development and one for production.
In order for this project to work there must be a MySQL database built with values and running.
- Run the
mirror.sqlfile in MySQL workbench and it will build the entire database. - Rebuild the database
- Drop the schema in MySQL workbench
- Rerun the
mirror.sqlfile
- Run the
testvalues.sqlfile to quickly populate the database
The .env needs to be put in /drury_mirror_portal directory. The file needs to contain these elements below with the correct values.
Replace the values of these in .env file
- SENDGRID_API_KEY
- JWT_SECRET
- MYSQL_HOST
- MYSQL_USER
- MYSQL_PASS
- MYSQL_DB
- MYSQL_PORT
NEXTAUTH_URL=http://localhost:3000/
NEXT_PUBLIC_API_PATH= keep empty
SENDGRID_API_KEY= sendgrid api key
JWT_SECRET= the secret key
MYSQL_HOST= your mysql IP
MYSQL_USER= your mysql workbench username
MYSQL_PASS=your mysql workbench password
MYSQL_DB= your mysql database name
MYSQL_PORT= your mysql port
MY_ENVIRONMENT=development Run these commands to start the development build.
-
npm install --force(Make sure you are in the drury_mirror_portal folder) npm run dev
Run this command to start the production build.
-
npm install --force(Make sure you are in the drury_mirror_portal folder) npm run build
This is the configuration for Ngnix
location /mirror/ {
    proxy_pass http://localhost:3230/;
    proxy_set_header Upgrade $http_upgrade;
    proxy_set_header Connection 'upgrade';
    proxy_set_header Host $host;
    proxy_set_header X-Real-IP $remote_addr;
    proxy_set_header X-Forwarded-For $proxy_add_x_forwarded_for;
    proxy_set_header X-Forwarded-Proto $scheme;
}pm2 start npm --name my-project -- run start-
pm2 statuswill show the current projects, make note of the ID's -
pm2 stop <ID>will stop that particular project
- Navigate to the SQL folder in the project or where the mySQL scripts are.
- Login into MySQL server
- `mysql -u du_mirror -p
- Enter the password
CREATE DATABASE du_mirror;USE du_mirror;-
SOURCE mirror.sql;Builds the database and all the tables needed -
SOURCE testvalues.sqlorSOURCE presentation.sqlorSOURCE <your own script>
Replace the values of these in .env file
- SENDGRID_API_KEY
- JWT_SECRET
- MYSQL_HOST
- MYSQL_USER
- MYSQL_PASS
- MYSQL_DB
- MYSQL_PORT
NEXTAUTH_URL=http://mcs.drury.edu/mirror
NEXT_PUBLIC_API_PATH=mirror
SENDGRID_API_KEY= sendgrid api key
JWT_SECRET= the secret key
MYSQL_HOST= server mysql IP
MYSQL_USER= server mysql username
MYSQL_PASS= server mysql password
MYSQL_DB= server mysql name
MYSQL_PORT= server mysql port
MY_ENVIRONMENT=production To start you must be in the Mobile-App-Prod branch.
- Make sure Xcode is installed and completely updated.
- Run
ipconfig getifaddr en0to get your IP address. - Copy and paste the IP address and paste it into the
capacitor.config.json-url: "https://<Your IP>:3000" - Start the next node server (Development Steps Above).
- Run the command
npx cap -h. This command brings up the help menu and it useful to follow. - Run the command
npx cap copy. - Run the command
npx cap sync. - Run the command
npx cap run ios(Home Brew & Cocoapods need to be installed) - Xcode and the simulator will launch, just wait for the files to be indexed.
- Make sure a device is selected, then select the play button.
Launch on physical iPhone
- Make sure phone is in developer mode
- Plug phone into computer
- Select the correct device
- Select Run
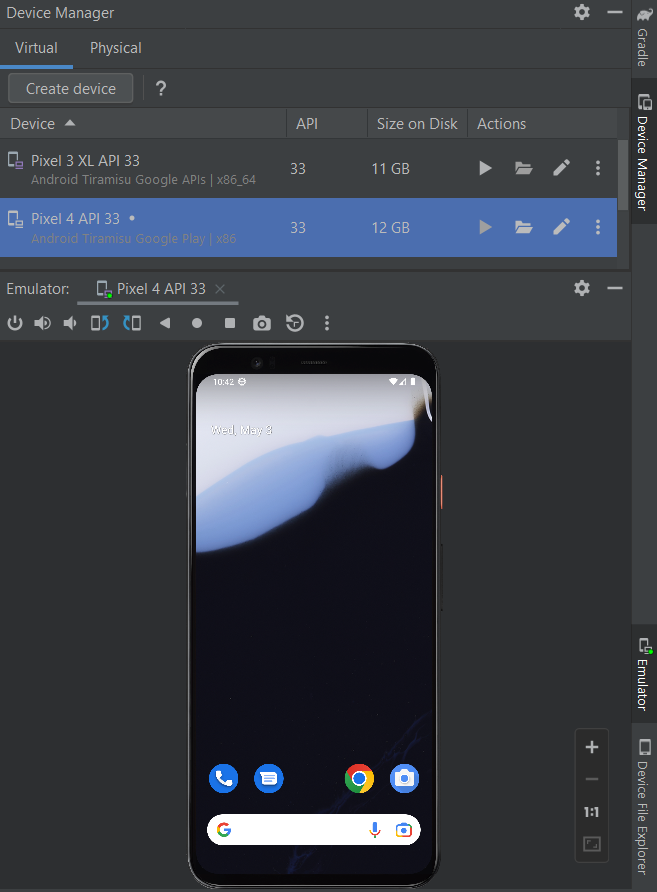
The first step in the android project setup is making sure you install a compatible emulator from the android studio device manager. If you already have a API level 33 android emulator, you may skip this step.
- Install Android Studio
- Open Android Studio
- Open Device Manager
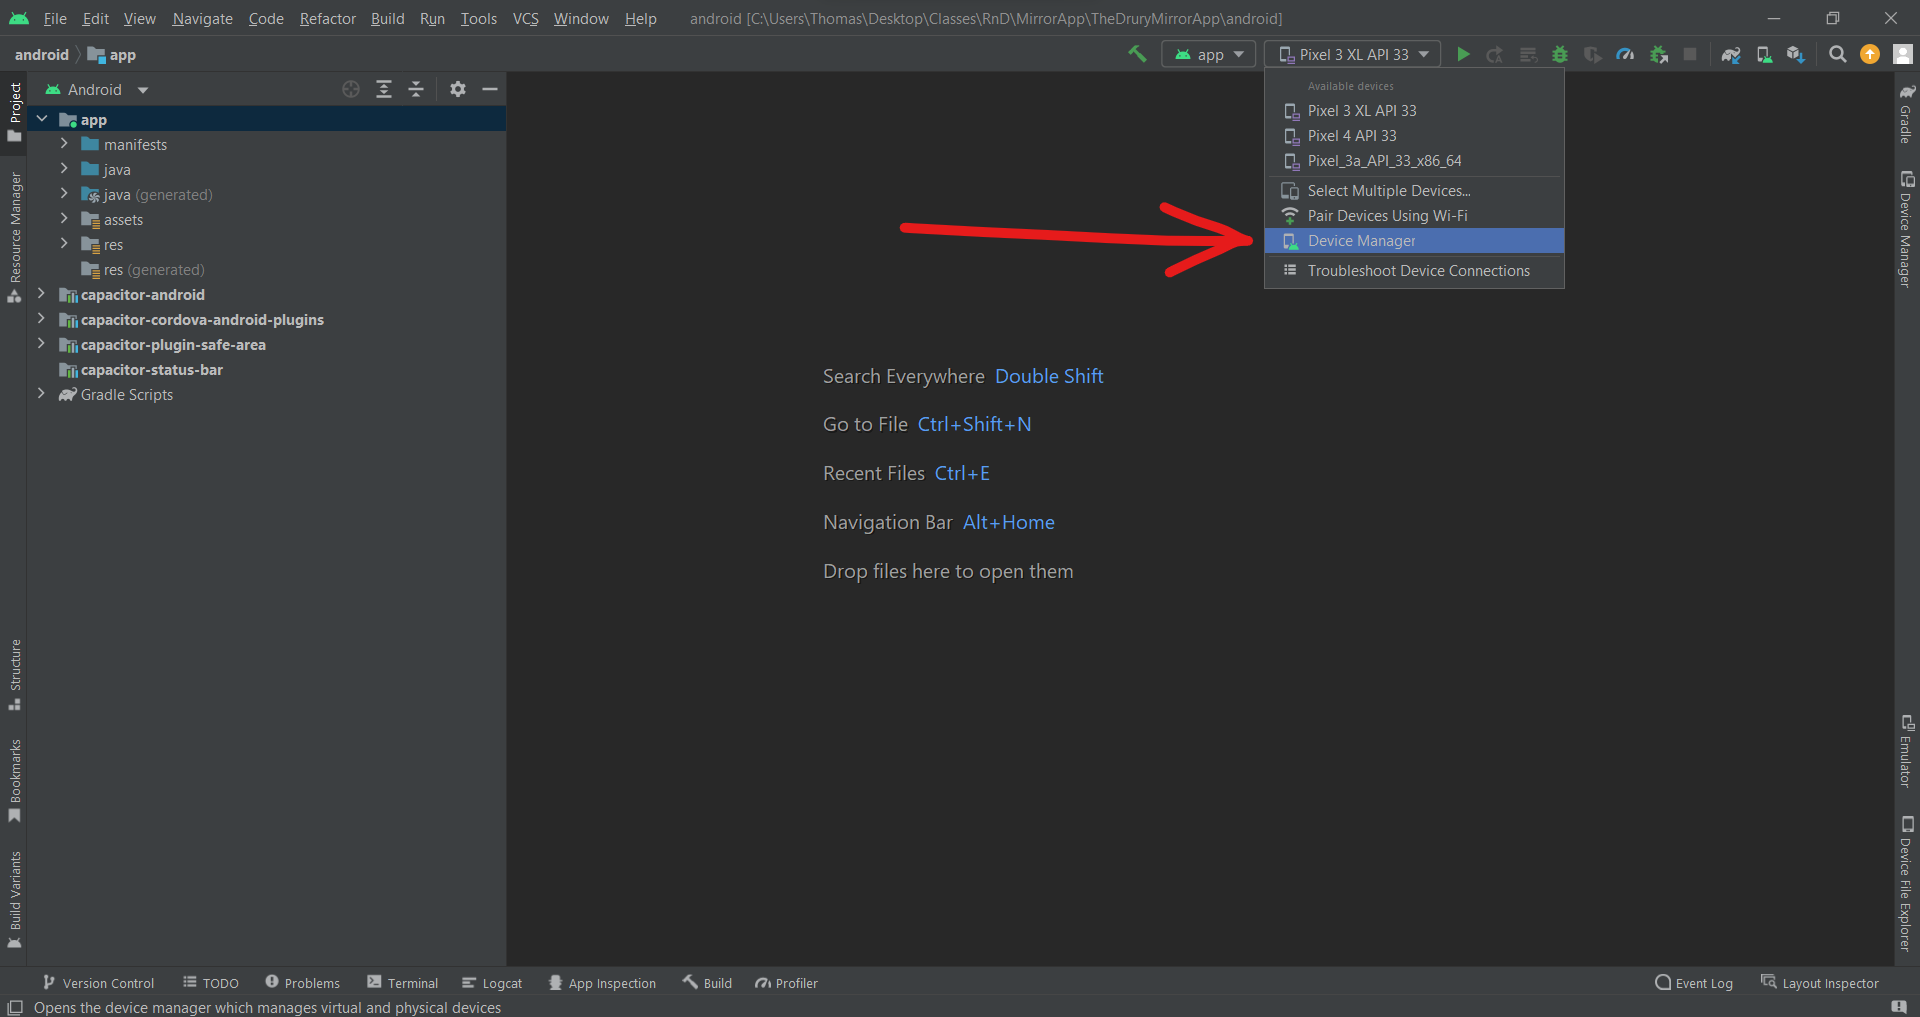
- Click "Create Device"
- For this example we're using
Pixel 4, but you should usePixel 4 API 33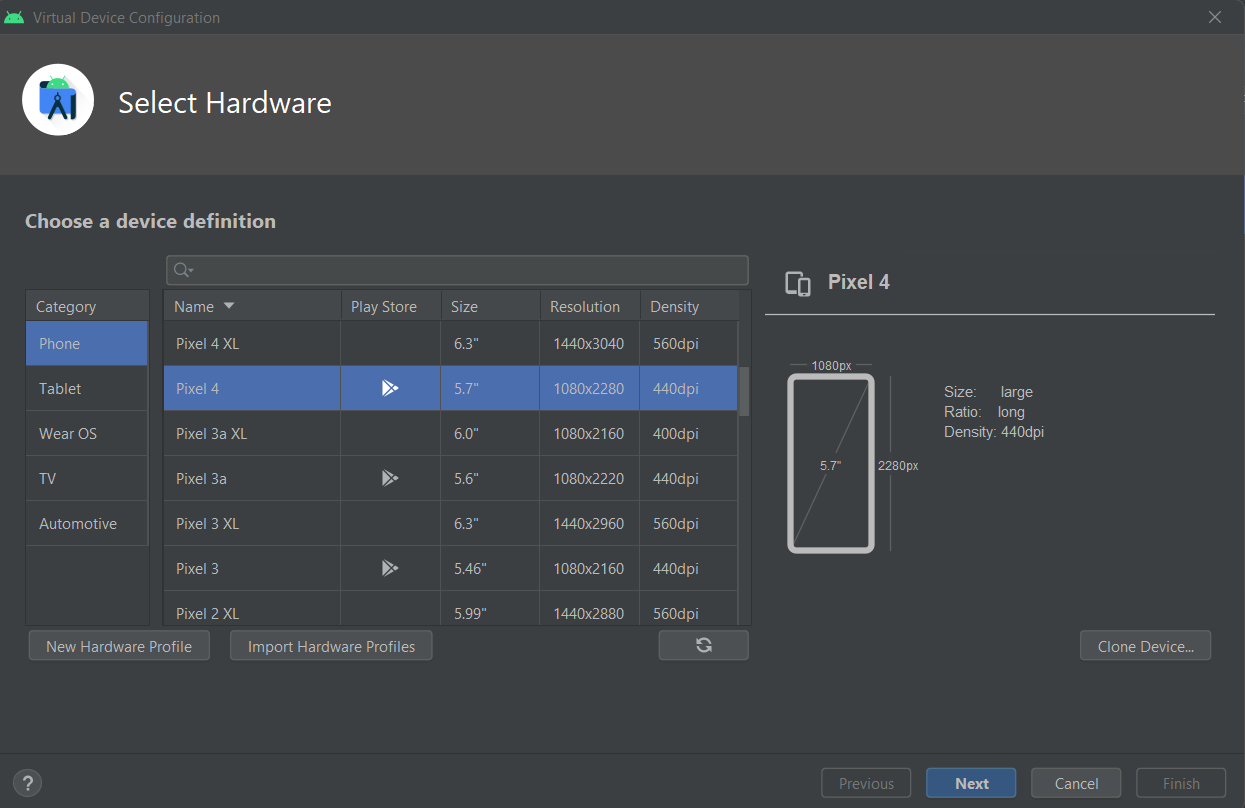
- Click "Next"
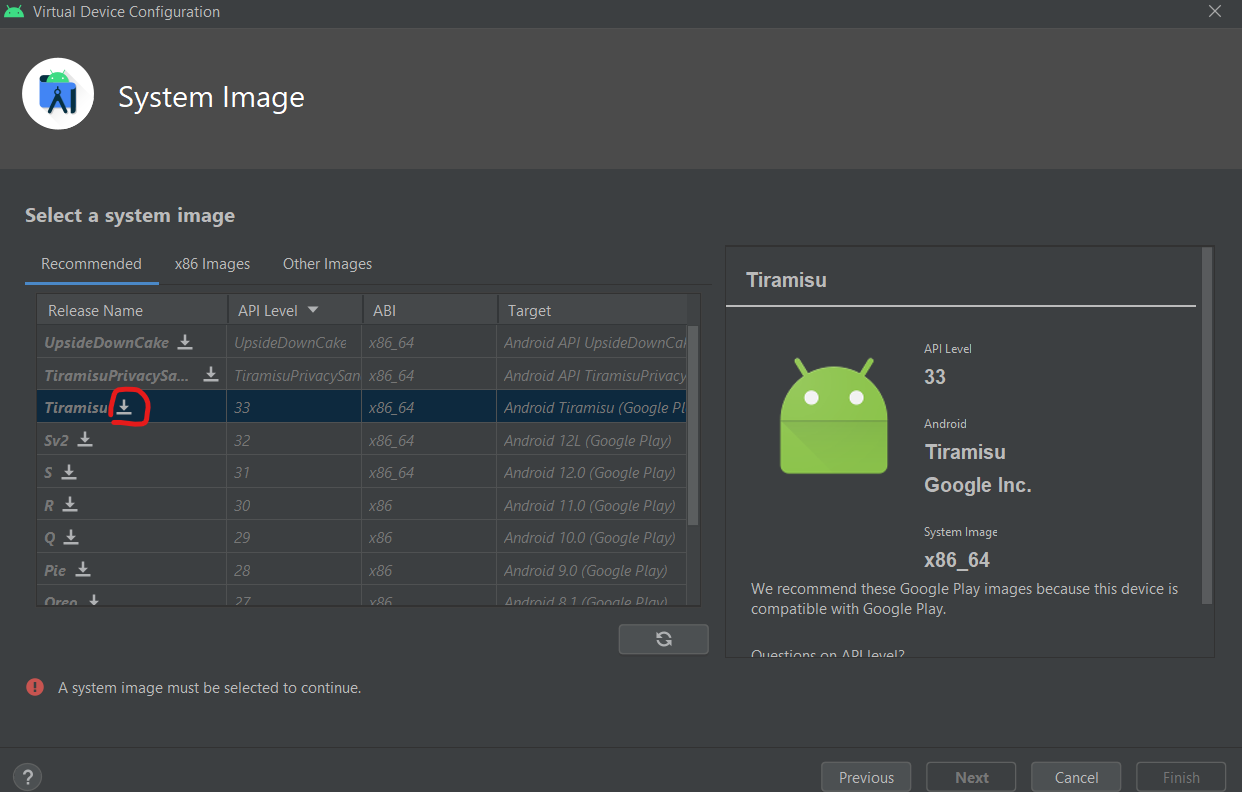
- You should see a list of APIs to install. Click Tiramisu's download button, Tiramisu has an API level of 33 which is what we used for this project.
- Click "Done" once the API is finished installing
- Click "Next"
- Leave the default settings
- Click Finish
Second, set up the project on VSCode or a similar editor.
- Install VSCode
- Create a folder where you can access this project
- Open VScode, open the folder you just created for the project
- Click
TerminalthenNew Terminal - Do
gh repo clone Developer-DUCS/TheDruryMirrorApp - Switch to the Mobile-App-Prod branch
You should now have all the project requirements for the project. Third, set up the capacitor requirements
- In VSCode, run the following commands in your terminal:
- Run
npm install --forceto install all the node modules - Run
npm run devto start the node server - Run
npx cap syncto sync files with the capacitor module - Run
npx cap add androidto add the capacitor android app - Run
npx cap open androidto open Android Studio
- Run
- On Android studio, do a
cold booton your Pixel 4 API 33 by going todevice manager, click the three dots next to your install emulator, then clickcold boot now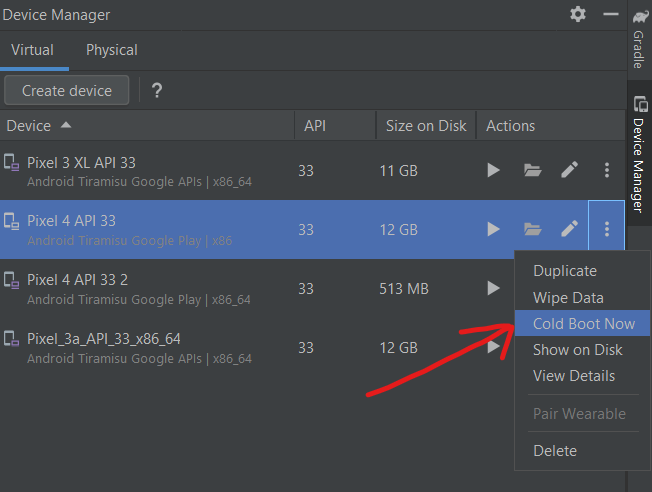
- The emulator might take a while to load for the first time. Wait for it to load, you can tell when it's done once you see the home screen and wallpaper.
- Go back to your VSCode editor, inside your terminal, run
npm run devto start the node server. The node server is required to run the app. - Open a new terminal in VSCode, run
npx cap run androidto open the application on your android emulator. Select the emulator you installed, in this case it should bePixel_4_API_33. This setup may take a while, a white screen will appear for a few seconds. - You should be presented with the mobile app if everything is done correctly.
- If your android screen is white or has a web error, try changing the
capacitor.config.jsonfile. - In
capacitor.config.json, change your "server" "url" to your Ipv4 default gateway - You can find your ipv4 by typing
cmdin your windows search thenipconfig