参考博客:http://www.blogjava.net/xylz/archive/2010/07/08/325587.html
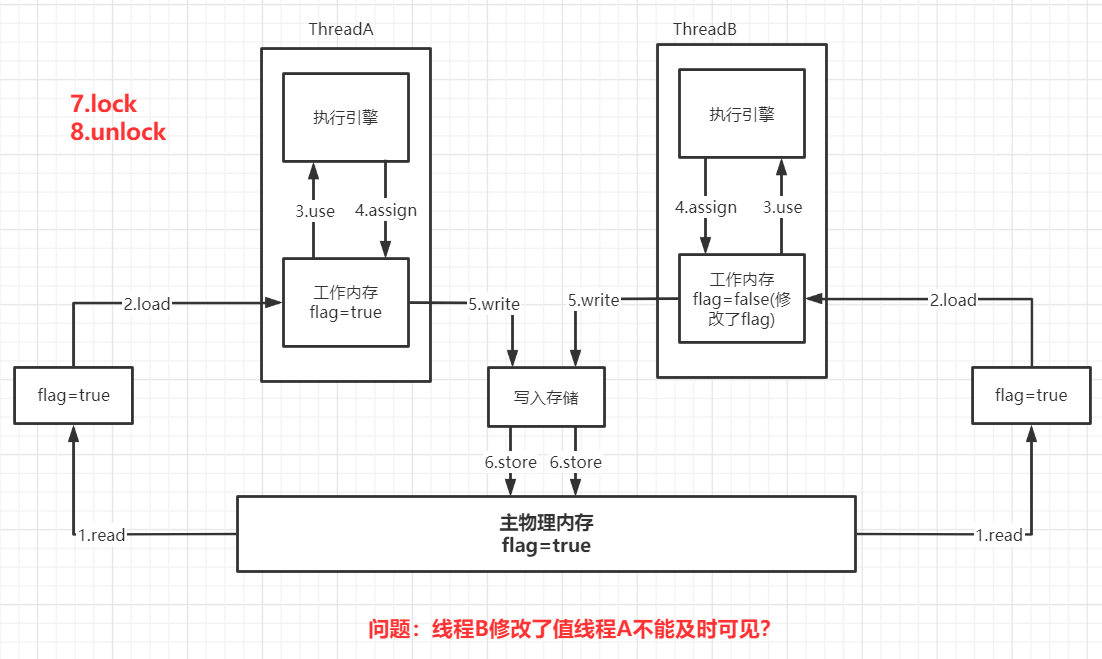
JMM:Java线程共享内存模型,不存在的东西,概念!约定!
JMM要求:
- 保证可见性(volatile支持)
- 保证原子性
- 保证有序性(volatile支持)
关于JMM的一些同步的约定:
-
线程解锁前,必须把共享变量立刻刷新回主物理内存。
-
线程加锁前,必须读取主物理内存中的最新的值到工作内存中。
-
加锁和解锁是同一把锁。
问:volatile是什么?谈谈对volatile的理解?
答:volatile是Java虚拟机提供的轻量级的同步机制:
- 保证线程可见性
- 不保证原子性
- 禁止指令重排
(1)测试代码:com.ymy.boot.VolatileVisibility
/**
 * 测试 volatile 的可见性
 *
 * @author Ringo
 * @since 2021/4/13 14:59
 */
public class VolatileDemo {
    public static void main(String[] args) {
        // 1: 资源类
        Resource resource = new Resource();

        // 2: 创建 A 线程操作资源
        new Thread(() -> {
            System.out.println(Thread.currentThread().getName() + "\t come in...");
            // 暂停一会儿线程
            try {
                Thread.sleep(3000);
            } catch (InterruptedException e) {
                e.printStackTrace();
            }
            resource.addTo60();
            System.out.println(Thread.currentThread().getName() + "\t update number value: " + resource.number);
        }, "A").start();

        // 3: 第二个线程就是我们的 main 线程
        while (resource.number == 0) {
            // main线程就一直在这里循环, 直到 number 值不再是0
        }

        // 4: if main 线程感知到 number 已经被修改了, 则会跳出循环打印下面的语句!
        System.out.println(Thread.currentThread().getName() + "\t mission is over.");
    }
}

class Resource {
    public int number = 0;

//    public volatile int number = 0;

    public void addTo60() {
        this.number = 60;
    }
}
(2)输出结果
// 没有使用 volatile 的输出结果
A	 come in...
A	 update number value: 60  // 一直执行循环...

// 使用 volatile 的输出结果
A	 come in...
A	 update number value: 60
main mission is over.(1)测试代码:com.ymy.boot.VolatileAtomic
package com.ymy.boot;

/**
 * 测试 volatile 原子性
 * 原子性:
 * 1、原子不可再分。
 * 2、线程在做某个具体业务时, 中间不可被其他线程干扰。
 * 3、整体完整性一致, 要么同时成功, 要么同时失败。
 *
 * @author Ringo
 * @since 2021/4/13 15:30
 */
public class VolatileAtomic {
    public static void main(String[] args) {
        // 1: 资源类
        Resource1 resource = new Resource1();

        // 2: 创建 20 个线程每个线程都执行 add() 方法 1w 次
        for (int i = 1; i <= 20; i++) {
            new Thread(() -> {
                for (int j = 1; j <= 10000; j++) {
                    resource.add();
                }
            }, i + "").start();
        }

        while (Thread.activeCount() > 2) {
            Thread.yield(); // main 线程让出 CPU
        }

        // 3: 当上面20个线程执行结束, main线程输出结果
        System.out.println("number: " + resource.number);
    }
}

class Resource1 {
    public volatile int number = 0;

    // 请注意: 此时 number 加了 volatile 关键字
    public void add() {
        ++this.number;
    }
}输出结果:
// 20个线程每个执行 1W 次, 理论上结果应该是 20w
// 显然volatile不能保证原子性
number: 177296/**
* volatile 原子性解决方案:
* 1、加锁: add()方法上添加 synchronized
* 2、不加锁: 使用 juc.atomic 下原子类 AtomicInteger
*
* @author Ringo
* @date 2021/4/13
*/
class Resource1 {
public AtomicInteger number = new AtomicInteger(0);
public void add() {
this.number.incrementAndGet();
}
}- 工作内存与主内存同步延迟现象导致的可见性问题:可以使用
synchronized/volatie关键字解决,他们都可以使一个线程修改后的变量立即对其他线程可见。 - 对于指令重排导致的可见性问题和有序性问题:可以利用
volatile关键字解决,因为volatile的另一个作用就是禁止指令重新排序优化。
/**
 * 单例模式: 单线程下的单例模式
 *
 * @author Ringo
 * @since 2021/4/13 17:04
 */
public class SingletonMode {
    private static SingletonMode instance = null;

    private SingletonMode() {
		System.out.println(Thread.currentThread().getName() + "\t 构造方法..");
    }

    public static SingletonMode getInstance() {
        if (instance == null) {
            instance = new SingletonMode();
        }
        return instance;
    }

    public static void main(String[] args) {
        SingletonMode instance1 = SingletonMode.getInstance();
        SingletonMode instance2 = SingletonMode.getInstance();
        System.out.println(instance1 == instance2); // true
    }
}控制台输出:
// 单线程下的单例模式正确!
单例模式的构造器..
true测试代码:com.ymy.boot.singleton.SingletonMode
/**
 * 多线程下的单例模式会出错
 *
 * @author Ringo
 * @since 2021/4/13 17:04
 */
public class SingletonMode {
    private static SingletonMode instance = null;

    private SingletonMode() {
        System.out.println(Thread.currentThread().getName() + "\t 构造方法..");
    }

    public static SingletonMode getInstance() {
        if (instance == null) {
            instance = new SingletonMode();
        }
        return instance;
    }

    public static void main(String[] args) {
        for (int i = 1; i <= 10; i++) {
            new Thread(() -> {
                SingletonMode.getInstance();
            }).start();
        }
    }
}输出结果:
// 被构造了两次....多线程下的单例模式出现了问题
Thread-1	 构造方法..
Thread-0 构造方法..测试代码:com.ymy.boot.singleton.MultiThreadSingleton
package com.ymy.boot.singleton;

/**
 * 多线程下单例模式的解决办法
 * DCL: Double Check Lock
 *
 * @author Ringo
 * @since 2021/4/13 17:19
 */
public class MultiThreadSingleton {

    // DCL中添加 volatile 就是为了禁止指令重排
    private static volatile MultiThreadSingleton instance = null;

    private MultiThreadSingleton() {
        System.out.println(Thread.currentThread().getName() + "\t 执行构造方法...");
    }

    /**
     * DCL: Double Check Lock 双端检锁机制
     * 1、DCL 机制不一定线程安全, 原因是有指令重排的存在, 加入 volatile 可以禁止指令重排。
     * 2、步骤1,2,3 编译器有可能会指令重排, 只要不影响单线程执行结果都有可能指令重排,
     * 但是多线程下指令重排会有很大影响!
     * @author Ringo
     * @date 2021/4/13
     */
    public static MultiThreadSingleton getInstance() {
        // 1: 老师说新同学张三要来, instance 这个座位是空的
        if (instance == null) {
            // 2: instance 这个座位锁定给张三
            synchronized (MultiThreadSingleton.class) {
                // 3: 张三来了, 确认座位是空的入座
                if (instance == null) {
                    instance = new MultiThreadSingleton();
                }
            }
        }
        return instance;
    }

    public static void main(String[] args) {
        for (int i = 1; i <= 10; i++) {
            new Thread(() -> {
                MultiThreadSingleton.getInstance();
            }).start();
        }
    }
}CAS: compare and swap。
学习 CAS 以AtomicInteger为切入点。
// AtomicInteger 源码
private volatile int value;
// 调用的是 Unsafe类中getAndAddInt(对象地址, 偏移量, 要增加的值)
public final int getAndIncrement() {
    return unsafe.getAndAddInt(this, valueOffset, 1);
}
Unsafe 类才是真正地可以保证了 volatile 的原子性(不需要加 synchronized)。
Unsafe类中的各个方法,JVM会实现各种汇编指令,从而实现原子操作。
//  Unsafe类中的 getAndAddInt
public final int getAndAddInt(Object var1, long var2, int var4) {
    int var5;
    do {
        // 通过对象地址和内存偏移量获得当前内存中的值
        var5 = this.getIntVolatile(var1, var2); // 原子操作
    } while(!this.compareAndSwapInt(var1, var2, var5, var5 + var4)); // 原子操作
    // compareAndSwapInt(对象地址, 偏移量, 期望的值, 要更新的值)

    return var5;
}1、循环时间长,开销大 do-while 一直循环。如果CAS失败,会一直循环,如果长时间不成功,会给CPU带来很大开销。
2、只能保证一个共享变量的原子操作,对于多个共享变量的操作,需要用锁来保证原子性。
3、引发ABA问题。
测试代码:com.ymy.boot.cas.AtomicReferenceDemo
/**
 * 原子引用:封装对象
 *
 * @author Ringo
 * @since 2021/4/13 19:32
 */
public class AtomicReferenceDemo {
    public static void main(String[] args) {
        Person person1 = new Person("zs", 18);
        Person person2 = new Person("li4", 20);

        AtomicReference<Person> atomicReference = new AtomicReference<>();
        atomicReference.set(person1); // person1 封装成原子类型

        System.out.println(atomicReference.compareAndSet(person1, person2) + "\t" + atomicReference.get());
        System.out.println(atomicReference.compareAndSet(person1, person2) + "\t" + atomicReference.get());
    }
}


class Person {
    public String name;
    public int age;

    public Person() {
    }

    public Person(String name, int age) {
        this.name = name;
        this.age = age;
    }

    @Override
    public String toString() {
        return "Person{" +
                "name='" + name + '\'' +
                ", age=" + age +
                '}';
    }
}输出结果:
true	Person{name='li4', age=20} // 期望是person1,实际上是,可以修改
false Person{name='li4', age=20} // 期望是person1,实际上不是,不能修改ABA问题说到底就是值的比较,并没有其他方面的控制,可以加上时间戳(版本号)控制,即使值修改和原来一样,也需要对比版本号。AtomicStampedReference加上时间戳可以解决这个问题。
AtomicStampedReference<Integer> atomic
    = new AtomicStampedReference<>(new Integer(1), 0);
Integer val = atomic.getReference();
int stamp = atomic.getStamp();
atomic.compareAndSet(val, 99, stamp, stamp + 1);(1)ArrayList源码解读
public class ArrayList<E> extends AbstractList<E>
    implements List<E>, RandomAccess, Cloneable, java.io.Serializable
{
    // 1: 定义默认容量 ==> 一个元素都不添加初始容量是0
    private static final int DEFAULT_CAPACITY = 10;

    // 2: 空数组, 方便 ArrayList 初始化
    private static final Object[] DEFAULTCAPACITY_EMPTY_ELEMENTDATA = {};

    // 3: 数据就存在这里!
    // 任何空的 ArrayList 初始值化都是 {} ==> 看下面构造方法
    // 当第一个元素加入到 elementData 数组中后, 数组的容量就会扩展到 DEFAULT_CAPACITY(10)
    transient Object[] elementData; // non-private to simplify nested class access

    // 4: 当前数组的长度(数组中包含元素的数量)默认是0
    private int size;

    // 5: 无参构造器 ==> 初始化 ArrayList
    public ArrayList() {
        // 初始容量0
        this.elementData = DEFAULTCAPACITY_EMPTY_ELEMENTDATA;
    }

    // 6: 有参构造器
    public ArrayList(int initialCapacity) {
        // 容量 > 0 你输入多少数组的长度就是多少
        if (initialCapacity > 0) {
            this.elementData = new Object[initialCapacity];
        } else if (initialCapacity == 0) {
            this.elementData = EMPTY_ELEMENTDATA;
        } else {
            throw new IllegalArgumentException("Illegal Capacity: "+
                                               initialCapacity);
        }
    }

    // 7: 将 ArrayList 的容量修剪为数组当前的长度
    public void trimToSize() {
        modCount++; // ArrayList 结构被修改的次数 + 1
        if (size < elementData.length) { // size 确实 < 数组的容量
            elementData = (size == 0)   // size(数组当前的长度)是不是0
                ? EMPTY_ELEMENTDATA     // 是 0 就是空数组
                : Arrays.copyOf(elementData, size); // 不是 0 就复制一份(创建个新数组)
        }
    }

    // ~ ~ ~ ~ ~ ~ ~ ~ ~ ~ ~ ~ ~ ~ 扩容代码 ~ ~ ~ ~ ~ ~ ~ ~ ~ ~ ~ ~ ~ ~ ~ ~ ~ ~


    // 8: 数组的扩容
    private void grow(int minCapacity) {
        int oldCapacity = elementData.length; // 获得数组的容量

        // 新数组的容量 = 旧数组容量的 1.5 倍
        int newCapacity = oldCapacity + (oldCapacity >> 1);

        // 新数组的容量 还不能满足minCapacity
        if (newCapacity - minCapacity < 0)
            newCapacity = minCapacity;

        // 新数组的容量比 MAX_ARRAY_SIZE 还大
        if (newCapacity - MAX_ARRAY_SIZE > 0)
            newCapacity = hugeCapacity(minCapacity);

        // minCapacity is usually close to size, so this is a win:
        elementData = Arrays.copyOf(elementData, newCapacity);
    }

    // 9: 确定数组要扩容
    private void ensureExplicitCapacity(int minCapacity) {
        modCount++; // 数组结构的修改次数 + 1

        // 要求的 minCapacity 比当前数组容量大 那就要扩容
        if (minCapacity - elementData.length > 0)
            grow(minCapacity);
    }

    // 10: 计算数组最小容量
    private static int calculateCapacity(Object[] elementData, int minCapacity) {
        if (elementData == DEFAULTCAPACITY_EMPTY_ELEMENTDATA) { // 空数组
            // 数组初始容量是0,第一次添加元素 minCapacity = 1,这里显然要将容量扩充为10
            return Math.max(DEFAULT_CAPACITY, minCapacity);
        }
        return minCapacity;
    }

    // 11: 确定要内部扩容(扩容主要是调用用这个方法!)
    private void ensureCapacityInternal(int minCapacity) {
        ensureExplicitCapacity(calculateCapacity(elementData, minCapacity));
    }


	// ~ ~ ~ ~ ~ ~ ~ ~ ~ ~ ~ ~ ~ ~ 操作代码 ~ ~ ~ ~ ~ ~ ~ ~ ~ ~ ~ ~ ~ ~ ~ ~ ~ ~

    // 12: add() 添加元素
    public boolean add(E e) {
        // 数组扩容, 数组初始容量是0,第一次添加元素就需要扩容了!
        ensureCapacityInternal(size + 1);

        elementData[size++] = e;
        return true;
    }

}
(2)关于 ArrayList 初始化容量为 0,添加第1个元素之后容量为 10 的测试!
// 只创建 ArrayList 对象, 但是不添加元素
ArrayList<String> arrayList = new ArrayList<>();
Field elementDataField = arrayList.getClass().getDeclaredField("elementData");
elementDataField.setAccessible(true);
Object[] elementData = (Object[]) (elementDataField.get(arrayList));
System.out.println("获得ArrayList的容量: " + elementData.length);

// 输出:获得ArrayList的容量: 0
// 创建 ArrayList 对象, 添加元素
ArrayList<String> arrayList = new ArrayList<>();
arrayList.add("1");
Field elementDataField = arrayList.getClass().getDeclaredField("elementData");
elementDataField.setAccessible(true);
Object[] elementData = (Object[]) (elementDataField.get(arrayList));
System.out.println("获得ArrayList的容量: " + elementData.length);
// 输出: 获得ArrayList的容量: 10多线程下,ArrayList线程不安全。java.util.ConcurrentModificationException 常见的异常!
// 1: 资源类
List<Integer> list = new ArrayList<>();

// 2: 多个线程并发修改资源类
for (int i = 1; i <= 20; i++) {
    final int temp = i;
    new Thread(() -> {
        list.add(temp);
        System.out.println(list);
    }).start();
}输出结果:
// 故障现象
Exception in thread "Thread-18" java.util.ConcurrentModificationException
	at java.util.ArrayList$Itr.checkForComodification(ArrayList.java:909)
	at java.util.ArrayList$Itr.next(ArrayList.java:859)
	at java.util.AbstractCollection.toString(AbstractCollection.java:461)
	at java.lang.String.valueOf(String.java:2994)
	at java.io.PrintStream.println(PrintStream.java:821)
	at com.ymy.boot.collection.ArrayListDemo.lambda$main$0(ArrayListDemo.java:22)
at java.lang.Thread.run(Thread.java:748)(1)Vector
// Vector 是 List 的实现类

// ArrayList是大致相当于Vector,不同之处在于它是不同步的
// Vector 中的 add() 使用了 synchronized ==> 数据一致性提高, 但是并发降低
public synchronized boolean add(E e) {
    modCount++;
    ensureCapacityHelper(elementCount + 1);
    elementData[elementCount++] = e;
    return true;
}
(2)Collections 可以将普通的集合类封装成 synchronizedList
// 普通的 List 可以包装一层, 返回 SynchronizedList(继承自List)
Collections.synchronizedList(new ArrayList<>());CopyOnWriteArrayList:写时复制,读写分离的思想,源码解析。
// 1: CopyOnWriteArrayList 封装的数组
// volatile 保证线程之间的可见性
private transient volatile Object[] array;


// 2: CopyOnWriteArrayList 中的 add()
// add() 写的是一个新的数组
public boolean add(E e) {
    final ReentrantLock lock = this.lock;
    lock.lock();
    try {
        Object[] elements = getArray(); // 获得旧的数组
        int len = elements.length;
        Object[] newElements = Arrays.copyOf(elements, len + 1);
        newElements[len] = e; // 写在一个新的数组里
        setArray(newElements); // 写完了改变指针, 让旧的数组 array 指向新的数组
        return true;
    } finally {
        lock.unlock();
    }
}

final void setArray(Object[] a) {
    array = a;
}

final Object[] getArray() {
    return array;
}

// 3: CopyOnWriteArrayList 中的 get()
// get()拿的是原来数组 array 中的值
public E get(int index) {
    return get(getArray(), index);
}

private E get(Object[] a, int index) {
    return (E) a[index];
}// 允许 key 和 value 都为 null
public class HashMap<K,V> extends AbstractMap<K,V>
implements Map<K,V>, Cloneable, Serializable {
// 1: 散列表默认的初始化容量(一定是2的幂)
static final int DEFAULT_INITIAL_CAPACITY = 1 << 4; // aka 16
// 2: 默认加载因子
static final float DEFAULT_LOAD_FACTOR = 0.75f;
// 3: 单链表转成红黑树的阈值(单链表长度至少是8), 包括首元结点(table[i])
static final int TREEIFY_THRESHOLD = 8;
// 散列表数组的长度至少是64 才会将将单链表转成红黑树
static final int MIN_TREEIFY_CAPACITY = 64;
// 4: 红黑树转成单链表结点数量的阈值
static final int UNTREEIFY_THRESHOLD = 6;
// 5: 根据当前所给的容量 获得离他最接近的2的幂
static final int tableSizeFor(int cap) {
int n = cap - 1;
n |= n >>> 1;
n |= n >>> 2;
n |= n >>> 4;
n |= n >>> 8;
n |= n >>> 16;
return (n < 0) ? 1 : (n >= MAXIMUM_CAPACITY) ? MAXIMUM_CAPACITY : n + 1;
}
// 6: 散列表!存数据的地方
// new HashMap() table == null 即: 数组还没有被分配
// 只要HashMap中 put 第一个<k, v>, HashMap数组的长度就为16
transient Node<K,V>[] table;
// 7: threshold表示当HashMap的size大于threshold时会执行resize操作。
// threshold = capacity * loadFactor
int threshold;
// 7:构造方法
public HashMap(int initialCapacity, float loadFactor) {
if (initialCapacity < 0)
throw new IllegalArgumentException("Illegal initial capacity: " +
initialCapacity);
if (initialCapacity > MAXIMUM_CAPACITY)
initialCapacity = MAXIMUM_CAPACITY;
if (loadFactor <= 0 || Float.isNaN(loadFactor))
throw new IllegalArgumentException("Illegal load factor: " +
loadFactor);
this.loadFactor = loadFactor;
// 设置 threshold 为 2 的幂(大于initialCapacity且最接近)
// 单new HashMap() threshold 是 0
// new HashMap(25) threshold 就会是32
this.threshold = tableSizeFor(initialCapacity);
}
public HashMap(int initialCapacity) {
this(initialCapacity, DEFAULT_LOAD_FACTOR);
}
/**
* Constructs an empty <tt>HashMap</tt> with the default initial capacity
* (16) and the default load factor (0.75).
* 构造空的 HashMap,默认容量是16, 初始容量还是0, 因为数组还没有被分配
*/
public HashMap() {
this.loadFactor = DEFAULT_LOAD_FACTOR; // all other fields defaulted
}
// 8: put()方法 插入k-v,key相同,value就会被覆盖
public V put(K key, V value) {
return putVal(hash(key), key, value, false, true);
}
/**
* 不执行 put(k, v),HashMap中的散列表不会被分配空间
*
* @param onlyIfAbsent 如果为true, 不会改变存在的值; false, 会改变存在的值
* @param evict false 表示HashMap处于创建模式
* @Return 先前的value, 不存在就返回 null
*/
final V putVal(int hash, K key, V value, boolean onlyIfAbsent,
boolean evict) {
Node<K,V>[] tab; // 定义临时的散列表
Node<K,V> p; // 临时结点
int n, i; // n代表散列表的容量: i代表数组下标
// HashMap为空(没有为table分配空间)
if ((tab = table) == null || (n = tab.length) == 0)
n = (tab = resize()).length; // 执行的是扩容方法
// 没有发生Hash碰撞直接添加到数组中即可
if ((p = tab[i = (n - 1) & hash]) == null)
tab[i] = newNode(hash, key, value, null);
// 恭喜, 这里发生Hash碰撞了
else {
Node<K,V> e; K k;
// 如果 hash 相同, key也相同, 进行覆盖
if (p.hash == hash &&
((k = p.key) == key || (key != null && key.equals(k))))
e = p;
// 红黑树结点就插入到红黑树中
else if (p instanceof TreeNode)
e = ((TreeNode<K,V>)p).putTreeVal(this, tab, hash, key, value);
// 单遍历结点就遍历, 然后添加
else {
for (int binCount = 0; ; ++binCount) {
// 单连表结尾添加新结点
if ((e = p.next) == null) {
p.next = newNode(hash, key, value, null);
if (binCount >= TREEIFY_THRESHOLD - 1) // -1 for 1st
treeifyBin(tab, hash); //单链表转红黑树
break;
}
// hash和Key都相同就退出循环
if (e.hash == hash &&
((k = e.key) == key || (key != null && key.equals(k))))
break;
p = e;
}
}
// 统一处理上边的 e ==> key相同进行value的覆盖
//如果e为null,代表上面的链表遍历到了最后面,并且是新建节点完成添加
// e != null,代表上面链表中存在key相同的节点,需要替换
if (e != null) { // existing mapping for key
V oldValue = e.value;
if (!onlyIfAbsent || oldValue == null)
e.value = value;
afterNodeAccess(e);
return oldValue;
}
}
++modCount; // HashMap 的修改次数 +1
// HashMap 的长度超过阈值 进行扩容
if (++size > threshold)
resize();
afterNodeInsertion(evict);
// 只有 key 相同 value 被覆盖的时候才会返回值
// 如果都是第一次添加,那么返回的就是 null
return null;
}
// 9: HashMap的扩容
final Node<K,V>[] resize() {
// oldTab:为数组类型,代表扩容之前HashMap中的数组,也就是所有的桶;
Node<K,V>[] oldTab = table;
int oldCap = (oldTab == null) ? 0 : oldTab.length; // oldTable 容量
int oldThr = threshold; // 这次扩容的阈值
// newCap 扩容之后的容量
// newThr 这次扩容之后下次扩容的阈值
int newCap, newThr = 0;
// oldCap > 0 说明已经正常初始化了 ==> 散列表中有值了
if (oldCap > 0) {
if (oldCap >= MAXIMUM_CAPACITY) {
threshold = Integer.MAX_VALUE;
return oldTab;
}
// oldCap 左移1位(乘2)赋值给newCap 即:每次扩容都是原来的2倍
else if ((newCap = oldCap << 1) < MAXIMUM_CAPACITY &&
oldCap >= DEFAULT_INITIAL_CAPACITY)
newThr = oldThr << 1; // newThr = oldThr * 2
}
// oldCap = 0 并且 oldThr > 0 ==> 使用有参构造器初始化 HashMap
else if (oldThr > 0) // initial capacity was placed in threshold
newCap = oldThr; // new HashMap(7) 那么 newCap 就是 8 了
// oldCap = 0 并且 oldThr = 0 ==> 使用无参构造器初始化 HashMap
else { // zero initial threshold signifies using defaults
newCap = DEFAULT_INITIAL_CAPACITY;
newThr = (int)(DEFAULT_LOAD_FACTOR * DEFAULT_INITIAL_CAPACITY);
}
// 如果 newThr 还是 0,那么就赋值 newThr 为 newCap * loadFactor
if (newThr == 0) {
float ft = (float)newCap * loadFactor;
newThr = (newCap < MAXIMUM_CAPACITY && ft < (float)MAXIMUM_CAPACITY ?
(int)ft : Integer.MAX_VALUE);
}
threshold = newThr; // 上面获得的新的阈值赋值给HashMap的阈值
// 上方的代码确认了扩容后的数组长度newCap和扩容阈值newThr
// 下方代码开始正式扩容
// 先创建一个长度为newCap的数组
Node<K,V>[] newTab = (Node<K,V>[])new Node[newCap];
// 将newTab赋值给当前HashMap的table
table = newTab;
// 如果 oldTab 不为空则将元素进行移动
if (oldTab != null) {
// 遍历 oldTab
for (int j = 0; j < oldCap; ++j) {
Node<K,V> e; // 临时结点 e
// 依次将数组上的节点赋值给e 并将原节点赋值为空
if ((e = oldTab[j]) != null) {
oldTab[j] = null;
// 如果e之后没有没有节点
if (e.next == null)
// 将e的hash值与新数组的长度进行按位与得到e在扩容后数组的位置
newTab[e.hash & (newCap - 1)] = e;
// e是红黑树的根结点
else if (e instanceof TreeNode)
((TreeNode<K,V>)e).split(this, newTab, j, oldCap);
// 以上情况都不是,说明节点e后方有链表,将一条链表分成两条然后存储到数组上
else { // preserve order
Node<K,V> loHead = null, loTail = null;
Node<K,V> hiHead = null, hiTail = null;
Node<K,V> next;
// 遍历单链表
// 使用循环将一条链表根据节点的hash值分成两条
do {
next = e.next;
// 将e.hash与原数组长度进行按位与操作
// 如果值为0则赋值给低位链表, 否则赋值给高位链表
if ((e.hash & oldCap) == 0) {
if (loTail == null)
loHead = e;
else
loTail.next = e;
loTail = e;
}
else {
if (hiTail == null)
hiHead = e;
else
hiTail.next = e;
hiTail = e;
}
} while ((e = next) != null);
// 以上的操作将一条链表分为两条但是还未接在数组上
// 将链表接在数组上
if (loTail != null) {
loTail.next = null;
newTab[j] = loHead;
}
if (hiTail != null) {
hiTail.next = null;
// 由于数组扩容2倍, 高位链表的位置需要加上 oldCap
newTab[j + oldCap] = hiHead;
}
}
}
}
}
return newTab;
}
}参考文章:https://segmentfault.com/a/1190000039087868
// 1: HashSet的底层是 HashMap
// HashSet 允许 null
private transient HashMap<E,Object> map;

/**
* Constructs a new, empty set; the backing <tt>HashMap</tt> instance has
* default initial capacity (16) and load factor (0.75).
*
* 构造一个新的空的 Set;底层的HashMap实例默认初始化容量为16, 加载因子是0.75!
*/
public HashSet() {
    map = new HashMap<>();
}

// 2: HashSet 的add()方法

// Dummy value to associate with an Object in the backing Map
// HashSet并不关心value
private static final Object PRESENT = new Object();

// Adds the specified element to this set if it is not already present.
// 如果说底层的HashMap中不存在传入的这个key, 就会在HashMap中添加新的key,否则就不会添加新的key
// 实际上还是HashMap中 Key 相同 value 就替换, 只不过HashSet中的value没有意义!
public boolean add(E e) {
    return map.put(e, PRESENT)==null; // 调用的HashMap中的put()方法!
}// 1: CopyOnWriteArraySet 底层是 CopyOnWriteArrayList
private final CopyOnWriteArrayList<E> al;
// CopyOnWriteArraySet 构造方法
public CopyOnWriteArraySet() {
al = new CopyOnWriteArrayList<E>();
}
// 2: CopyOnWriteArraySet的add() 实际上是调用 CopyOnWriteArrayList 的 addIfAbsent()
public boolean add(E e) {
return al.addIfAbsent(e);
}
// 3: CopyOnWriteArrayList 的 addIfAbsent(E e)方法
public boolean addIfAbsent(E e) {
Object[] snapshot = getArray(); // 获得当前的数组
// 如果当前的数组中已经存在要添加的 e 了, 直接退出
// 不存在, 就去执行addIfAbsent(E e, Object[] snapshot) 添加!
return indexOf(e, snapshot, 0, snapshot.length) >= 0 ? false :
addIfAbsent(e, snapshot);
}
private boolean addIfAbsent(E e, Object[] snapshot) {
final ReentrantLock lock = this.lock;
lock.lock();
try {
Object[] current = getArray(); // 拿到当前的数组
int len = current.length;
// 传进来的数组不是当前的数组 ==> 比较的是地址
// 另一个线程对数组进行了修改
if (snapshot != current) {
// Optimize for lost race to another addXXX operation
// 优化另一个addXXX操作的失败竞争
int common = Math.min(snapshot.length, len); // 取两个数组长度的最小值
for (int i = 0; i < common; i++)
// 当前的数组中已经存在 e 了, 不用添加到Set集合了
if (current[i] != snapshot[i] && eq(e, current[i]))
return false;
// 在剩下的部分中去搜索, 如果已经存在了就不需要添加了
if (indexOf(e, current, common, len) >= 0)
return false;
}
// 到这里: 就证明 现在的数组中没有添加这个 e
Object[] newElements = Arrays.copyOf(current, len + 1);
newElements[len] = e;
setArray(newElements);
return true;
} finally {
lock.unlock();
}
}- 公平锁:多个线程按照申请锁的顺序来获取锁,类似排队打饭,先来后到。
- 非公平锁:有可能后申请的线程比先申请的线程优先获取锁。
- 在高并发情况下,有可能会造成优先级反转或者线程饥饿现象。
// 1: ReentrantLock 可以设置 公平锁/非公平锁
public class ReentrantLock implements Lock, java.io.Serializable {
    /**
     * Creates an instance of {@code ReentrantLock}.
     * This is equivalent to using {@code ReentrantLock(false)}.
     * 默认非公平锁
     */
    public ReentrantLock() {
        sync = new NonfairSync();
    }

    /**
     * Creates an instance of {@code ReentrantLock} with the
     * given fairness policy.
     *
     * @param fair {@code true} if this lock should use a fair ordering policy
     * 可以设置 fair/unfair
     */
    public ReentrantLock(boolean fair) {
        sync = fair ? new FairSync() : new NonfairSync();
    }
}

// 2: synchronized:非公平锁ReentrantLock/Synchronized 属于可重入锁,可重入锁的最大作用是避免死锁!
可重入锁:指的是同一线程外层函数获得锁之后,内层递归函数仍然能获取该锁(注:外层函数和内层函数的锁是同一个对象的锁)!
即:线程可以进入任何一个它所有的锁的同步代码块!线程只要拿到当前对象的锁,就可以访问当前对象中所有的同步代码块!
可重入锁的种类:
- 隐式锁(即 synchronized 关键字使用的锁),默认是可重入锁。
- 显示锁(即Lock)也有 ReentrantLock 这样的可重入锁。
(1)测试 synchronized 可重入
public class ReentrantDemo {

    public static void main(String[] args) {
        Phone1 phone1 = new Phone1();
        new Thread(() -> {
            phone1.sendSms();
        }, "t1").start();
        new Thread(() -> {
            phone1.sendSms();
        }, "t2").start();
    }

}

class Phone1 {

    // synchronized 锁的是当前对象
    public synchronized void sendSms() {
        System.out.println(Thread.currentThread().getName() + "\t sendSms()");
        this.sendEmail();
    }

    // synchronized 锁的是当前对象
    public synchronized void sendEmail() {
        System.out.println(Thread.currentThread().getName() + "\t sendEmail()");
    }
}输出结果:
t1	 sendSms()
t1	 sendEmail()
t2	 sendSms()
t2	 sendEmail()
(2)测试 ReentrantLock 可重入
注意:lock()、unlock() 必须成对出现!
public class ReentrantDemo {

    public static void main(String[] args) {
        //  测试 ReentrantLock 可重入
        Phone2 phone2 = new Phone2();
        new Thread(() -> {
            phone2.sendSms();
        }, "t3").start();
        new Thread(() -> {
            phone2.sendSms();
        }, "t4").start();
    }

}

class Phone2 {
    Lock lock = new ReentrantLock();

    public void sendSms() {
        lock.lock();
        lock.lock();
        try {
            System.out.println(Thread.currentThread().getName() + "\t sendSms()");
            this.sendEmail();
        } finally {
            // lock() 和 unlock() 必须要成对出现
            lock.unlock();
            lock.unlock();
        }
    }

    public void sendEmail() {
        lock.lock();
        try {
            System.out.println(Thread.currentThread().getName() + "\t sendEmail()");
        } finally {
            lock.unlock();
        }
    }
}输出结果:
t3	 sendSms()
t3	 sendEmail()
t4	 sendSms()
t4	 sendEmail()
自旋锁:是指尝试获取锁的线程不会立即阻塞,而是采用循环的方式去尝试获取锁。好处是减少上下文切换的消耗,缺点是会消耗 CPU。
// 手写自旋锁
public class SpinLockDemo {

    // 原子引用, 泛型 Thread
    AtomicReference<Thread> atomicReference = new AtomicReference<>();

    // 自旋锁 加锁
    public void lock() {
        Thread currentThread = Thread.currentThread();
        while (!atomicReference.compareAndSet(null, currentThread)) ;
        System.out.println(currentThread.getName() + "\t lock()");
    }

    // 解锁
    public void unlock() {
        Thread currentThread = Thread.currentThread();
        atomicReference.compareAndSet(currentThread, null);
        System.out.println(currentThread.getName() + "\t come in unlock()");
    }

    // 测试
    public static void main(String[] args) throws Exception {
        SpinLockDemo spinLock = new SpinLockDemo();
        new Thread(() -> {
            spinLock.lock();
            spinLock.unlock();
        }, "t1").start();

        Thread.sleep(1000);

        new Thread(() -> {
            spinLock.lock();
            spinLock.unlock();
        }, "t2").start();
    }
}ReadWriteLock 细化了锁的粒度,增强并发性!读锁共享,写锁排他!
ReentrantLock 不管读写,全是独占锁。
// 读写锁!
// ReadWriteLock 可以保证写操作独占(原子性), 但是读的时候允许其他线程一起读(写会阻塞)
public class ReadWriteLockDemo {
    public static void main(String[] args) {
        Cache cache = new Cache();

        for (int i = 1; i <= 5; i++) {
            final int temp = i;
            new Thread(() -> {
                cache.put("k" + temp, "v" + temp);
            }, "t" + i).start();
        }

        for (int i = 6; i <= 10; i++) {
            final int temp = i - 5;
            new Thread(() -> {
                cache.get("k" + temp);
            }, "t" + i).start();
        }
    }
}

// 资源类
class Cache {

    // volatile 保证线程间的可见性
    private volatile Map<String, Object> map = new HashMap<>();

    private ReadWriteLock readWriteLock = new ReentrantReadWriteLock();

    public void put(String key, Object value) {
        Lock writeLock = readWriteLock.writeLock();
        writeLock.lock();
        try {
            System.out.println(Thread.currentThread().getName() + "\t正在写入: " + key);
            try {
                Thread.sleep(3000);
            } catch (InterruptedException e) {
                e.printStackTrace();
            }
            map.put(key, value);
            System.out.println(Thread.currentThread().getName() + "\t写入完成: " + key);
        } finally {
            writeLock.unlock();
        }
    }

    public Object get(String key) {
        Lock readLock = readWriteLock.readLock();
        readLock.lock();
        try {
            System.out.println(Thread.currentThread().getName() + "\t正在读: " + key);
            Object value = map.get(key);
            System.out.println(Thread.currentThread().getName() + "\t读取完成: " + value);

            // try语句块 有 return 最后也会执行 finally
            return value;
        } finally {
            readLock.unlock();
        }
    }
}测试代码: com.ymy.boot.lock.lock8.Lock8Demo
/**
 * <li>
 * 6、两个静态同步方法, 两部手机, 先打印邮件还是短信?
 * static 类锁, 同一把锁
 * </li>
 *
 * <li>
 * 7、1个静态同步方法, 1个普通同步方法, 同一部手机, 先打印邮件还是短信?
 * static 类锁
 * 普通的同步方法 对象锁
 * 两把锁, 互不影响
 * </li>
 *
 * <li>
 * 8、1个静态同步方法, 1个普通同步方法, 2部手机, 先打印邮件还是短信?
 * static 类锁
 * 普通的同步方法 锁当前对象
 * 两把锁, 互不影响
 * </li>
*/API:
//调用await()方法的线程会被挂起,它会等待直到count值为0才继续执行
public void await() throws InterruptedException { };
//和await()类似,只不过等待一定的时间后count值还没变为0的话就会继续执行
public boolean await(long timeout, TimeUnit unit) throws InterruptedException { };
//将count值减1 线程不会阻塞
public void countDown() { }; case:
- 教室有 5 位同学,依次离开教室。
- 当所有同学都离开教室,那么班长锁上教室的门。
/**
 * CountDownLatch
 * 功能: 5 4 3 2 1 0 ok 发射!
 *
 * @author Ringo
 * @since 2021/4/15 20:50
 */
public class CountDownLatchDemo {
    public static void main(String[] args) throws Exception {
        CountDownLatch countDownLatch = new CountDownLatch(5);

        for (int i = 1; i <= 5; i++) {
            new Thread(() -> {
                System.out.println(Thread.currentThread().getName() + "\t离开教室");

                countDownLatch.countDown(); // 计数器 -1
            }, "student" + i).start();
        }

        // 只要 count != 0 这里就会一直阻塞.
        countDownLatch.await();
        System.out.println(Thread.currentThread().getName() + "\t 班长关门!");
    }
}输出结果:
student1	离开教室
student3	离开教室
student4	离开教室
student5	离开教室
student2	离开教室
main 班长关门!- 1、枚举中不要写 set 方法
- 2、枚举中可以写 属性 和 构造器
- 3、枚举中需要写 get 方法
/**
 * 枚举厉害!
 * Enum、CountDownLatch 配合使用
 *
 * @author Ringo
 * @since 2021/4/15 21:11
 */
public class EnumDemo {
    public static void main(String[] args) throws Exception {
        CountDownLatch countDownLatch = new CountDownLatch(6);

        for (int i = 1; i <= 6; i++) {
            new Thread(() -> {
                System.out.println(Thread.currentThread().getName() + "被灭!");
                countDownLatch.countDown();
            }, Country.get(i).getName() + i).start();
        }

        countDownLatch.await();

        System.out.println(Country.SEVEN.getName() + "统一天下!");
    }
}

/**
 * 1、枚举中不要写 set 方法
 * 2、枚举中可以写 属性 和 构造器
 * 3、枚举中需要写 get 方法
 *
 * @author Ringo
 * @date 2021/4/15
 */
enum Country {

    ONE(1, "齐国"),

    TWO(2, "楚国"),

    THREE(3, "燕国"),

    FOUR(4, "韩国"),

    FIVE(5, "赵国"),

    SIX(6, "魏国"),

    SEVEN(7, "秦国");

    private int index;

    private String name;

    Country(int index, String name) {
        this.index = index;
        this.name = name;
    }

    public static Country get(int index) {
        for (Country c : Country.values()) {
            if (c.index == index)
                return c;
        }
        return null;
    }

    public int getIndex() {
        return index;
    }

    public String getName() {
        return name;
    }
}API
// 构造方法 Barrier 屏障(集合点, 汇合点)
// parties: 总共需要的线程数
// barrierAction: 人到齐了触发的事件
CyclicBarrier(int parties, Runnable barrierAction);

// 人不齐,将一直等待。
int await();

// 人不齐就等待, 超出指定的等待时间就不等了。
int await(long timeout, TimeUnit unit);

// 返回目前正在等待的参与者的数量。
int getNumberWaiting();

// 返回要求启动此 barrier 的参与者数目
int getParties();

// 查询这个障碍是否处于破碎状态
boolean isBroken();

// 将屏障重置为初始状态
void reset();case:5个人到齐了才能开会!
public class CyclicBarrierDemo {

    public static void main(String[] args) {
        CyclicBarrier cyclicBarrier = new CyclicBarrier(5, () -> {
            System.out.println("人到齐了开会...");
        });

        for (int i = 1; i <= 5; i++) {
            new Thread(() -> {
                try {
                    System.out.println(Thread.currentThread().getName() + "\t 到达会议室");
                    cyclicBarrier.await();
                } catch (Exception e) {
                    e.printStackTrace();
                }
            }, "emp" + i).start();
        }
    }
}输出结果:
emp2	 到达会议室
emp3	 到达会议室
emp1	 到达会议室
emp4	 到达会议室
emp5	 到达会议室
人到齐了开会...Semaphore 应用场景: 多个线程控制多个资源类!
API
acquire()
// 获取一个令牌,在获取到令牌、或者被其他线程调用中断之前线程一直处于阻塞状态。

acquire(int permits)
// 获取一个令牌,在获取到令牌、或者被其他线程调用中断、或超时之前线程一直处于阻塞状态。

acquireUninterruptibly()
// 获取一个令牌,在获取到令牌之前线程一直处于阻塞状态(忽略中断)。

tryAcquire()
// 尝试获得令牌,返回获取令牌成功或失败,不阻塞线程。

tryAcquire(long timeout, TimeUnit unit)
// 尝试获得令牌,在超时时间内循环尝试获取,直到尝试获取成功或超时返回,不阻塞线程。

release()
// 释放一个令牌,唤醒一个获取令牌不成功的阻塞线程。

hasQueuedThreads()
// 等待队列里是否还存在等待线程。

getQueueLength()
// 获取等待队列里阻塞的线程数。

drainPermits()
// 清空令牌把可用令牌数置为0,返回清空令牌的数量。

availablePermits()
//返回可用的令牌数量。停车案例:
public class SemaphoreDemo {
    public static void main(String[] args) {
        Semaphore semaphore = new Semaphore(3);
        for (int i = 1; i <= 10; i++) {
            new Thread(() -> {
                try {
                    System.out.println("==== " + Thread.currentThread().getName() + "来到停车场");
                    if (semaphore.availablePermits() == 0) {
                        System.out.println("对" + Thread.currentThread().getName() + "说: 车位不足,请耐心等待");
                    }
                    semaphore.acquire(1);
                    System.out.println(Thread.currentThread().getName() + "成功进入停车场");
                    Thread.sleep(new Random().nextInt(10000));//模拟车辆在停车场停留的时间
                    System.out.println(Thread.currentThread().getName() + "驶出停车场");
                    semaphore.release();//释放令牌,腾出停车场车位
                } catch (InterruptedException e) {
                    e.printStackTrace();
                }
            }, i + "").start();
        }
    }
}输出结果:
==== 1来到停车场
1成功进入停车场
==== 2来到停车场
2成功进入停车场
==== 3来到停车场
3成功进入停车场
==== 4来到停车场
对4说: 车位不足,请耐心等待
==== 5来到停车场
对5说: 车位不足,请耐心等待
1驶出停车场
4成功进入停车场
3驶出停车场
5成功进入停车场
4驶出停车场
5驶出停车场
2驶出停车场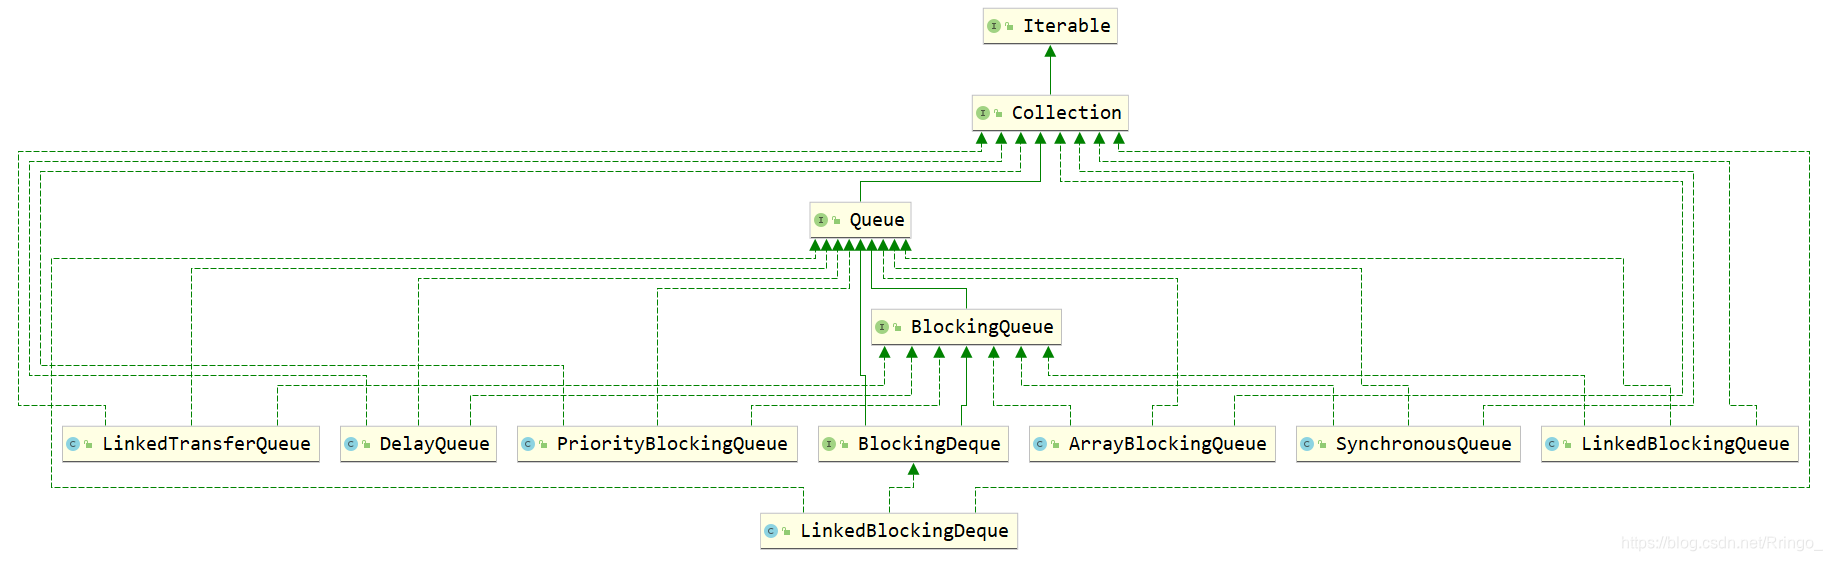
ArrayBlockingQueue: 由数组构成的有界阻塞队列。LinkedBlockingQueue: 由链表组成的有界(默认值位 Integer.MAX_VALUE)阻塞队列。SynchronousQueue:不存储元素的阻塞队列,也即单个元素的队列。PriorityBlockingQueue:支持优先级排序的无界阻塞队列。DelayQueue:使用优先级队列实现的延迟无界阻塞队列。LinkedTransferQueue:由链表组成的无界阻塞队列。LinkedBlockingDeque:由链表组成的无界双端阻塞队列。
| 方法类型 | 抛出异常 | 特殊值 | 一直阻塞 | 超时退出 |
|---|---|---|---|---|
| 插入 | add(e) | offer(e) | put(e) | offer(e, time, unit) |
| 移除 | remove() | poll() | take() | poll(time, unit) |
| 检查 | element() | peek() | 不可用 | 不可用 |
(1)抛出异常
- 当阻塞队列满时,再 add 插入元素会抛出异常
IllegalStateException: Queue full。 - 当阻塞队列空时,在 remove 移除元素会抛出
NoSuchElementException。
(2)特殊值
- 插入方法,成功true,失败false。
- 移除方法,成功返回出队元素,队里没有元素就返回 null。
(3)一直阻塞
- 当阻塞队列满时,生产者线程继续往队列里 put 元素,队列会一直阻塞生产者线程直到 put 进元素/中断 。
- 当阻塞队列空时,消费者线程试图从队列里 take 元素,队列会一直阻塞消费者线程直到队列可用。
(4)超时退出
- 当阻塞队列满时,队列会阻塞生产者线程一定时间,超过 等待时间 后生产者线程退出!
SynchronousQueue 没有容量,它不存储任何元素。
与其他 BlockingQueue 不同,每一个 put 操作必须要等待一个 take 操作,否则不能继续添加元素!
测试代码:com.ymy.boot.queue.SynchronousQueueDemo。
题目: 两个线程, 可以操作初始值为 0 的一个变量, 实现一个线程对该变量加1, 一个线程对该变量减1, 实现交替, 来10轮, 最后变量初始值为 0。
参考代码:com.ymy.boot.lock.question.WaitNotifyDemo
注意:
- 线程操作资源类。
- 判断 / 业务/ 通知。
- 防止虚假唤醒 。
synchronized(obj) {
    // while 语句可以防止线程的虚假唤醒
    // while 的本质是 循环 + 判断
    while(condition does not hold) {
        obj.wait();
    }
}测试代码:
public class WaitNotifyDemo {

    public static void main(String[] args) {
        Resource resource = new Resource();

        new Thread(() -> {
            for (int i = 1; i <= 10; i++) {
                try {
                    resource.increment();
                } catch (Exception e) {
                    e.printStackTrace();
                }
            }
        }).start();

        new Thread(() -> {
            for (int i = 1; i <= 10; i++) {
                try {
                    resource.decrement();
                } catch (Exception e) {
                    e.printStackTrace();
                }
            }
        }).start();
    }
}

// 资源类
// wait(): 导致当前线程等待,直到另一个线程调用该对象的 notify()方法或 notifyAll()方法
// notify(): 唤醒正在等待对象监视器的单个线程。
class Resource {

    private int var = 0;

    public synchronized void increment() throws Exception {
        // 防止虚假唤醒
        while (var != 0) {
            this.wait();
        }
        ++var;
        System.out.println(var);
        this.notify();
    }

    public synchronized void decrement() throws Exception {
        while (var == 0) {
            this.wait();
        }
        --var;
        System.out.println(var);
        this.notify();
    }
}输出结果:
1
0
1
0
1
0
1
0
1
0
1
0
1
0
1
0
1
0
1
0题目: 多线程之间按顺序调用, 实现 A->B->C 三个线程启动, 要求如下: "aa" 打印 5 次, "bb" 打印 10 次, "cc" 打印 15 次 循环 10 轮。
测试代码:com.ymy.boot.lock.question.AwaitSignalDemo
public class AwaitSignalDemo {

    public static void main(String[] args) throws Exception {
        Resource1 resource = new Resource1(3);

        new Thread(() -> {
            for (int i = 1; i <= 10; i++) {
                resource.print(0, 1, 1, "aa");
            }
        }, "A").start();

        TimeUnit.SECONDS.sleep(1);

        new Thread(() -> {
            for (int i = 1; i <= 10; i++) {
                resource.print(1, 2, 2, "bb");
            }
        }, "B").start();

        TimeUnit.SECONDS.sleep(1);

        new Thread(() -> {
            for (int i = 1; i <= 10; i++) {
                resource.print(2, 0, 3, "cc");
                System.out.println("第【" + i + "】轮结束!");
            }
        }, "C").start();
    }
}

// 资源类
class Resource1 {

    private ReentrantLock lock = new ReentrantLock();

    // 标志位
    // 0 => Thread A; 1 => Thread B; 2 => Thread C ...
    private int flag = 0;

    // 线程数量
    private int threadCount;

    // 条件
    private Condition[] conditions;

    // 构造方法
    public Resource1(int threadCount) {
        this.threadCount = threadCount;
        this.conditions = new AbstractQueuedSynchronizer.ConditionObject[this.threadCount];
        for (int i = 0; i < this.threadCount; i++) {
            this.conditions[i] = this.lock.newCondition();
        }
    }

    /**
     * @param index   选定执行打印的线程 (0: Thread A; 1: Thread B; 2: Thread C ....)
     * @param next    要通知的线程
     * @param n       打印的次数
     * @param content 打印的内容
     * @author Ringo
     * @date 2021/4/17
     */
    public void print(int index, int next, int n, String content) {
        if (index < 0 || index > this.threadCount || next < 0 || next > this.threadCount) {
            throw new RuntimeException("index/next的值 < 0 或者 > 最大线程数");
        }
        lock.lock();
        try {
            // 防止虚假唤醒
            while (flag != index) {
                this.conditions[index].await();
            }

            // 业务
            for (int i = 1; i <= n; i++) {
                System.out.println(content + i);
            }

            // 修改标志位
            flag = next;

            // 唤醒下一个线程
            this.conditions[flag].signal();
        } catch (Exception e) {
            e.printStackTrace();
        } finally {
            lock.unlock();
        }
    }
}我们使用线程的时候就去new Thread(),这样实现起来非常简便,但是就会有一个问题:
如果并发的线程数量很多,并且每个线程都是执行一个时间很短的任务就结束了,这样频繁创建线程就会大大降低系统的效率,因为频繁创建线程和销毁线程需要时间。
线程池的优势:
- 控制运行线程数量,处理过程种将任务放入队列,然后在线程创建后启动这些任务。
- 如果线程数量超过了最大数量,超出数量的线程排队等候。等其他线程执行完毕后,再从队列中取出来执行!
主要特点:
- 线程复用。
- 控制最大并发数。
- 管理线程。
测试代码:com.ymy.boot.thread.ThreadPoolExecutorDemo
public class ThreadPoolExecutorDemo {
public static void main(String[] args) {
// fixThreadPool();
// singleThreadPool();
cacheThreadPool();
}
/**
* 1: 一池固定线程
*
* @author Ringo
* @date 2021/4/17
*/
public static void fixThreadPool() {
// 1: 一池5个工作线程(相当于银行5个服务窗口)
ExecutorService threadPool = Executors.newFixedThreadPool(5);
// 2: 模拟有 10个 顾客来银行办理业务
work(threadPool);
}
/**
* 2: 一池一线程
*
* @author Ringo
* @date 2021/4/17
*/
public static void singleThreadPool() {
ExecutorService threadPool = Executors.newSingleThreadExecutor();
work(threadPool);
}
/**
* 3: 一池 N 线程(可根据业务自动扩容)
*
* @author Ringo
* @date 2021/4/17
*/
public static void cacheThreadPool() {
ExecutorService threadPool = Executors.newCachedThreadPool();
work(threadPool);
}
/**
* 模拟线程池办理业务
*
* @author Ringo
* @date 2021/4/17
*/
public static void work(ExecutorService threadPool) {
try {
for (int i = 1; i <= 10; i++) {
threadPool.execute(() -> {
System.out.println(Thread.currentThread().getName() + "\t办理业务");
});
}
} finally {
threadPool.shutdown();
}
}
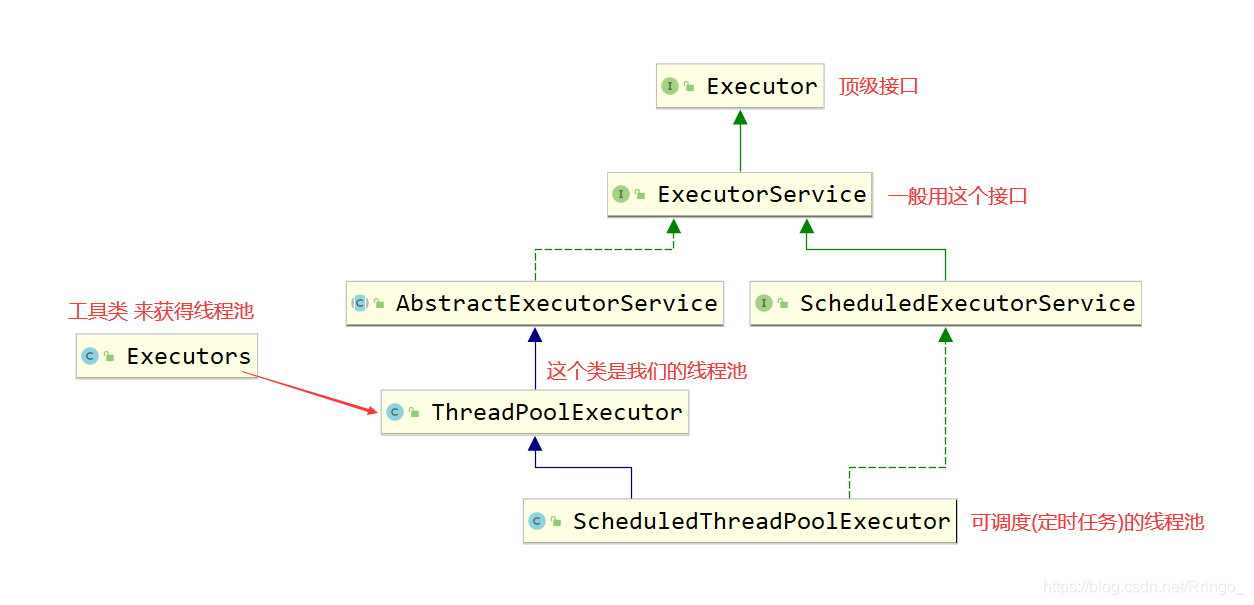
}Executors 三大方法
// 一池固定线程
public static ExecutorService newFixedThreadPool(int nThreads) {
    return new ThreadPoolExecutor(nThreads, nThreads,
                                  0L, TimeUnit.MILLISECONDS,
                                  new LinkedBlockingQueue<Runnable>());
}

// 一池一线程
public static ExecutorService newSingleThreadExecutor() {
    return new FinalizableDelegatedExecutorService
        (new ThreadPoolExecutor(1, 1,
                                0L, TimeUnit.MILLISECONDS,
                                new LinkedBlockingQueue<Runnable>()));
}

// 一池 N 线程
public static ExecutorService newCachedThreadPool() {
    return new ThreadPoolExecutor(0, Integer.MAX_VALUE,
                                  60L, TimeUnit.SECONDS,
                                  new SynchronousQueue<Runnable>());
}corePoolSize:线程池中的常驻核心线程数。maximumPoolSize:线程池中能够容纳同时执行的最大线程数,此值必须大于等于1。keepAliveTime:销毁空闲线程,直到还剩下 corePoolSize 个活跃线程。unit:时间单位(枚举)。workQueue,任务队列,被提交但是尚未执行的任务在这里排队。threadFactory: 线程工程,用于创建线程。默认即可。handler:拒绝策略,线程池所有线程都被占用,且任务队列满了,如何拒绝请求执行的任务。
// ThreadPoolExecutor
public class ThreadPoolExecutor extends AbstractExecutorService {

    // 构造方法
    public ThreadPoolExecutor(int corePoolSize,
                              int maximumPoolSize,
                              long keepAliveTime,
                              TimeUnit unit,
                              BlockingQueue<Runnable> workQueue,
                              ThreadFactory threadFactory,
                              RejectedExecutionHandler handler) {
        if (corePoolSize < 0 ||
            maximumPoolSize <= 0 ||
            maximumPoolSize < corePoolSize ||
            keepAliveTime < 0)
            throw new IllegalArgumentException();
        if (workQueue == null || threadFactory == null || handler == null)
            throw new NullPointerException();
        this.acc = System.getSecurityManager() == null ?
            null :
        AccessController.getContext();
        this.corePoolSize = corePoolSize;
        this.maximumPoolSize = maximumPoolSize;
        this.workQueue = workQueue;
        this.keepAliveTime = unit.toNanos(keepAliveTime);
        this.threadFactory = threadFactory;
        this.handler = handler;
    }
}线程池就是管理线程的池子,当有任务要处理时,不用频繁创建新线程,而是从池子拿个线程出来处理。当任务执行完,线程并不会被销毁,而是在等待下一个任务。因此可以节省资源,提高响应速度。
测试代码:com.ymy.boot.thread.ThreadPoolExecutorApplyDemo
public class ThreadPoolExecutorApplyDemo {
    public static void main(String[] args) throws Exception {

        // 1: 阻塞队列
        BlockingQueue<Runnable> blockingQueue = new ArrayBlockingQueue<>(10);

        // 2: 创建线程池
        ExecutorService threadPool = new ThreadPoolExecutor(1,
                Runtime.getRuntime().availableProcessors(),
                2, TimeUnit.SECONDS,
                blockingQueue, Executors.defaultThreadFactory(),
                new ThreadPoolExecutor.AbortPolicy());

        // 3: 执行并关闭
        try {
            for (int i = 1; i <= 50; i++) {
                final int temp = i;
                TimeUnit.MILLISECONDS.sleep(10);
                threadPool.submit(() -> {
                    System.out.println(temp + "\t 号被处理...");
                });
            }
        } finally {
            threadPool.shutdown();
        }
    }
}/**
* 1: 抛异常, 阻止系统正常运行
* A handler for rejected tasks that throws a
* {@code RejectedExecutionException}.
*/
public static class AbortPolicy{
}
// 2: 将任务回退给调用者线程(不会抛弃任务, 也不会报异常)
public static class CallerRunsPolicy {
}
// 3: 直接抛弃拒绝的任务, 允许任务丢失时,这是最好的策略
public static class DiscardPolicy {
}
// 4: 抛弃最前的未执行的任务, 然后重新提交被拒绝的任务
public static class DiscardOldestPolicy {
}最大线程到底该如何定义:
1、CPU密集型,电脑是几核,就是几,可以保证CPU的效率最高。
// 获得处理器的核数
Runtime.getRuntime().availableProcessors()
2、IO密集型,> 判断程序中十分耗IO的线程有多少个 // 1: 阻塞队列
BlockingQueue<Runnable> blockingQueue = new ArrayBlockingQueue<>(10);
// 2: 创建线程池
ExecutorService threadPool = new ThreadPoolExecutor(1,
Runtime.getRuntime().availableProcessors(), // 这样写
2, TimeUnit.SECONDS,
blockingQueue, Executors.defaultThreadFactory(),
new ThreadPoolExecutor.AbortPolicy());Java项目编程中,为了充分利用计算机CPU资源,一般开启多个线程来执行异步任务。但不管是继承Thread类还是实现Runnable接口,都无法获取任务执行的结果。
JDK 5中引入了Callable和Future,通过它们执行异步任务可以获取执行结果。
Future模式可以这样来描述:我有一个任务,提交给了Future,Future替我完成这个任务。期间我自己可以去做任何想做的事情。一段时间之后,我就便可以从Future那儿取出结果。就相当于下了一张订货单,一段时间后可以拿着提订单来提货,这期间可以干别的任何事情。其中Future 接口就是订货单,真正处理订单的是 Executor 类,它根据Future接口的要求来生产产品。
Future接口提供方法来检测任务是否被执行完,等待任务执行完获得结果,也可以设置任务执行的超时时间。这个设置超时的方法就是实现 Java 程序执行超时的关键。
测试代码:com.ymy.boot.thread.CallableDemo。
public class CallableDemo {
    public static void main(String[] args) {
        // 1: 创建线程池
        ExecutorService threadPool = new ThreadPoolExecutor(1,
                Runtime.getRuntime().availableProcessors(),
                2, TimeUnit.SECONDS,
                new ArrayBlockingQueue<Runnable>(3),
                Executors.defaultThreadFactory(),
                new ThreadPoolExecutor.CallerRunsPolicy());

        // 2: 执行任务
        try {
            for (int i = 1; i <= 50; i++) {
                try {
                    // Future 保存 Callable任务的执行结果
                    Future<String> future = threadPool.submit(new CallableTask());
                    System.out.println(future.get());
                } catch (Exception e) {
                    e.printStackTrace();
                }
            }
        } finally {
            threadPool.shutdown();
        }
    }
}

// 任务实现 Callable 接口
class CallableTask implements Callable<String> {
    @Override
    public String call() throws Exception {
        return Thread.currentThread().getName() + "\tHello";
    }
}ForkJoinPool是JDK7引入的线程池,核心思想是将大的任务拆分成多个小任务(即fork),然后在将多个小任务处理汇总到一个结果上(即join),非常像MapReduce处理原理。同时,它提供基本的线程池功能,支持设置最大并发线程数,支持任务排队,支持线程池停止,支持线程池使用情况监控,也是AbstractExecutorService的子类,主要引入了“工作窃取”机制,在多CPU计算机上处理性能更佳。
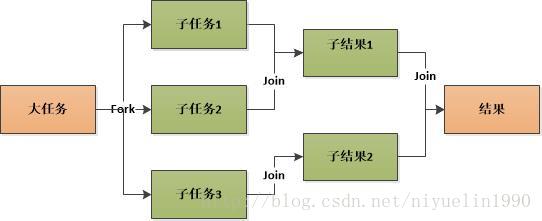
ForkJoinTask:我们要使用ForkJoin框架,必须首先创建一个ForkJoin任务。它提供在任务中执行fork()和join()操作的机制,通常情况下我们不需要直接继承ForkJoinTask类,而只需要继承它的子类,Fork/Join框架提供了以下两个子类:
RecursiveAction:用于没有返回结果的任务。
RecursiveTask :用于有返回结果的任务。测试代码:com.ymy.boot.thread.ComputedTask
/**
 * ForkJoinPool: 分支合并(多线程计算 ==> 合并计算结果)
 * 案例: 计算 1-100 的和, 多线程计算然后分支合并
 *
 * @author Ringo
 * @date 2021/4/17 21:36
 */
public class ForkJoinPoolDemo {
    public static void main(String[] args) throws Exception {
        ForkJoinPool forkJoinPool = new ForkJoinPool();

        // Future 获得计算结果
        Future<Integer> future = forkJoinPool.submit(new ComputedTask(1, -2));
        System.out.println(future.get());
    }
}

/**
 * 分支计算 1-50、51-100的和然后合并
 *
 * @author Ringo
 * @date 2021/4/17
 */
class ComputedTask extends RecursiveTask<Integer> {
    private int start; // 开始
    private int end; // 结束
    private int result; // 结果

    // 分支计算的阈值(数量 < 10个就直接 for 循环计算)
    private int threshold = 10;

    // 构造方法
    public ComputedTask(int start, int end) {
        if (start > end) {
            this.start = end;
            this.end = start;
            return;
        }
        this.start = start;
        this.end = end;
    }

    @Override
    protected Integer compute() {
        if (end - start <= threshold) {
            for (int i = start; i <= end; i++) {
                result += i;
            }
            return result;
        }

        // 分成两个任务
        int mid = (start + end) / 2;
        ComputedTask task1 = new ComputedTask(start, mid);
        ComputedTask task2 = new ComputedTask(mid + 1, end);

        // 开一个新线程计算 task1
        task1.fork();

        // 使用本线程计算 task2
        Integer task2Res = task2.compute();
        return task1.join() + task2Res;
    }
}(1)4种创建异步操作的方法
// CompletableFuture 类


// 1: 支持返回值
public static <U> CompletableFuture<U> supplyAsync(Supplier<U> supplier);
public static <U> CompletableFuture<U> supplyAsync(Supplier<U> supplier,
                                                   Executor executor);
// 2: runAsync 不支持返回值
public static CompletableFuture<Void> runAsync(Runnable runnable);
public static CompletableFuture<Void> runAsync(Runnable runnable,
                                                   Executor executor);
没有指定Executor的方法会使用 ForkJoinPool.commonPool() 作为它的线程池执行异步代码。如果指定线程池,则使用指定的线程池运行。以下所有的方法都类同。
(2)有返回值案例
public static void supplyAsync() throws Exception {
    CompletableFuture<Integer> future = CompletableFuture.supplyAsync(() -> 10);
    System.out.println(future.get());
}
(3)无返回值
public static void runAsync() throws Exception {
    // 1: 创建线程池
    ExecutorService threadPool = new ThreadPoolExecutor(1, Runtime.getRuntime().availableProcessors(),
2, TimeUnit.SECONDS,
new ArrayBlockingQueue<Runnable>(10),
Executors.defaultThreadFactory(), new ThreadPoolExecutor.CallerRunsPolicy());

    // 2: 无返回值异步回调
    try {
        CompletableFuture<Void> future = CompletableFuture.runAsync(() -> {
            System.out.println("runAsync()...");
        }, threadPool);

        System.out.println(future.get());
    } finally {
        threadPool.shutdown();
    }
}当CompletableFuture的计算结果完成,或者抛出异常的时候,可以执行特定的Action。
主要是下面的方法:
// 1: 执行当前任务的线程执行继续执行 whenComplete 的任务
public CompletableFuture<T> whenComplete(BiConsumer<? super T,? super Throwable> action);

// 2: 是执行把 whenCompleteAsync 这个任务继续提交给线程池来进行执行
public CompletableFuture<T> whenCompleteAsync(BiConsumer<? super T,? super Throwable> action);

public CompletableFuture<T> whenCompleteAsync(BiConsumer<? super T,? super Throwable> action, Executor executor);

// 3:
public CompletableFuture<T> exceptionally(Function<Throwable,? extends T> fn)案例:
public static void whenComplete() throws Exception {
    Future<Integer> future = CompletableFuture.supplyAsync(() -> 10 / 0)
        // 异步任务无论成功还是异常都会来到这里
        // 成功 t != null; 抛异常 t == null
        .whenCompleteAsync((t, u) -> {
            if (t != null)
                System.out.println("执行完成\t" + 10);
        })
        // 异步任务执行结果出现异常就会进入到这里
        .exceptionally(throwable -> {
            System.out.println("执行出现了异常...");
            return 8848;
        });
    System.out.println(future.get());
}当一个线程依赖另一个线程时,可以使用 thenApply 方法来把这两个线程串行化。
public <U> CompletableFuture<U> thenApply(Function<? super T,? extends U> fn);
public <U> CompletableFuture<U> thenApplyAsync(Function<? super T,? extends U> fn);
public <U> CompletableFuture<U> thenApplyAsync(Function<? super T,? extends U> fn, Executor executor);
public static void thenApply() throws Exception {
CompletableFuture<Integer> future = CompletableFuture.supplyAsync(() -> 10)
.thenApplyAsync(t -> ++t)
.whenCompleteAsync((t, u) -> {
if (t != null)
System.out.println("执行结果: " + t);
}).exceptionally(exception -> 8848);
System.out.println(future.get());
}handle 是执行任务完成时对结果的处理。 handle 方法和 thenApply 方法处理方式基本一样。不同的是 handle 是在任务完成后再执行,还可以处理异常的任务。thenApply 只可以执行正常的任务,任务出现异常则不执行 thenApply 方法
public <U> CompletionStage<U> handle(BiFunction<? super T, Throwable, ? extends U> fn);
public <U> CompletionStage<U> handleAsync(BiFunction<? super T, Throwable, ? extends U> fn);
public <U> CompletionStage<U> handleAsync(BiFunction<? super T, Throwable, ? extends U> fn,Executor executor);
public static void handle() throws Exception {
CompletableFuture<Integer> future = CompletableFuture.supplyAsync(() -> 10)
.thenApplyAsync(t -> ++t)
.whenCompleteAsync((res, ex) -> {
if (res != null)
System.out.println("执行结果: " + res);
})
.handleAsync((res, ex) -> {
System.out.println(ex);
System.out.println(res);
if (ex != null) {
return 8848;
}
return res;
});
System.out.println(future.get());
}(1)thenAccept 接收任务的处理结果,并消费处理,无返回结果。
该方法只是消费执行完成的任务,并可以根据上面的任务返回的结果进行处理。并没有后续的输错操作。
public CompletionStage<Void> thenAccept(Consumer<? super T> action);
public CompletionStage<Void> thenAcceptAsync(Consumer<? super T> action);
public CompletionStage<Void> thenAcceptAsync(Consumer<? super T> action,Executor executor);
(2)thenRun 不关心任务的处理结果,只要上面的任务执行完成,就开始执行 thenAccept 。
该方法同 thenAccept 方法类似。不同的是上个任务处理完成后,并不会把计算的结果传给 thenRun 方法。只是处理玩任务后,执行 thenAccept 的后续操作。
public CompletionStage<Void> thenRun(Runnable action);
public CompletionStage<Void> thenRunAsync(Runnable action);
public CompletionStage<Void> thenRunAsync(Runnable action,Executor executor);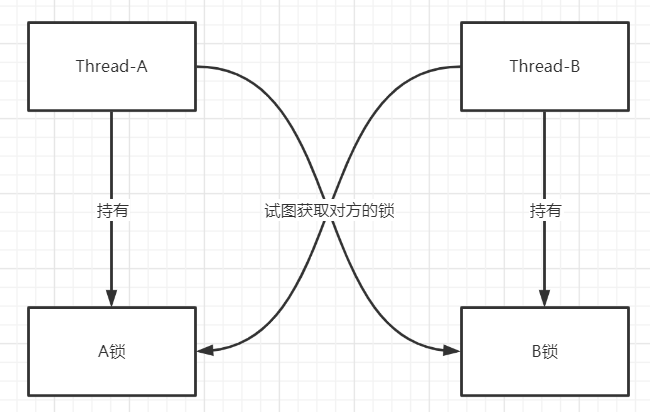
死锁:指两个或两个以上的进程在执行过程中,由于竞争资源或者由于彼此通信而造成的一种阻塞的现象,若无外力作用,它们都将无法推进下去。此时称系统处于死锁状态或系统产生了死锁,这些永远在互相等待的进程称为死锁进程。
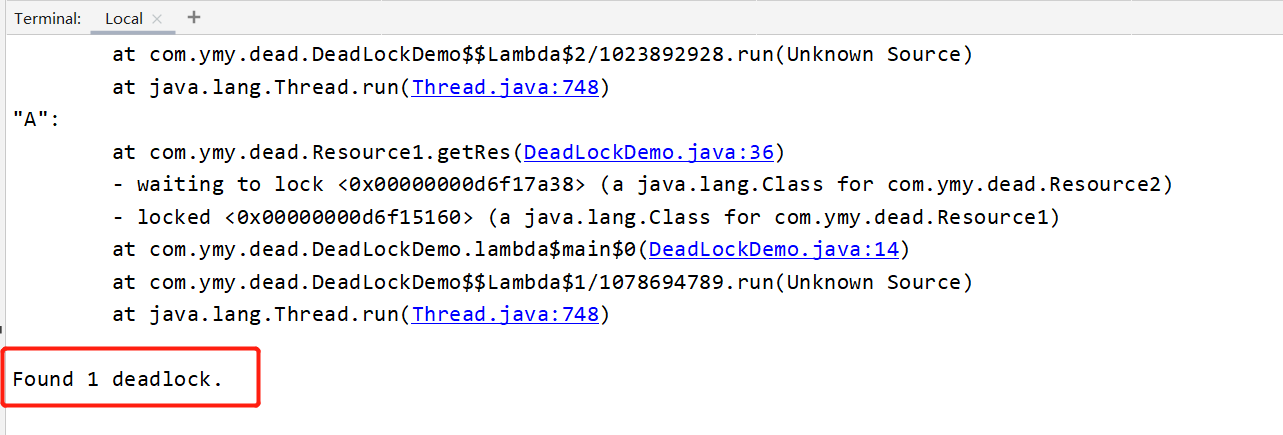
测试代码:com.ymy.boot.deadlock.DeadLockDemo1。
/**
 * 死锁代码
 *
 * @author Ringo
 * @date 2021/4/18 19:21
 */
public class DeadLockDemo1 {
    public static void main(String[] args) {
        // String a = "aaa";
        // String b = "bbb"; // 如果 b = "aaa" 因为是字符串缓冲区 a和b指向同一对象, 同一把锁

        String c = new String("ccc");
        String d = new String("ccc");

        new Thread(() -> {
            synchronized (c) {
                System.out.println(Thread.currentThread().getName() + "\t获取" + a);
                try {
                    TimeUnit.SECONDS.sleep(3);
                } catch (Exception e) {
                    e.printStackTrace();
                }
                synchronized (d) {
                    System.out.println(Thread.currentThread().getName() + "\t获取" + b);
                }
            }
        }, "Thread A").start();

        new Thread(() -> {
            synchronized (d) {
                System.out.println(Thread.currentThread().getName() + "\t获取" + b);
                try {
                    TimeUnit.SECONDS.sleep(3);
                } catch (Exception e) {
                    e.printStackTrace();
                }
                synchronized (c) {
                    System.out.println(Thread.currentThread().getName() + "\t获取" + a);
                }
            }
        }, "Thread B").start();
    }
}step1:使用jps-l定位进程号。 (java ps -l)
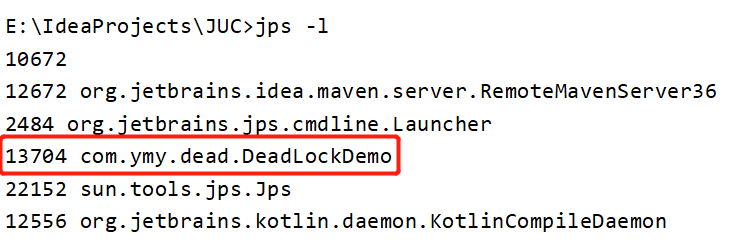
step2: 使用jstack + 进程号 打印堆栈信息。
// 2: 同步代码块源代码
public void set() {
    synchronized (this) {
        System.out.println("Hello World");
    }
}

  // 2: 同步代码块反编译结果
  public void set();
    descriptor: ()V
    flags: ACC_PUBLIC
    Code:
      stack=2, locals=3, args_size=1
         0: aload_0
         1: dup
         2: astore_1
         3: monitorenter	// 进入同步方法
         4: getstatic     #2                  // Field java/lang/System.out:Ljava/io/PrintStream;
         7: ldc           #3                  // String Hello World
         9: invokevirtual #4                  // Method java/io/PrintStream.println:(Ljava/lang/String;)V
        12: aload_1
        13: monitorexit		// 退出同步方法
        14: goto          22
        17: astore_2
        18: aload_1
        19: monitorexit     // 发生异常, 退出同步方法
        20: aload_2
        21: athrow
22: return- 当前线程将试图获取 objectref(即对象锁) 所对应的 monitor 的持有权,当 objectref 的 monitor 的进入计数器为 0,那线程可以成功取得 monitor,并将计数器值设置为 1,取锁成功。
- 如果当前线程已经拥有 objectref 的 monitor 的持有权,那它可以重入这个 monitor ,重入时计数器的值也会加 1。
- 倘若其他线程已经拥有 objectref 的 monitor 的所有权,那当前线程将被阻塞,直到正在执行线程执行完毕,即monitorexit指令被执行,执行线程将释放 monitor(锁)并设置计数器值为0 ,其他线程将有机会持有 monitor 。
- 值得注意的是编译器将会确保无论方法通过何种方式完成,方法中调用过的每条 monitorenter 指令都有执行其对应 monitorexit 指令,而无论这个方法是正常结束还是异常结束。为了保证在方法异常完成时 monitorenter 和 monitorexit 指令依然可以正确配对执行,编译器会自动产生一个异常处理器,这个异常处理器声明可处理所有的异常,它的目的就是用来执行 monitorexit 指令。从字节码中也可以看出多了一个monitorexit指令,它就是异常结束时被执行的释放monitor 的指令。
// 1: 同步方法源代码
public synchronized void get() {
    System.out.println("Hello World");
}

  // 2: 同步方法锁的底层 ACC_SYNCHRONIZED 标志
  public synchronized void get();
    descriptor: ()V
    flags: ACC_PUBLIC, ACC_SYNCHRONIZED
    Code:
      stack=2, locals=1, args_size=1
         0: getstatic     #2                  // Field java/lang/System.out:Ljava/io/PrintStream;
         3: ldc           #3                  // String Hello World
         5: invokevirtual #4                  // Method java/io/PrintStream.println:(Ljava/lang/String;)V
         8: return
      LineNumberTable:
        line 10: 0
line 11: 8-
从字节码中可以看出,synchronized修饰的方法并没有monitorenter指令和monitorexit指令,取得代之的确实是ACC_SYNCHRONIZED标识,该标识指明了该方法是一个同步方法,JVM通过该ACC_SYNCHRONIZED访问标志来辨别一个方法是否声明为同步方法,从而执行相应的同步调用。
-
这便是synchronized锁在同步代码块和同步方法上实现的基本原理。
在Java早期版本中,synchronized属于重量级锁,效率低下,因为监视器锁(monitor)是依赖于底层的操作系统的Mutex Lock来实现的,而操作系统实现线程之间的切换时需要从用户态转换到核心态,这个状态之间的转换需要相对比较长的时间,时间成本相对较高,这也是为什么早期的synchronized效率低的原因。
庆幸的是在Java 6之后Java官方对从JVM层面对synchronized较大优化,所以现在的synchronized锁效率也优化得很不错了,Java 6之后,为了减少获得锁和释放锁所带来的性能消耗,引入了轻量级锁和偏向锁。
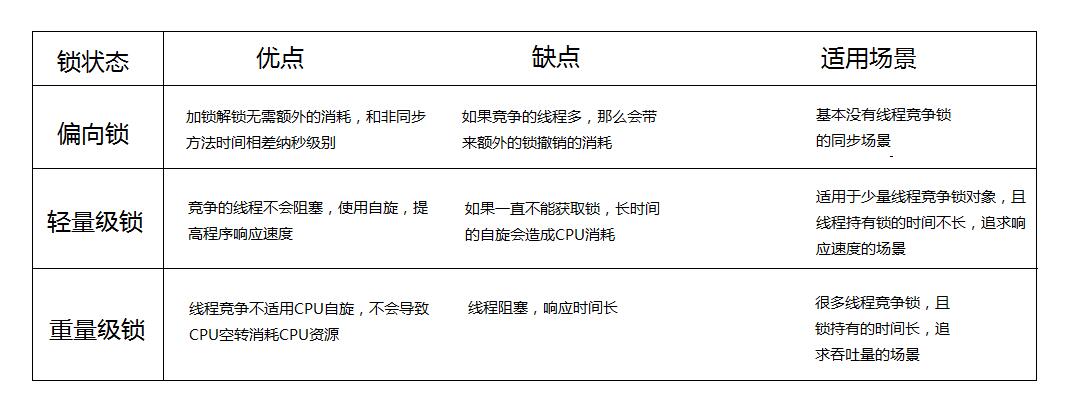
锁的状态总共有四种,无锁状态、偏向锁、轻量级锁和重量级锁。随着锁的竞争,锁可以从偏向锁升级到轻量级锁,再升级的重量级锁,但是锁的升级是单向的,也就是说只能从低到高升级,不会出现锁的降级。
(1)偏向锁
为什么要引入偏向锁? 因为经过HotSpot的作者大量的研究发现,大多数时候是不存在锁竞争的,常常是一个线程多次获得同一个锁,因此如果每次都要竞争锁会增大很多没有必要付出的代价,为了降低获取锁的代价,才引入的偏向锁。
偏向锁的升级:
- 当线程1访问代码块并获取锁对象时,会在java对象头和栈帧中记录偏向的锁的threadID,因为偏向锁不会主动释放锁,因此以后线程1再次获取锁的时候,需要比较当前线程的threadID和Java对象头中的threadID是否一致。
- 如果一致(还是线程1获取锁对象),则无需使用CAS来加锁、解锁;如果不一致(其他线程,如线程2要竞争锁对象,而偏向锁不会主动释放因此还是存储的线程1的threadID),那么需要查看Java对象头中记录的线程1是否存活。
- 如果没有存活,那么锁对象被重置为无锁状态,其它线程(线程2)可以竞争将其设置为偏向锁;如果存活,那么立刻查找该线程(线程1)的栈帧信息,如果还是需要继续持有这个锁对象,那么暂停当前线程1,撤销偏向锁,升级为轻量级锁,如果线程1 不再使用该锁对象,那么将锁对象状态设为无锁状态,重新偏向新的线程。
偏向锁的取消: 偏向锁是默认开启的,而且开始时间一般是比应用程序启动慢几秒,如果不想有这个延迟,那么可以使用-XX:BiasedLockingStartUpDelay=0; 如果不想要偏向锁,那么可以通过-XX:-UseBiasedLocking = false来设置。
(2)轻量级锁
为什么要引入轻量级锁? 轻量级锁考虑的是竞争锁对象的线程不多,而且线程持有锁的时间也不长的情景。因为阻塞线程需要CPU从用户态转到内核态,代价较大,如果刚刚阻塞不久这个锁就被释放了,那这个代价就有点得不偿失了,因此这个时候就干脆不阻塞这个线程,让它自旋这等待锁释放。
轻量级锁什么时候升级为重量级锁? 如果在线程1复制对象头的同时(在线程1 CAS之前),线程2也准备获取锁,复制了对象头到线程2的锁记录空间中,但是在线程2 CAS的时候,发现线程1已经把对象头换了,线程2的CAS失败,那么线程2就尝试使用自旋锁来等待线程1释放锁。 但是如果自旋的时间太长也不行,因为自旋是要消耗CPU的,因此自旋的次数是有限制的,比如10次或者100次,如果自旋次数到了线程1还没有释放锁,或者线程1还在执行,线程2还在自旋等待,这时又有一个线程3过来竞争这个锁对象,那么这个时候轻量级锁就会膨胀为重量级锁。重量级锁把除了拥有锁的线程都阻塞,防止CPU空转。
注意:为了避免无用的自旋,轻量级锁一旦膨胀为重量级锁就不会再降级为轻量级锁了;偏向锁升级为轻量级锁也不能再降级为偏向锁。一句话就是锁可以升级不可以降级,但是偏向锁状态可以被重置为无锁状态。
(1)锁粗化:
按理来说,同步块的作用范围应该尽可能小,仅在共享数据的实际作用域中才进行同步,这样做的目的是为了使需要同步的操作数量尽可能缩小,缩短阻塞时间,如果存在锁竞争,那么等待锁的线程也能尽快拿到锁。 但是加锁解锁也需要消耗资源,如果存在一系列的连续加锁解锁操作,可能会导致不必要的性能损耗。 锁粗化就是将多个连续的加锁、解锁操作连接在一起,扩展成一个范围更大的锁,避免频繁的加锁解锁操作。
(2)锁消除:
可以简单理解为当某段代码即将第一次被执行时进行编译,又称即时编译,通过对运行上下文的扫描,经过逃逸分析,去除不可能存在共享资源竞争的锁,通过这种方式消除没有必要的锁,可以节省毫无意义的请求锁时间。
sleep()和wait()方法都是Java中造成线程阻塞的方法,都会释放 CPU 的执行权。
不同之处在于:
1、sleep是 Thread 的方法,但是wait是 Object 中的方法。
2、sleep方法不会释放lock,但是wait会释放,而且会加入到等待队列中。
3、sleep方法不依赖于synchronized,但是 wait 需要依赖 synchronized 关键字。
4、sleep不需要被唤醒(休眠之后退出阻塞),但是wait需要(不指定时间需要被别人中断)被 notify 唤醒。
线程中断即线程运行过程中被其他线程给打断了,它与 stop 最大的区别是:stop 是由系统强制终止线程,而线程中断则是给目标线程发送一个中断信号,如果目标线程没有接收线程中断的信号并结束线程,线程则不会终止,具体是否退出或者执行其他逻辑由目标线程决定。
// Thread 类

/**
 * 1: 中断当前线程(只有当前线程可以中断自己)
 * current thread 处于阻塞状态(Object#wait()、Thread#join()、Thread#sleep()),
 * 中断状态会被清除, 然后抛出 InterruptedException。
 */
public void interrupt();


// 2: 判断当前线程是否已经被中断 true: 被中断; false: 没有被中断
// 当第一次调用 interrupted() 的时候, 会清除中断状态
// 第二次再调用的时候就会返回 false, 除非在第二次调用之前又被中断了
public static boolean interrupted();

// 3: 判断当前线程是否已经被中断(不会清除中断状态)
public boolean isInterrupted();(1)中断失败: 没有接收中断信息
public static void test1() {
    Thread thread = new Thread(() -> {
        while (true) {
            Thread.yield();
        }
    });
    thread.start();
    thread.interrupt();
}
请问示例1中的线程会被中断吗?
答案:不会,因为虽然给线程发出了中断信号,但程序中并没有响应中断信号的逻辑,所以程序不会有任何反应。
(2)中断成功
public static void test2() {
    Thread thread = new Thread(() -> {
        while (true) {
            Thread.yield();

            // 响应中断
            // 或者 if (Thread.interrupted())
            if (Thread.currentThread().isInterrupted()) {
                System.out.println("响应中断, 程序退出...");
                return;
            }
        }
    });
    thread.start();
    thread.interrupt();
}(3)中断成功:阻塞时被中断,会清除中断状态,需要手动发出中断信号。
public static void test3() {
    Thread thread = new Thread(() -> {
        try {
            Thread.sleep(3000);
        } catch (InterruptedException e) {
            // 已经清除中断状态了
            System.out.println("sleep时被中断..");
            // 手动发起中断信号
            Thread.currentThread().interrupt();
        }

        while (true) {
            Thread.yield();
            // 响应中断
            // 或者 if (Thread.interrupted())
            if (Thread.currentThread().isInterrupted()) {
                System.out.println("响应中断, 程序退出...");
                return;
            }
        }
    });
    thread.start();
    thread.interrupt();
}
只是在 sleep() 方法被中断并清除标记后手动重新中断当前线程,然后程序接收中断信号返回退出。
LockSupport 是用来创建锁和其他同步类的基本线程阻塞原语。
LockSupport 中的 park() 和 unpark() 的作用分别是 阻塞线程 和 解除阻塞线程。
测试代码:com.ymy.boot.aqs.WaitNotifyRestrictDemo。
(1)wait-notify不能脱离synchronized而运行,否则会抛出异常。
// wait-notify 必须配合 synchronized 一起使用
java.lang.IllegalMonitorStateException
(2)notify 放在 wait 前面,程序无法唤醒线程。所以,先 wait 再 notify 才 OK。
测试代码:com.ymy.boot.aqs.AwaitSignalRestrictDemo。
(1)await-signal 不能脱离 lock-unlock 而运行,否则会抛异常。
// await-signal 必须 配置 lock()、unlock() 一起使用
java.lang.IllegalMonitorStateException
(2)await 必须在 signal 程序才正常运行。
传统的 synchronized 和 Lock 实现 Thread 的等待唤醒约束:
- 线程必须要先获得并且持有锁,必须在同步方法(synchronized或lock)中。
- 必须要先等待后唤醒,线程才能够被唤醒。
(1)API。
// LockSuppot 类

// 1: 阻塞线程
public static void park(Object blocker);

// 2: 接触阻塞线程
// 如果 unpark() 在 park(t1) 之前执行,下一次 t1 调用 park()无需阻塞直接通行
public static void unpark(Thread thread);(2)测试代码:com.ymy.boot.aqs.LockSupportDemo。
/**
 * LockSupport:
 * 1. 只阻塞和唤醒线程, 不用先拿到锁
 * 2. park(): 阻塞线程; unPark(): 解除线程阻塞
 * 3. park() unPark() 没有先后顺序
 *
 * @author Ringo
 * @date 2021/4/19 16:59
 */
public class LockSupportDemo {

    public static void main(String[] args) {

        String a = "123";

        Thread t1 = new Thread(() -> {
            try {
                TimeUnit.SECONDS.sleep(3);
            } catch (InterruptedException e) {
                e.printStackTrace();
            }
            System.out.println(Thread.currentThread().getName() + "\t park...");
            LockSupport.park(a);
            // LockSupport.park(a); 连续调用两次会阻塞
            System.out.println("a: " + a);
        }, "t1");

        t1.start();

        Thread t2 = new Thread(() -> {
            LockSupport.unpark(t1);
            System.out.println(Thread.currentThread().getName() + "\t unPark...");
        }, "t2");

        t2.start();
    }
}输出结果:
t2	 unPark...
t1	 park...
a: 123每个线程使用 LockSupport 都有一个许可证(Permit)关联。
Permit 相当于只有1,0的开关,默认是0。
LockSupport 提供 park() 和 unpark() 方法实现线程的阻塞和唤醒过程:
- 调用一次 unpark(),Permit就会加1变成1。
- 调用一次 park(),Permit就会减1变成0(Permit被消费)。
- 如果再次调用 park() 线程就会阻塞(因为 Permit 为 0 无法被消费,直到 Permit 变为1),这时调用 unpark() 就可以解除线程阻塞了。
注意:每个线程都有且仅有一个 Permit,重复调用 unpark() 不会累加 Permit。
public class NonReentrantLock {

    private final AtomicBoolean locked = new AtomicBoolean(false);

    private final Queue<Thread> waiters = new ConcurrentLinkedQueue<>();

    /**
     * 加锁
     *
     * @author Ringo
     * @date 2021/4/19
     */
    public void lock() {
        boolean wasInterrupted = false;
        Thread current = Thread.currentThread();
        waiters.add(current);

        // Block while not first in queue or cannot acquire lock
        // 1. not first in queue: 排队还没有轮到 current thread
        // 2. cannot acquire lock: 前一个 thread 还没有释放锁
        while (waiters.peek() != current || !locked.compareAndSet(false, true)) {
            LockSupport.park(this);    // 线程阻塞, 在这里候着
            if (Thread.interrupted())
                wasInterrupted = true;
        }

        waiters.remove();

        if (wasInterrupted)
            current.interrupt();
    }

    /**
     * 解锁
     *
     * @author Ringo
     * @date 2021/4/19
     */
    public void unlock() {
        // 1: 解锁的时候, 一个线程用完之后才解锁, 不存在竞争关系
        locked.set(false);

        // 2: 队头线程解除阻塞
        LockSupport.unpark(waiters.peek());
    }
}(1)类继承图

(2)AQS整体架构图
(3)ReentrantLock实现流程图
static final class Node {
    /*********** 1: 结点模式 ***********/
    /** Marker to indicate a node is waiting in shared mode */
    // 用于指示节点正在共享模式下等待的标记
    static final Node SHARED = new Node();

    /** Marker to indicate a node is waiting in exclusive mode */
    // 用于指示节点正在独占模式下等待的标记
    static final Node EXCLUSIVE = null;

    /*********** 2: 线程 waitStatus ***********/
    /** waitStatus value to indicate thread has cancelled */
    // waitStatus值,指示线程已取消
    static final int CANCELLED =  1;

    /** waitStatus value to indicate successor's thread needs unparking */
    // waitStatus == -1 表示 后续线程需要 unpark()
    static final int SIGNAL    = -1;

    /** waitStatus value to indicate thread is waiting on condition */
    // waitStatus == -2 表示 线程在条件下等待
    static final int CONDITION = -2;


    /***********3: Node结点的属性 ***********/
    // 当前结点中线程的等待状态
    // waitStatus = 0 表示资源空闲, 无人占用
    volatile int waitStatus;

    // 前一个结点
    volatile Node prev;

    // 后一个结点
    volatile Node next;

    // 保存的线程
    volatile Thread thread;

    // 当前结点的模式(共享:排他?)
    Node nextWaiter;

    /***********4: 构造方法 ***********/
    // waitStatus = 0,  thread = null 的构造方法
    Node() {    // Used to establish initial head or SHARED marker
    }

    Node(Thread thread, Node mode) {     // Used by addWaiter
        this.nextWaiter = mode;
        this.thread = thread;
    }

    Node(Thread thread, int waitStatus) { // Used by Condition
        this.waitStatus = waitStatus;
        this.thread = thread;
    }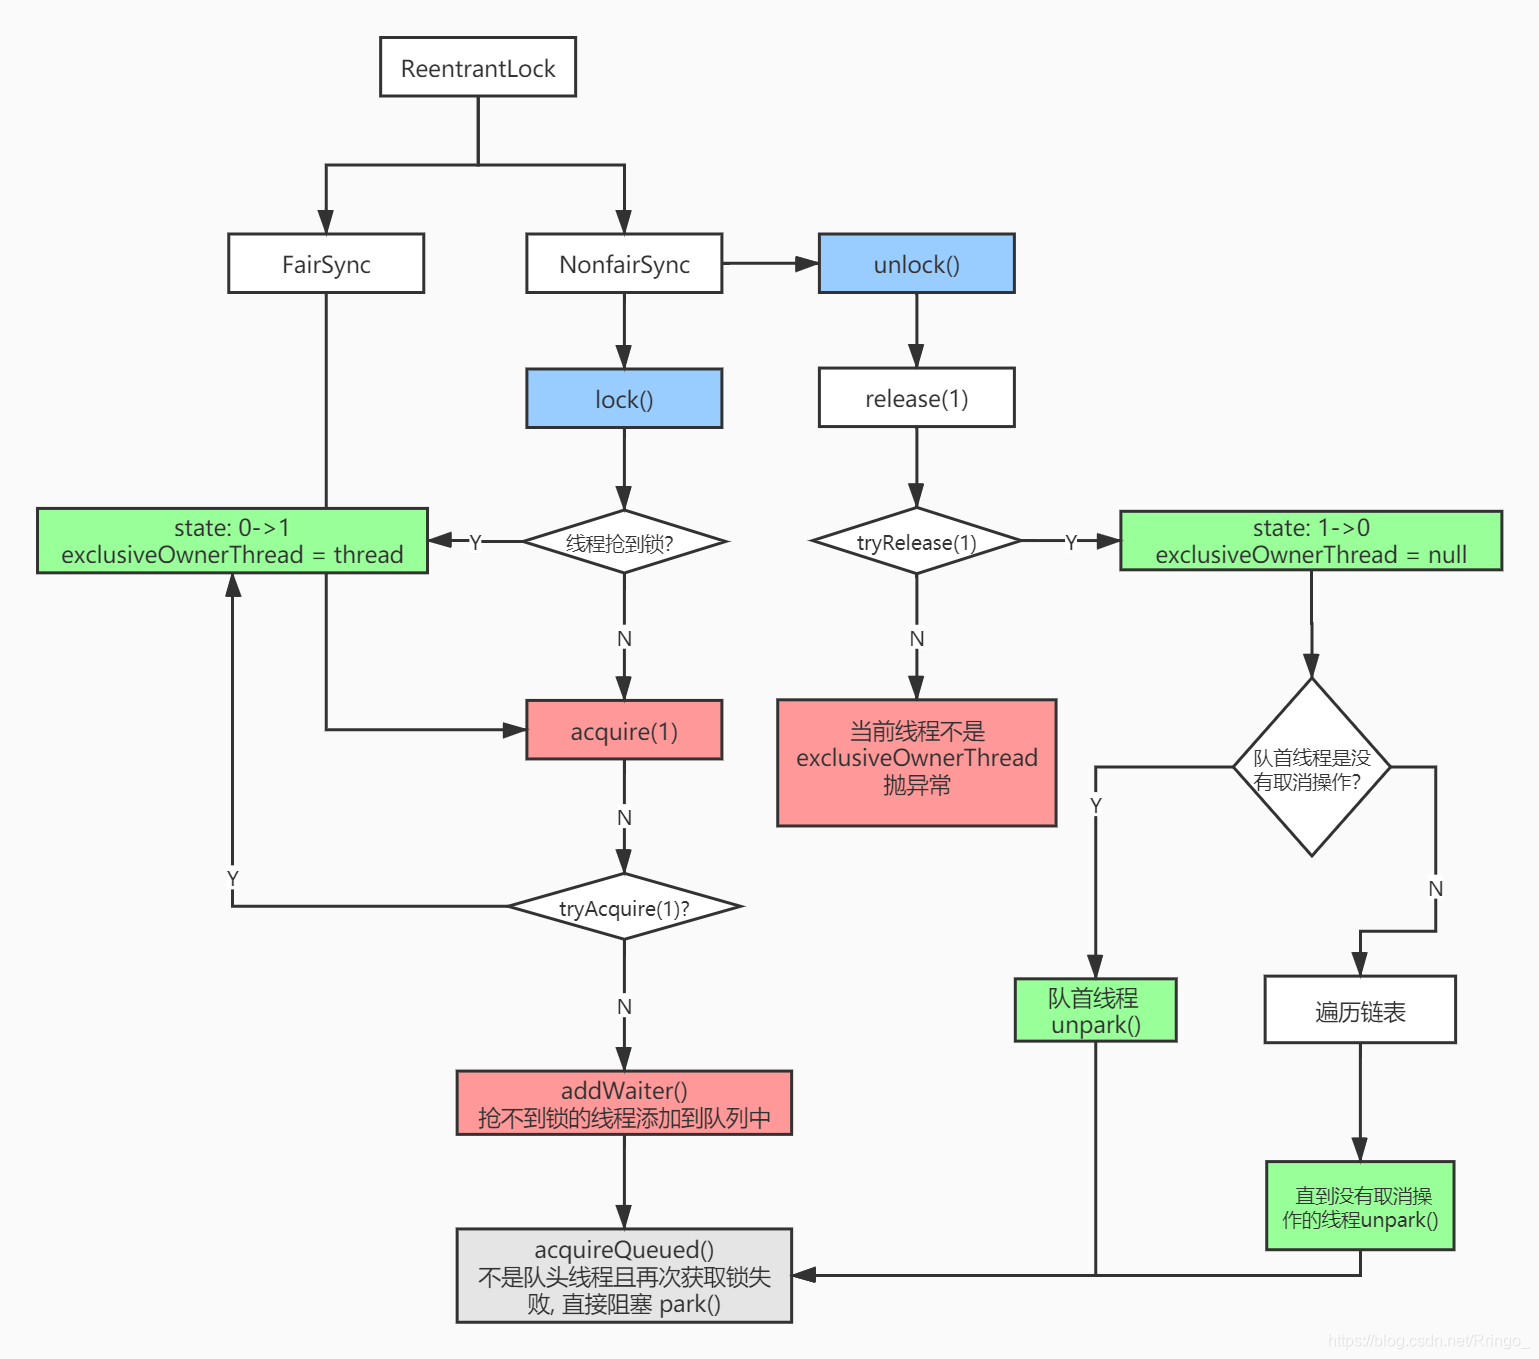
}// acquire() 方法中包含4个方法
// 1: tryAcquire(1): 尝试获取锁。
// 返回ture, 并且将 state 设置为 1, 后面不用执行了。
// 返回false, 表示当前线程没有抢到锁, 执行下面逻辑。
// 2: addWaiter(Node.EXCLUSIVE): 将当前线程加入到队列中。
// 如果队列不存在, 先创建队列, head tail 都指向头结点(占位符),然后尾插法入队
// 队列存在, 链表的尾插法入队
// 3: acquireQueued(final Node node, int arg):
// 作用: 阻塞线程、返回是否中断、当前线程位于队头时不断尝试获取资源
// 如果当前结点的前一个结点是占位结点(当前结点是队首结点), 再次尝试获取锁
// 尝试索取锁失败,则 park() 阻塞线程, 在这里等候 ===> 注意, 这里是自旋锁!unpark()后继续执行
// 4: selfInterrupt(): 线程没有抢到锁, 并且收到中断信号, 当前线程 直接中断。
public final void acquire(int arg) {
if (!tryAcquire(arg) &&
acquireQueued(addWaiter(Node.EXCLUSIVE), arg))
selfInterrupt();
}// tryAcquire(1): 尝试获取锁
// 1: 非公平锁
protected final boolean tryAcquire(int acquires) {
return nonfairTryAcquire(acquires);
}
final boolean nonfairTryAcquire(int acquires) {
final Thread current = Thread.currentThread();
int c = getState();
// c == 0 表示资源空闲,当前线程可以去竞争资源
if (c == 0) {
if (compareAndSetState(0, acquires)) {
setExclusiveOwnerThread(current); // 当前线程获取到资源,保存当前线程
return true;
}
}
// c !=0 表示资源被占用。但是, 占用资源的线程又来申请这个资源(重入锁)
else if (current == getExclusiveOwnerThread()) {
int nextc = c + acquires; // state + 1
if (nextc < 0) // overflow
throw new Error("Maximum lock count exceeded");
setState(nextc);
return true;
}
// tryAcquire 当前线程尝试获取资源失败
return false;
}
// 2: 公平锁
protected final boolean tryAcquire(int acquires) {
final Thread current = Thread.currentThread();
int c = getState();
if (c == 0) {
// 这里和非公平锁不一样
if (!hasQueuedPredecessors() &&
compareAndSetState(0, acquires)) {
setExclusiveOwnerThread(current);
return true;
}
}
else if (current == getExclusiveOwnerThread()) {
int nextc = c + acquires;
if (nextc < 0)
throw new Error("Maximum lock count exceeded");
setState(nextc);
return true;
}
return false;
}
// 等待队列为空 / 当前线程是等待队列中的第一个 才有资格去争抢资源
public final boolean hasQueuedPredecessors() {
// The correctness of this depends on head being initialized
// before tail and on head.next being accurate if the current
// thread is first in queue.
Node t = tail; // Read fields in reverse initialization order
Node h = head;
Node s;
return h != t &&
((s = h.next) == null || s.thread != Thread.currentThread());
}// addWaiter(Node node): 没有拿到锁的线程加入到队列中
private Node addWaiter(Node mode) {
Node node = new Node(Thread.currentThread(), mode);
// Try the fast path of enq; backup to full enq on failure
Node pred = tail;
// 队列已经存在了,直接尾插法加入到队列中即可
if (pred != null) {
node.prev = pred;
if (compareAndSetTail(pred, node)) {
pred.next = node;
return node;
}
}
// 等待队列还没有初始化, 初始化队列, 然后将当前线程插入到队列尾部
enq(node);
return node;
}
private Node enq(final Node node) {
// 自旋锁机制, 既可以创建头结点(占位符), 还可以插入新的结点
for (;;) {
Node t = tail;
// 头结点(占位符不存在就要创建)
if (t == null) { // Must initialize
// 期望是 null, 然后添加头结点(占位符)
// new Node() 其中 waitStatus = 0, thread = null ==> 工具人本质
if (compareAndSetHead(new Node()))
tail = head;
} else {
node.prev = t;
if (compareAndSetTail(t, node)) {
t.next = node;
return t;
}
}
}
}
// 创建头结点的方法, 期望头结点是 null, 然后 CAS 添加
private final boolean compareAndSetHead(Node update) {
return unsafe.compareAndSwapObject(this, headOffset, null, update);
}// park() 线程
// 不断获取锁
// 检查是否发生中断
final boolean acquireQueued(final Node node, int arg) {
boolean failed = true;
try {
boolean interrupted = false;
// 注意: 这里是自旋
for (;;) {
final Node p = node.predecessor();
// p == head 表示 p 是工具人结点, 即 node 代表队首结点
// node是队首结点, 当前线程就可以尝试获取锁
if (p == head && tryAcquire(arg)) {
// 当前结点抢到锁, 之前的头结点(占位符)就要被释放,
// 当前结点就变成了头结点(占位符)
setHead(node);
p.next = null; // help GC
failed = false;
return interrupted;
}
// 获取锁失败,当前线程就要被阻塞了
if (shouldParkAfterFailedAcquire(p, node) &&
parkAndCheckIn terrupt())
interrupted = true;
}
} finally {
if (failed)
cancelAcquire(node);
}
}
// 要把 node 前边的结点 waitStatus 设置为 -1 ==> 后续线程需要 unpark() 该 park() 了
private static boolean shouldParkAfterFailedAcquire(Node pred, Node node) {
int ws = pred.waitStatus;
if (ws == Node.SIGNAL)
/*
* This node has already set status asking a release
* to signal it, so it can safely park.
*/
return true;
// 前一个结点取消争抢资源了
if (ws > 0) {
/*
* Predecessor was cancelled. Skip over predecessors and
* indicate retry.
*/
do {
node.prev = pred = pred.prev;
} while (pred.waitStatus > 0);
pred.next = node;
} else {
/*
* waitStatus must be 0 or PROPAGATE. Indicate that we
* need a signal, but don't park yet. Caller will need to
* retry to make sure it cannot acquire before parking.
*/
compareAndSetWaitStatus(pred, ws, Node.SIGNAL);
}
return false;
}
// 由于线程抢了多次, 没有抢到资源, park() 当前线程阻塞
private final boolean parkAndCheckInterrupt() {
LockSupport.park(this); // 线程阻塞, 停在这里等候
return Thread.interrupted(); // 查看线程是否被中断
}假设这样的情景:state代表银行服务窗口,当 state=0 时,表示窗口没人,state = 1时,表示窗口有人。
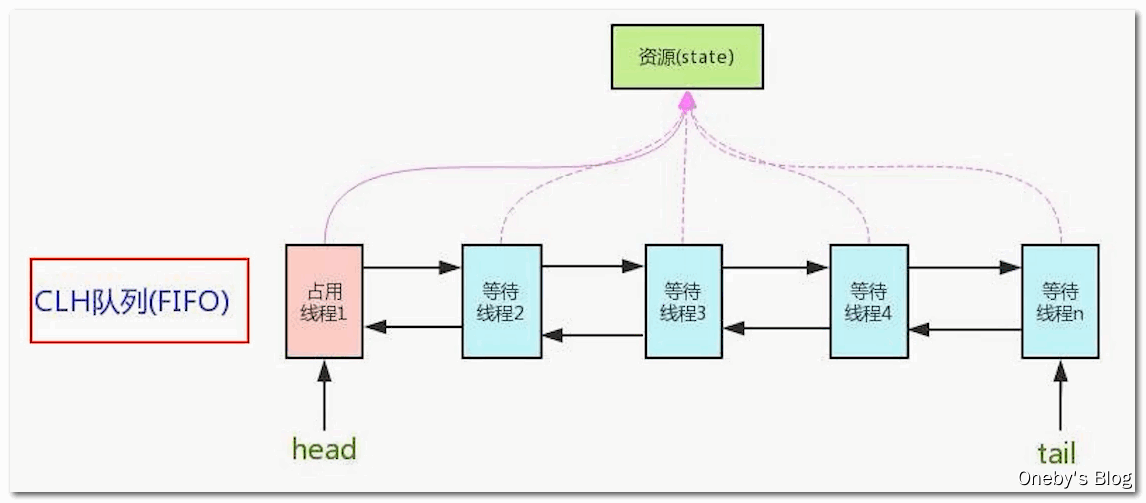
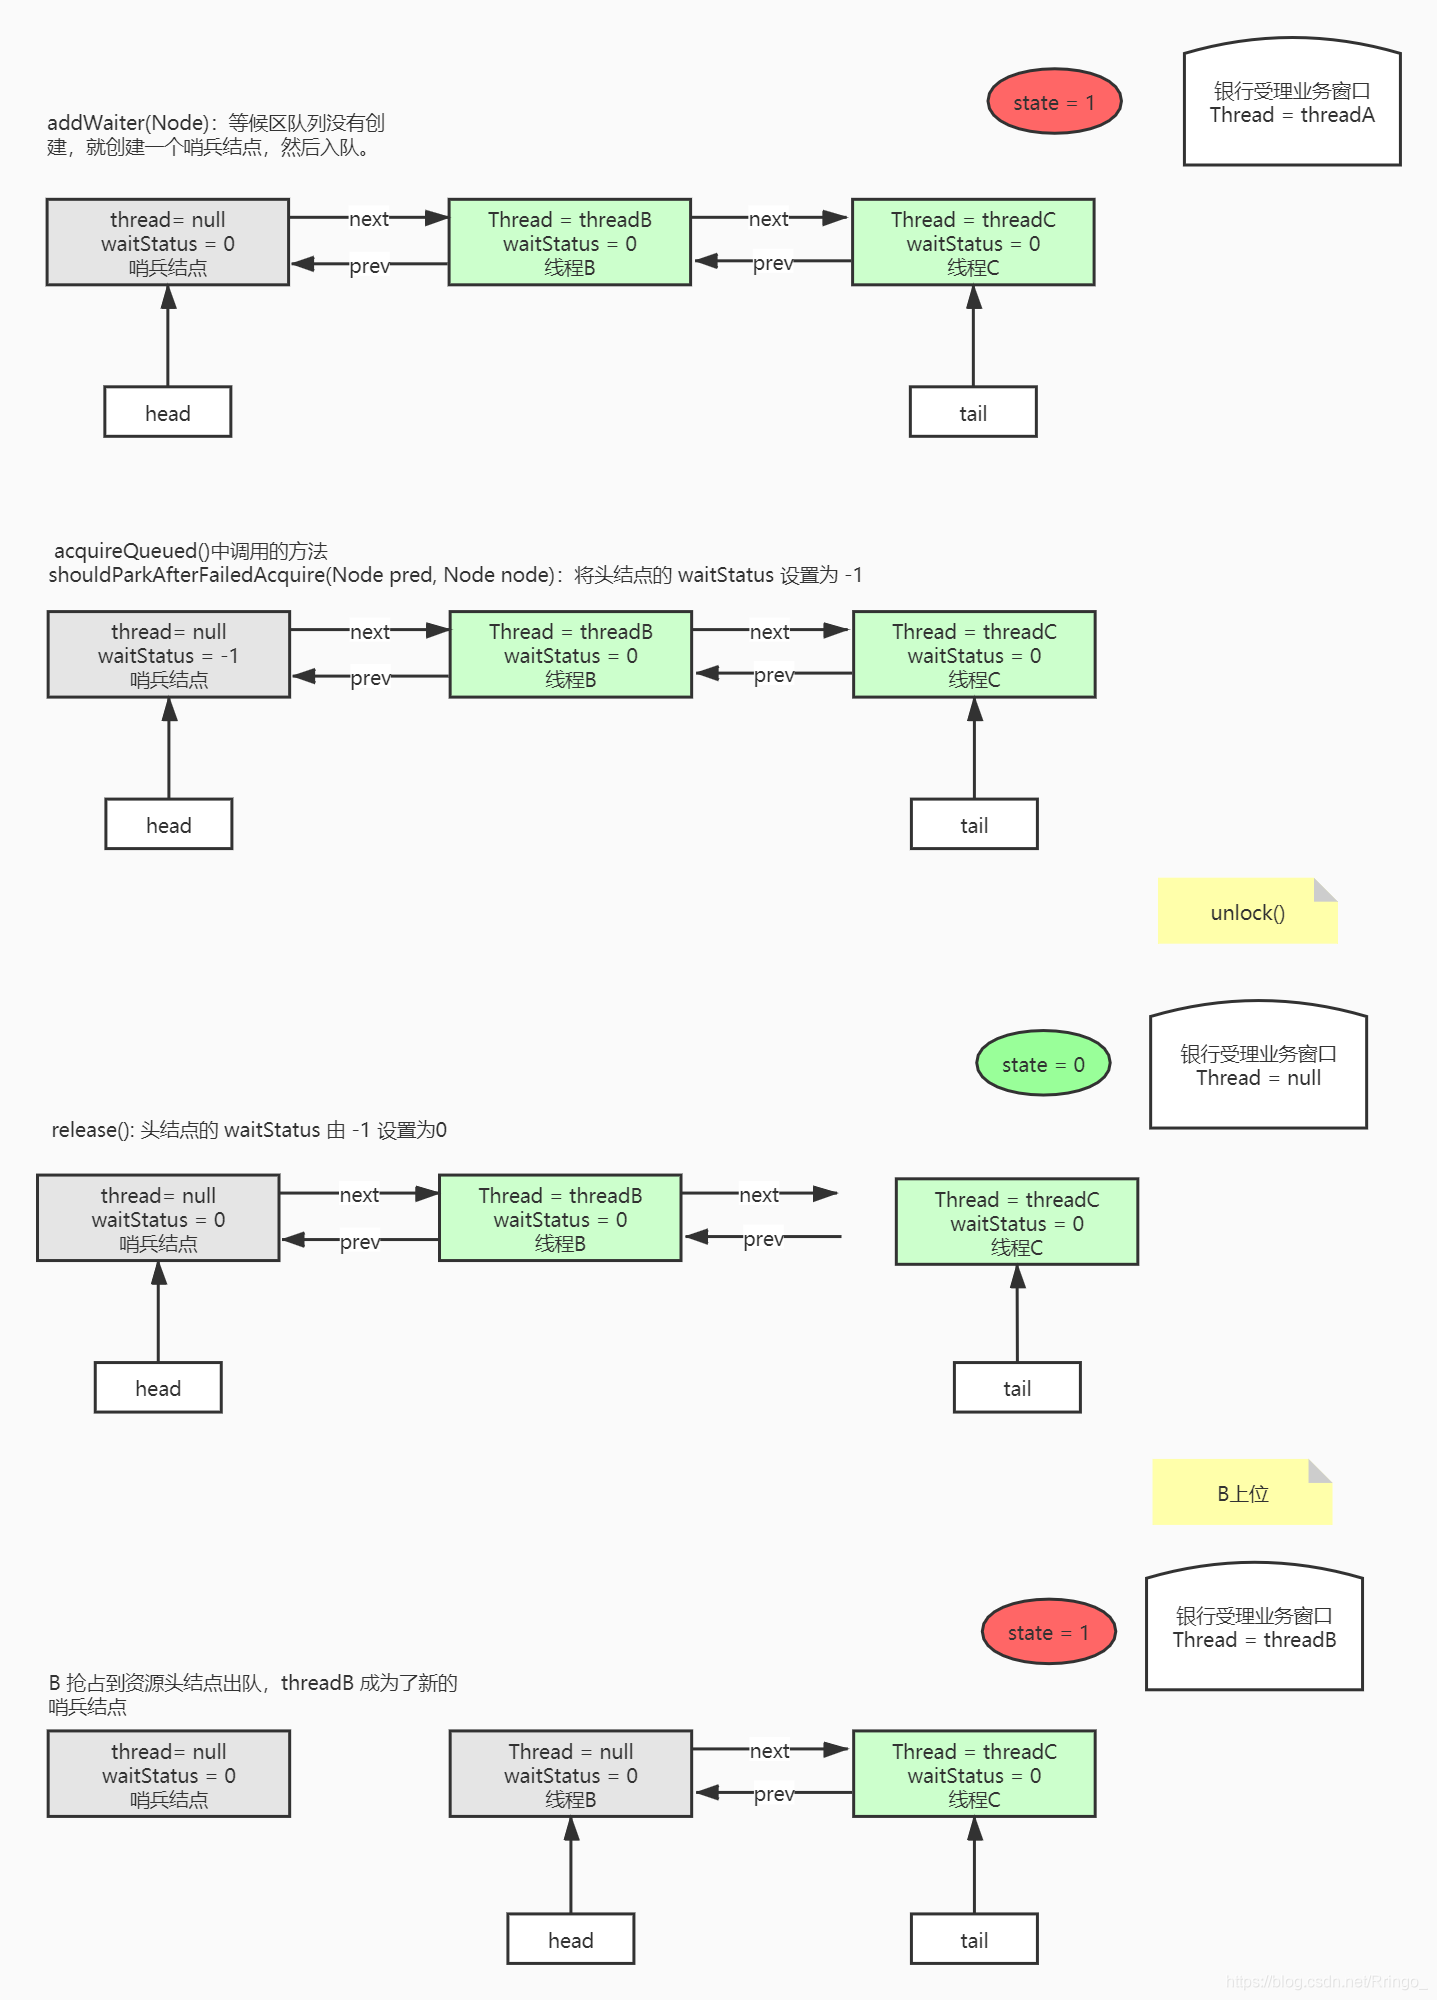
A, B两个人同时来到窗口前,但是 A 先获得服务,服务窗口将 state 设置为1,并且保存 A 的信息,展示在显示屏上 "银行窗口正在为 A 顾客提供服务"。A 办完业务后,说等等我还有事情要做,于是 A 又坐下继续办理业务 state 又会加1(可重入锁)。
B 这个人先去看一眼 state 是不是 0,看到是 1,就去了候客区(队列没有就创建,然后等待线程入队)。到了候客区的座位那里,他就看站着看自己是不是队列的第一个人,看到自己也不是队首元素,OK死心了,线程阻塞(park, 线程就卡在这里了),等待自己被叫号(unpark)。
候客区的第一个人会不停的去看 state 是不是 0,等待争抢服务窗口。
以后再来的人,第一反应不是先去排队,而是看服务窗口有没有人占用,有人占用才去乖乖排队。
这就是非公平锁机制,先争抢再排队。
// ReentrantLock#unlock()
public void unlock() {
    sync.release(1);
}

// release(1)
public final boolean release(int arg) {
    if (tryRelease(arg)) {
        Node h = head;
        if (h != null && h.waitStatus != 0)
            unparkSuccessor(h);
        return true;
    }
    return false;
}

// tryRelease(1)
// 释放资源
protected final boolean tryRelease(int releases) {
    int c = getState() - releases;
    if (Thread.currentThread() != getExclusiveOwnerThread())
        throw new IllegalMonitorStateException();
    boolean free = false;
    if (c == 0) {
        free = true;
        setExclusiveOwnerThread(null);
    }
    setState(c);
    return free;
}

// unpark 后继线程
private void unparkSuccessor(Node node) {
    /*
     * If status is negative (i.e., possibly needing signal) try
     * to clear in anticipation of signalling.  It is OK if this
     * fails or if status is changed by waiting thread.
     */
    int ws = node.waitStatus;
    if (ws < 0)
        compareAndSetWaitStatus(node, ws, 0);

    /*
     * Thread to unpark is held in successor, which is normally
     * just the next node.  But if cancelled or apparently null,
     * traverse backwards from tail to find the actual
     * non-cancelled successor.
     */
    Node s = node.next;
    if (s == null || s.waitStatus > 0) {
        s = null;
        for (Node t = tail; t != null && t != node; t = t.prev)
            if (t.waitStatus <= 0)
                s = t;
    }
    if (s != null)
        LockSupport.unpark(s.thread);
}
平时我们所用的引用就是强引用。
Object o = new Object();
// 引用 o 指向堆中的Object对象
// 当引用 o 不存在的时候, 堆中的 Object 对象才会变成垃圾扩展:Java回收垃圾可以被追踪,Object类中有 finalize(),每次GC的时候都会调用这个方法。
下面是Demo:
public class M {
    // 重写 finalize()
    @Override
    protected void finalize() throws Throwable {
        System.out.println("finalize..");
        super.finalize();
    }
}
public class NormalReferenceDemo {
public static void main(String[] args) throws Exception {
M m = new M();
m = null;
System.gc(); // JVM会将堆中的对象M回收
// 阻塞 main 线程
System.in.read();
}
}// 运行结果
finalize..问题:
1、为什么案例中要写
System.in.read();,不写会有什么问题?当 main 线程走完之后,JVM全部退出,GC线程也会退出。有可能堆中的对象M还没被回收整个程序就结束了,这种情况下会看不到输出结果。
2、GC调优的场景?
小米遇到的情况:频繁FGC,OOM的情况。
原因:C++程序员转成Java程序员重写了
finalize()方法。(1)为什么C++程序员会重写
finalize()方法? C++需要手动释放内存,认为 Java 的 finalize 可以自动释放内存。
(2)为什么重写
finalize()方法会发生FGC和OOM? 重写的
finalize()中放了耗时的操作,等于延长了对象的生命周期。对象产生的速度快,回收的速度 慢,就会造成OOM。
结论:
- 当堆内存够用时,软引用(前提不是垃圾)不会被GC回收。
- 当内存不够用时,软引用会被GC回收。软引用被GC回收后,堆内存还是不够用,直接OOM。
- 强引用(前提不是垃圾)宁肯OOM,也不会被回收。
注意:
- 软引用只是逻辑上的软,而不是物理上的软软的指向内存。
案例:
step1、设置JVM堆最大空间为20M。
Vm Options: -Xmx20Mstep2、创建软引用,指向10M的byte数组,然后再创建强引用,指向12M的byte数组。
public class SoftReferenceDemo {
    public static void main(String[] args) throws Exception {
        SoftReference<byte[]> m =
                new SoftReference<>(new byte[1024 * 1024 * 10]);

        System.out.println(m.get());            // 拿到字节数组
        System.gc();
        Thread.sleep(500);
        System.out.println(m.get());            // GC之后拿到字节数组

        byte[] b = new byte[1024 * 1024 * 12];  // 堆里再分配15M空间, 显然堆中空间不够
        System.out.println(m.get());            // 拿不到软引用值了
    }
}
// 运行结果
[B@4554617c
[B@4554617c
null
应用场景:
// SoftReference源码 注释
/**
 * Soft reference objects, which are cleared at the discretion of the garbage
 * collector in response to memory demand.  Soft references are most often used
 * to implement memory-sensitive caches.
*/当内存需要的时候,软引用对象会被GC清除。
软引用经常被用于内存敏感的缓存。
public class WeakReferenceDemo {
    public static void main(String[] args) throws Exception {
        WeakReference<M> wf = new WeakReference<>(new M());
        System.out.println(wf.get());
        System.gc();
        Thread.sleep(500);
        System.out.println(wf.get());			// gc之后直接就被回收了
    }
}
// 输出结果
com.ymy.boot.reference.M@4554617c
finalize..
nullPhantomReference
作用:管理直接内存。我们用不到。在 JVM get() 是 获取不到的!
public class ThreadLocalDemo {

    // 创建 ThreadLocal
    private static final ThreadLocal<Person> tl = new ThreadLocal<>();

    public static void main(String[] args) {

        // t1线程 2s 后拿
        new Thread(() -> {
            try {
                Thread.sleep(2000);
            } catch (InterruptedException e) {
                e.printStackTrace();
            }
            System.out.println(tl.get());
        }).start();

        // t2线程 1s 后取
        new Thread(() -> {
            try {
                Thread.sleep(1000);
            } catch (InterruptedException e) {
                e.printStackTrace();
            }
            tl.set(new Person(Thread.currentThread().getName()));
        }).start();
    }

    private static class Person {
        private String name;

        public Person(String name) {
            this.name = name;
        }

        @Override
        public String toString() {
            return "Person{" +
                "name='" + name + '\'' +
                '}';
        }
    }
}
// 运行结果
null一个线程在ThreadLocal中存对象,另一个线程取对象,结果是取不到!
ThreadLocal可以起到线程隔离的作用,和线程进行了绑定。
// ThreadLocal的set()方法
public void set(T value) {
    // 1: 通过当前线程获得 ThreadLocalMap
    Thread t = Thread.currentThread();
    ThreadLocalMap map = getMap(t);

    // 2: ThreadLocal 对象为 key, 案例中的 Person 对象为 value,添加到 ThreadLocalMap 中
    // ThreadLocalMap 是 Thread 类中的一个属性
    if (map != null)
        map.set(this, value);
    else
        createMap(t, value);
}

// ThreadLocal的createMap()方法
void createMap(Thread t, T firstValue) {
    t.threadLocals = new ThreadLocalMap(this, firstValue);
}
// ThreadLocal源码
// ThreadLocalMap 是 ThreadLocal 的静态内部类
// ThreadLocalMap 构造方法
ThreadLocalMap(ThreadLocal<?> firstKey, Object firstValue) {
// ThreadLocalMap 就是用 Entry 数组构成的
table = new Entry[INITIAL_CAPACITY];
int i = firstKey.threadLocalHashCode & (INITIAL_CAPACITY - 1);
table[i] = new Entry(firstKey, firstValue);
size = 1;
setThreshold(INITIAL_CAPACITY);
}
// Entry 是 ThreadLocal 的讲台内部类
// Entry 是自弱引用的子类
static class Entry extends WeakReference<ThreadLocal<?>> {
/** The value associated with this ThreadLocal. */
Object value;
Entry(ThreadLocal<?> k, Object v) {
super(k); // 弱引用中传的 ThreadLocal 对象
value = v;
}
}弱引用指向的是 ThreadLocal 对象,当强引用不再指向 ThreadLocal 对象后,只要遇到GC就会将ThreadLocal对象清理。
当我们将案例中的 tl 设置为 null 的时候,只要触发 GC 创建的 ThreadLocal 对象就会被回收,ThreadLocalMap中的 key 就会变为 null。
假设 ThreadLocalMap 的 Entry 对 ThreadLocal 对象是强引用,需要 ThreadLocalMap 的 key 不使用 ThreadLocal 对象之后,创建的 ThreadLocal 对象才会被GC回收,这就会造成内存泄漏。
内存泄漏(Memory Leak)是指程序中已动态分配的堆内存由于某种原因程序未释放或无法释放,造成系统内存的浪费,导致程序运行速度减慢甚至系统崩溃等严重后果。

注意: tl 对 ThreadLocal 对象是强引用,ThreadLocalMap 中 key 对 ThreadLocal 对象是弱引用,当 tl 设置为 null 时,触发 GC,ThreadLocal 对象会被回收,因此 ThreadLocalMap 中的 key 会变成 null,但是 value 还是强引用的 Person 对象。我们需要手动 remove ThreadLocalMap中的 k-v,将 value 设置为 null,删除 value 对 Person 对象的强引用。