Transmit LDR measurements from an ESP32 to a web socket client, and turn the built-in LED on / off with incoming messages.
Reacting to HTTP requests is useful especially if a computer should trigger something on the ESP32 / Arduino or only needs to get updates from time to time. For transmitting real-time measurements, web sockets are a better alternative, as they have way less overhead than HTTP requests. You can use web sockets to continuously transmit updates, instead of having to query from a client through HTTP requests repeatedly.
You need a compatible ESP32 board (in this case: Wemos / LOLIN D32), a simple LDR sensor with a matching resistor (e.g., 10kΩ) and a local Wi-Fi network you can connect to with both the board and your computer. Create a new project with Visual Studio Code and Platform.IO. Add the “ESP Async WebServer” library by Hristo Gochkov.
The library documentation has more information about handling WebSockets, but it doesn’t contain a simple example that only includes the functionality we require for sending & receiving web socket messages: https://github.com/me-no-dev/ESPAsyncWebServer#async-websocket-plugin
Use an LDR and a suitable resistor (here: 10kΩ, but depends on the datasheet of your resistor). Connect to GND and 3V. Attach the cable for the voltage divider in the middle of the resistor and the LDR to PIN 32.

GPIO Pins on the ESP32: the ESP32 has two analog digital converters (ADCs), which are used for analog-enabled pins:
- ADC1: GPIOs 32-39
- ADC2: GPIOs 0, 2, 4, 12-15, 25-27
WIFI is using ADC2; therefore, it is not possible to execute some (analog) operations on the GPIO pins listed under ADC2 when using WiFi. Use the pins from ADC1 or digital-only pins if you do not require analog functionality. Continue using the setup from the Light Dependent Resistors (LDR) chapter (9). Connect the analog input PIN 32 instead of 25. Also make sure you change the configuration in the code accordingly.
The full code for both the ESP32 as well as the client-side is available here: https://github.com/andijakl/ESP32-WebSockets Make sure you configure the serial port monitor speed to match the configuration in setup(); the example code uses 115200.
The example connects the ESP32 to your existing Wi-Fi network. Enter the credentials at the top of main.cpp. The web server listens on port 80, and the web server connection is made available through the /ws path. This means that if your ESP32 gets IP address 192.168.10.35 assigned, the corresponding path for the web socket transmission is: ws://192.168.10.35/ws
The ESP32 acts as the web socket server. The sample implementation is as simple as possible – it does not manage connected clients or perform authentication, but instead simply broadcasts its LDR measurements to all connected clients. This happens in loop(), where ws.textAll(message) sends a simple string. Alternatives would be binary data transmissions or JSON. However, for early tests, strings are most flexible.
To also enable a channel where clients can configure the ESP32, the example also listens to all incoming messages. The handler-function onWsEvent() is defined in the upper part of main.cpp. The sample focuses on the essential aspects: it simply reads single-part string messages, which is OK in our controlled environment where we only use very short messages. You could extend this function to also show info about connected clients, to handle binary messages or multi-part messages as well.
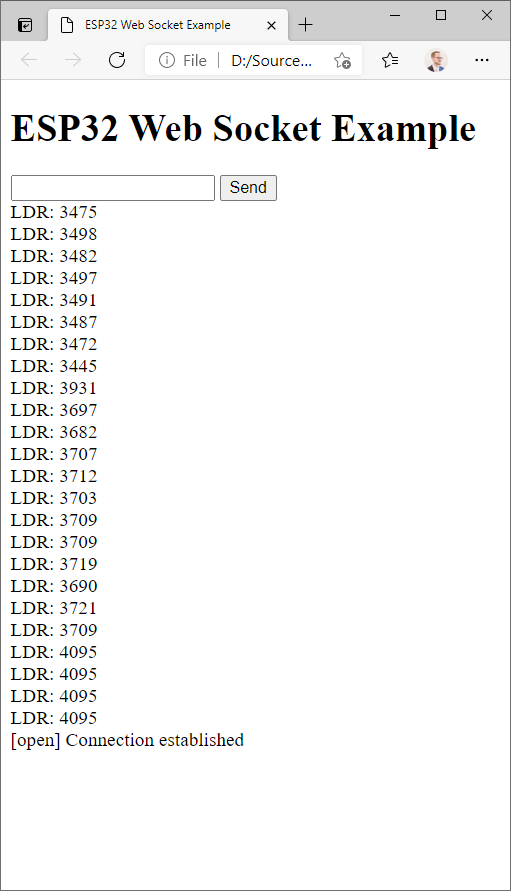
To test the client side, the "WebSocket-JS-Client" folder contains a simple HTML page and a JavaScript file. The HTML defines a short form for entering messages, as well as a div tag that will contain the message data.
In the JavaScript file (ws.js), update the IP address of your ESP32 web socket server. When loading the web page, it automatically attempts to establish a connection. Corresponding status messages will be added to the div tag through the addMessage() convenience function.
The most important function is socket.onmessage(). It gets the data that was sent by the ESP32 and adds it as text to the div tag on the HTML page.
To send data back from the client to the server, a simple HTML form is placed at the top of the HTML page. The submit() handler at the bottom of ws.js reads the entered text and sends the string to the ESP32 through the web socket connection.
To test the visible results, enter either “on” or “off” as text. The code in the ESP32 main.cpp switches the built-in LED on/off accordingly. Note that the comparison is simple, so it is case-sensitive and requires an exact string match.
Compile & upload the code to your ESP32. Check the serial monitor for the successful Wi-Fi connection and its assigned IP address. Then, copy this address to the ws.js file and open index.html in your favorite browser. You should immediately see the LDR measurements arriving on your PC. Enter “on” or “off” and click the button to send messages back to the ESP32 and to control its built-in LED.
Released under the MIT License - see the LICENSE file for details.
Developed by Andreas Jakl, Professor at the St. Pölten University of Applied Sciences, Austria.