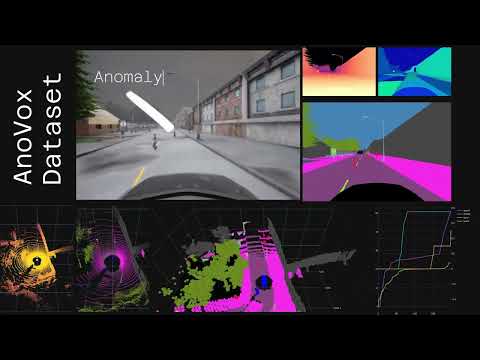
A multimodal benchmark for anomaly detection in autonomous driving.
AnoVox delivers a methodology for generating datasets using the CARLA simulator. AnoVox focuses on creating datasets of abnormal scenarios with rare objects and unusual, unexpected actor behaviors. AnoVox is highly customizable and can be used to create new datasets, e.g., with adapted sensor configurations. Ground truth is provided not only in semantic camera and lidar data but also in spatial voxel representations in order to compare anomaly detection methods based on different sensor modalities.
- Download our custom CARLA 0.9.14 build (Linux only) which has all the necessary assets included
- You need a linux distribution with git, python3, and pip installed. Tested on Ubuntu 20.04 LTS.
- Setup a venv
with
python3 -m venv env - Source the virtual environment with
source env/bin/activate - Update pip with
pip install --upgrade pipand install all necessary packages withpip install -r requirements.txt
The number of scenarios can be customized in Definitions.py using the following parameters:
NBR_OF_SCENARIOS = 1000
"""Number of Scenarios in the desired dataset. Set as you wish."""

USED_MAPS = [
    # "Town01",
    # "Town02",
    # "Town03",
    # "Town04",
    # "Town05",
    # "Town06",
    # "Town07",
    "Town10HD",
]
"""
Towns to be used in the dataset.
Uncomment every Map that should be used in the dataset.

Warning: Do not uncomment more towns than the value of NBR_OF_SCENARIOS.
"""
In the first step, AnoVox generates one scenario configuration JSON file for every used map. The config for each scenario looks as follows:
{
  "scenario_definition": {
    "map": "Town10HD",
    "scenarios": [
      {
        "anomaly_config": {
          "anomalytype": "STATIC",
          "anomaly_bp_name": "static.prop.o_barbedwire_special",
          "distance_to_waypoint": 78,
          "rotation": 237.30526616506287
        },
        "id": "739b5ee1-e1e9-43d7-93e5-b3097de8dc6e",
        "ego_spawnpoint": {
          "location": {
            "x": -110.9637451171875,
            "y": 59.68935775756836,
            "z": 0.5999999642372131
          },
          "rotation": {
            "pitch": 0.0,
            "yaw": 90.6422348022461,
            "roll": 0.0
          }
        },
        "ego_end_spawnpoint": {
          "location": {
            "x": -71.26968383789062,
            "y": 132.3148956298828,
            "z": 0.5999999642372131
          },
          "rotation": {
            "pitch": 0.0,
            "yaw": -167.12705993652344,
            "roll": 0.0
          }
        },
        "ego_route": {
          "locations": [
            {
              "x": -110.9571762084961,
              "y": 63.85898971557617,
              "z": 0.0
            },
            {
              "x": -110.9683837890625,
              "y": 64.85892486572266,
              "z": 0.0
            }
          ],
           "weather_preset": "SOFT_RAIN_SUNSET",
           "npc_vehicle_amount": 100,
           "npc_walker_amount": 50
        }
      }
    ]
  }
}
The following attributes are randomized:
- weather
- spawn point of the ego vehicle
- anomaly actor/object
- spawn point of the anomaly (depending on the anomaly type)
During runtime, these attributes are parsed and used to execute each scenario in simulation.
Depending on the scenario type, the anomaly_config object contains different keys. Scenario Types determine the
executed scenario behavior and can be extended as seen down below.
Using this approach, one can easily create datasets with large amounts of scenarios.
We provide four pre-designed multimodal vehicle sensor configurations.We provide four pre-designed multimodal vehicle sensor configurations. The MONO_SENSOR_SETS configuration consists of a lidar and a camera which are centered on top of the vehicle, centered forward. Our STEREO_SENSOR_SETS setup consists of two cameras at the front edge and both a camera and lidar on top. The MULTI_SENSOR_SETS setup adds rear-facing cameras and additional lidar sensors at the front and rear, positioned at a lower level compared to the roof-mounted lidars. Finally, the SURROUND_SENSOR_SETS setup provides a full 360° camera view next to a top-mounted lidar. Every RGB camera automatically comes with a depth camera.
CURRENT_SENSOR_SETS = [
    MONO_SENSOR_SETS,
    #STEREO_SENSOR_SETS,
    #STEREO_ONE_LIDAR_SENSOR_SETS,
    #MULTI_SENSOR_SETS,
    #SURROUND_SENSOR_SETS
]
"""" Set the sensor setups to be used in the dataset. Uncomment only the sensor setups that should be used in the
dataset. (only one at a time)"""
For transformation into a voxel grid we use Open3d. The transformation is done by merging a point cloud created from the semantic depth image as well as the point cloud given as output by the semantic lidar sensor. The merged point cloud will be used for transformation to the voxel grid. The provided voxel Reader script (voxel_reader.py) can be used to visualize 3D voxel grids.
For each included scenario, AnoVox generates a zip file, containing images of the following sensors:
- Action-States of the ego vehicle (steering, throttle, brake, ...)
- Anomaly Actor (Spawnpoint, Rotation, ...)
- Depth-Camera
- PCD (point cloud data derived from lidar scans)
- RGB-Camera
- Semantic-Camera (offering ground truth information via semantic segmentation)
- Semantic_PCD (contains point cloud representations with embedded semantic segmentation details, further enriching the ground truth information)
- Voxel_Grid (provides ground truth via a voxel representation of the surroundings)
Read more about our dataset output here.
flowchart TB
    GenerateScenarioConfigurationFiles--> b1
    definitions --> ScenarioDefinititionGenerator.py
    RunScenarios --> ScenarioMain.py
    b1-->ScenarioConfigFiles
    ScenarioConfigFiles-->ScenarioMain.py
    ScenarioMain.py-->DataGenerator.py
    SensorProcessing-->SensorData
    Voxelization-->VoxelData
    SemanticCamera-->VoxelData
    SemanticLIDAR--> VoxelData
    LIDAR-->SensorProcessing
    RBG_Camera-->SensorProcessing
    DEPTH_CAMERA-->SensorProcessing
    AnomalyBevhaviours.py-->ScenarioMain.py

    SensorData-->ZipFiles
    VoxelData-->ZipFiles
    ScenarioConfigFiles-->ZipFiles
    ZipFiles-->DataSet.zip


    subgraph main.py
    Start-->GenerateScenarioConfigurationFiles[Generate Scenario Configuration Files]
    GenerateScenarioConfigurationFiles-->RunScenarios[Run Scenarios]
    RunScenarios-->ZipFiles
    ZipFiles[Zip Files]-->End
    end

    subgraph Definitions.py
    definitions[User configurable variables]
    end

    subgraph ScenarioMain.py
    Node[Run scenario]
    Node-- for all scenario configs --> Node
    end

    subgraph ScenarioDefinititionGenerator.py
    b1[Generate Scenario Configuration Files]
    end

    subgraph Outputs/
    DataSet.zip
    ScenarioConfigFiles[Scenario Config Files]
    SensorData[Sensor Data]
    VoxelData[Voxel Data]
    end

    subgraph AnomalyBevhaviours.py
    PredefinedBehaviours[Predefined Behaviours]
    UserDefinedBehaviours[User Defined Behaviours]
    end

    subgraph DataGenerator.py
    SensorProcessing[Processing Sensor Data]
    SensorProcessing-->Voxelization
    Voxelization[Generate Voxel Data using Sensor Data]
    end

    subgraph Semantic Data
    SemanticCamera[Semantic Camera]
    SemanticLIDAR[Semantic Lidar]
    end


    subgraph SensorProcessor[Sensors]
    LIDAR
    RBG_Camera
    DEPTH_CAMERA
    end
Creating the dataset is very easy. After configuring the desired parameters, like the number of included scenarios and
used
CARLA maps, simply navigate into the root project directory anovox, start CARLA, and execute the main file:
$ sh [your-carla-installation-folder]/CarlaUE4.sh --carla-world-port=2020 -RenderOffScreen
$ python3 main.py --run
Notice: The
carla-world-portmust match the corresponding variable inside Definitions.py
Depending on
- the number of scenarios you specified inside Definitions.py
- the specification of your computer
the creation of the dataset can take some time. You can monitor the process by watching the anovox/Data/Outputs/
folder, where the dataset
is progressively created.
All constants inside Definitions.py are designed to be customizable. Depending on your requirements, you can change the values as you wish. Just take note of the comments describing the constants' purpose inside the file.
-
Create a new Anomaly Type Inside Definitions.py, specify a new anomaly type.
class AnomalyTypes(Enum):
    """
    Enum class for different types of anomalies.
    """
    NORMALITY = "normality"
    STATIC = "static"
    SUDDEN_BREAKING_OF_VEHICLE_AHEAD = "sudden_braking_of_vehicle_ahead"


selected_anomaly_types = [
    # AnomalyTypes.NORMALITY,
    AnomalyTypes.STATIC,
    # AnomalyTypes.SUDDEN_BREAKING_OF_VEHICLE_AHEAD,
]
"""
ANOMALY_TYPES to be used in the dataset
Uncomment every ANOMALY_TYPE that should be used in the dataset.
"""
-
All constants inside AnomalyBehaviourDefinitions.py are designed to be customizable.
def my_anormal_scenario_behavior(scenario_config, sensors, image_queues, tick_count, max_tickcount, frame_id):

    anomaly_type, scenario_id, ego_vehicle, scenario = destructure_dict(scenario_config, 'anomaly_type', 'scenario_id', 'ego_vehicle', 'scenario')
    rgb_camera, lidar, depth_camera, semantic_camera, semantic_lidar = destructure_dict(sensors, 'rgb_camera', 'lidar', 'depth_camera', 'semantic_camera', 'semantic_lidar')
    rgb_img_queue, depth_img_queue, semantic_img_queue, lidar_queue, semantic_lidar_queue = destructure_dict(image_queues, 'rgb_img_queue', 'depth_img_queue', 'semantic_img_queue', 'lidar_queue', 'semantic_lidar_queue')

    # Write your behavior here using the variables above. See the existing behaviors
    # above for inspiration.
In the same file, add your newly created scenario behavior to the
ANOMALY_BEHAVIORSdictionary usingANOMALY_TYPES[YourType]as key.ANOMALY_BEHAVIORS = { ANOMALY_TYPES.STATIC: static_scenario_behavior, ANOMALY_TYPES.SUDDEN_BREAKING_OF_VEHICLE_AHEAD: sudden_braking_of_vehicle_ahead, ANOMALY_TYPES.WRONG_WAY_DRIVER: wrong_way_driver, # Add this line. ANOMALY_TYPES[YOUR_NEW_ANOMALY_TYPE]: my_anormal_scenario_behavior, }
This visualizer.py generates plots in the browser for data produced by the AnoVox. It can render images coming from the sensors, LIDAR point cloud, semantic point cloud, and depth point cloud. To run the script, you need to provide the path to the scenario directory. You can also use the optional arguments to render only specific plots.
python3 visualizer.py <path_to_scenario> [-c] [-p] [-s] [-d] [-a] [-l]

-c --camera-feed: Render camera feed
-p --point-cloud: Render LIDAR point cloud
-s --semantic-cloud: Render semantic point cloud
-d --depth-cloud: Render deph point cloud
-a --all: Render all plots (Default)
-l --last: Render the first scenario of last output