Robotics Nano Degree


The goal of this project was to create a 3D Perception Pipeline to identify and label the table objects using the PR2 RGBD (where D is Depth) camera.
For this project the combined pipeline was implemented in perception_pipeline.py
The 3D perception pipeline begins with a noisy pc2.PointCloud2 ROS message. A sample animated GIF follows:

After conversion to a PCL cloud a statistical outlier filter is applied to give a filtered cloud.
The cloud with inlier ie outliers filtered out follows:

A voxel filter is applied with a voxel (also know as leaf) size = .01 to down sample the point cloud.

Two passthrough filters one on the 'x' axis (axis_min = 0.4 axis_max = 3.) to remove the box edges and another on the 'z' axis (axis_min = 0.6 axis_max = 1.1) along the table plane are applied.

Finally a RANSAC filter is applied to find inliers being the table and outliers being the objects on it per the following
# Create the segmentation object
seg = cloud_filtered.make_segmenter()

# Set the model you wish to fit
seg.set_model_type(pcl.SACMODEL_PLANE)
seg.set_method_type(pcl.SAC_RANSAC)

# Max distance for a point to be considered fitting the model
max_distance = .01
seg.set_distance_threshold(max_distance)

# Call the segment function to obtain set of inlier indices and model coefficients
inliers, coefficients = seg.segment()

# Extract inliers and outliers
extracted_inliers = cloud_filtered.extract(inliers, negative=False)
extracted_outliers = cloud_filtered.extract(inliers, negative=True)
cloud_table = extracted_inliers
cloud_objects = extracted_outliers
Euclidean clustering on a white cloud is used to extract cluster indices for each cluster object. Individual ROS PCL messages are published (for the cluster cloud, table and objects) per the following code snippet:
    # Euclidean Clustering
    white_cloud = XYZRGB_to_XYZ(cloud_objects)
    tree = white_cloud.make_kdtree()

    # Create a cluster extraction object
    ec = white_cloud.make_EuclideanClusterExtraction()

    # Set tolerances for distance threshold
    # as well as minimum and maximum cluster size (in points)
    ec.set_ClusterTolerance(0.03)
    ec.set_MinClusterSize(30)
    ec.set_MaxClusterSize(1200)
    # Search the k-d tree for clusters
    ec.set_SearchMethod(tree)
    # Extract indices for each of the discovered clusters
    cluster_indices = ec.Extract()

    # Create Cluster-Mask Point Cloud to visualize each cluster separately
    #Assign a color corresponding to each segmented object in scene
    cluster_color = get_color_list(len(cluster_indices))

    color_cluster_point_list = []

    for j, indices in enumerate(cluster_indices):
        for i, indice in enumerate(indices):
            color_cluster_point_list.append([white_cloud[indice][0],
                                            white_cloud[indice][1],
                                            white_cloud[indice][2],
                                            rgb_to_float(cluster_color[j])])

    #Create new cloud containing all clusters, each with unique color
    cluster_cloud = pcl.PointCloud_PointXYZRGB()
    cluster_cloud.from_list(color_cluster_point_list)

    # Convert PCL data to ROS messages
    ros_cloud_objects = pcl_to_ros(cloud_objects)
    ros_cloud_table = pcl_to_ros(cloud_table)
    ros_cluster_cloud = pcl_to_ros(cluster_cloud)

    # Publish ROS messages
    pcl_objects_pub.publish(ros_cloud_objects)
    pcl_table_pub.publish(ros_cloud_table)
    pcl_cluster_pub.publish(ros_cluster_cloud)


Features were captured in the sensor_stick simulator for ['biscuits', 'soap', 'soap2', 'book', 'glue', 'sticky_notes', 'snacks', 'eraser'] model names with 40 sample of each captures.
hsv color space was used a combination of color and normalised histograms per
# Extract histogram features
chists = compute_color_histograms(sample_cloud, using_hsv=True)
normals = get_normals(sample_cloud)
nhists = compute_normal_histograms(normals)
feature = np.concatenate((chists, nhists))
labeled_features.append([feature, model_name])
The colour histograms where produced with 32 bins in the range (0, 256) and the normal values with 32 bins in the range (-1, 1.).
The full training.set was used in train_svm.py where I replaced the standard sum.SVC(kernel='linear') classifier with a Random Forest based classifier.
clf = ExtraTreesClassifier(n_estimators=10, max_depth=None,
                           min_samples_split=2, random_state=0)
It dramatically improved training scores per the following normalised confusion matrix:

The trained model.sav was used as input into the perception pipeline where for each cluster found in the point cloud, histogram features were extracted as per the training step above and used in prediction and added to a list of detected objects.
# Make the prediction, retrieve the label for the result
# and add it to detected_objects_labels list
prediction = clf.predict(scaler.transform(feature.reshape(1, -1)))
label = encoder.inverse_transform(prediction)[0]


It was interesting to learn about using point clouds and to learn this approach. I found occasionally there was some false readings. In addition few of the objects were picked and placed in the creates (the PR2 did not seem to grasp them properly). This may mean that further effort is needed to refine the centroid selection of each object.
Whilst I achieved average ~90% accuracy, across all models, on the classifier training, with more spent, I would have liked to have achieved closer to 97%. This would also improve those false readings. I'm also not sure I fully understand the noise introduced in this project from the PR2 RGBD camera.
If I was to approach this project again, I'd be interested to see how a 4D Tensor would work via deep learning using YOLO and/or CNNs. Further research is required.
In this project, you must assimilate your work from previous exercises to successfully complete a tabletop pick and place operation using PR2.
The PR2 has been outfitted with an RGB-D sensor much like the one you used in previous exercises. This sensor however is a bit noisy, much like real sensors.
Given the cluttered tabletop scenario, you must implement a perception pipeline using your work from Exercises 1,2 and 3 to identify target objects from a so-called “Pick-List” in that particular order, pick up those objects and place them in corresponding dropboxes.
For this setup, catkin_ws is the name of active ROS Workspace, if your workspace name is different, change the commands accordingly If you do not have an active ROS workspace, you can create one by:
$ mkdir -p ~/catkin_ws/src
$ cd ~/catkin_ws/
$ catkin_make
Now that you have a workspace, clone or download this repo into the src directory of your workspace:
$ cd ~/catkin_ws/src
$ git clone https://github.com/udacity/RoboND-Perception-Project.git
Note: If you have the Kinematics Pick and Place project in the same ROS Workspace as this project, please remove the 'gazebo_grasp_plugin' directory from the RoboND-Perception-Project/ directory otherwise ignore this note.
Now install missing dependencies using rosdep install:
$ cd ~/catkin_ws
$ rosdep install --from-paths src --ignore-src --rosdistro=kinetic -y
Build the project:
$ cd ~/catkin_ws
$ catkin_make
Add following to your .bashrc file
export GAZEBO_MODEL_PATH=~/catkin_ws/src/RoboND-Perception-Project/pr2_robot/models:$GAZEBO_MODEL_PATH
If you haven’t already, following line can be added to your .bashrc to auto-source all new terminals
source ~/catkin_ws/devel/setup.bash
To run the demo:
$ cd ~/catkin_ws/src/RoboND-Perception-Project/pr2_robot/scripts
$ chmod u+x pr2_safe_spawner.sh
$ ./pr2_safe_spawner.sh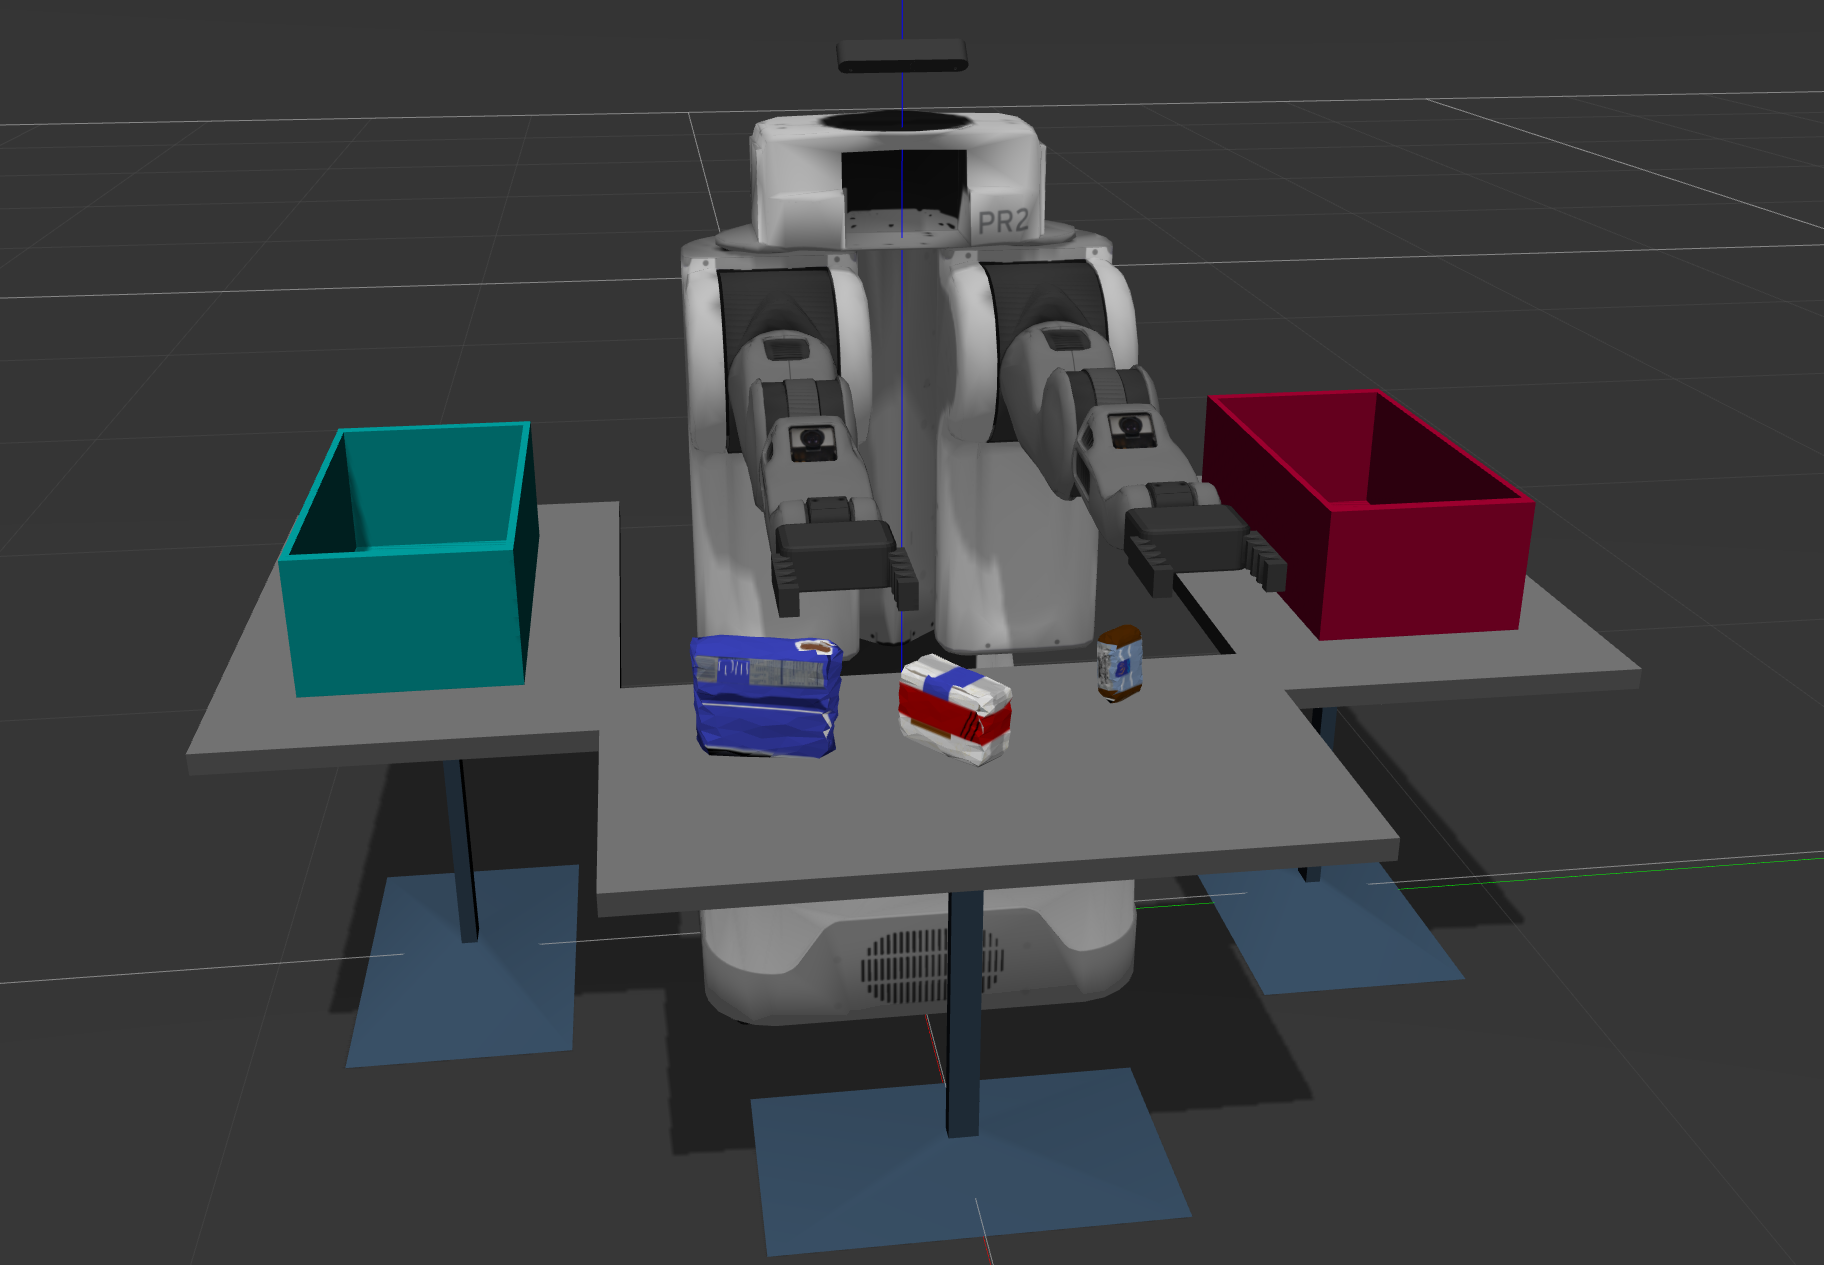
Once Gazebo is up and running, make sure you see following in the gazebo world:
-
Robot
-
Table arrangement
-
Three target objects on the table
-
Dropboxes on either sides of the robot
If any of these items are missing, please report as an issue on the waffle board.
In your RViz window, you should see the robot and a partial collision map displayed:
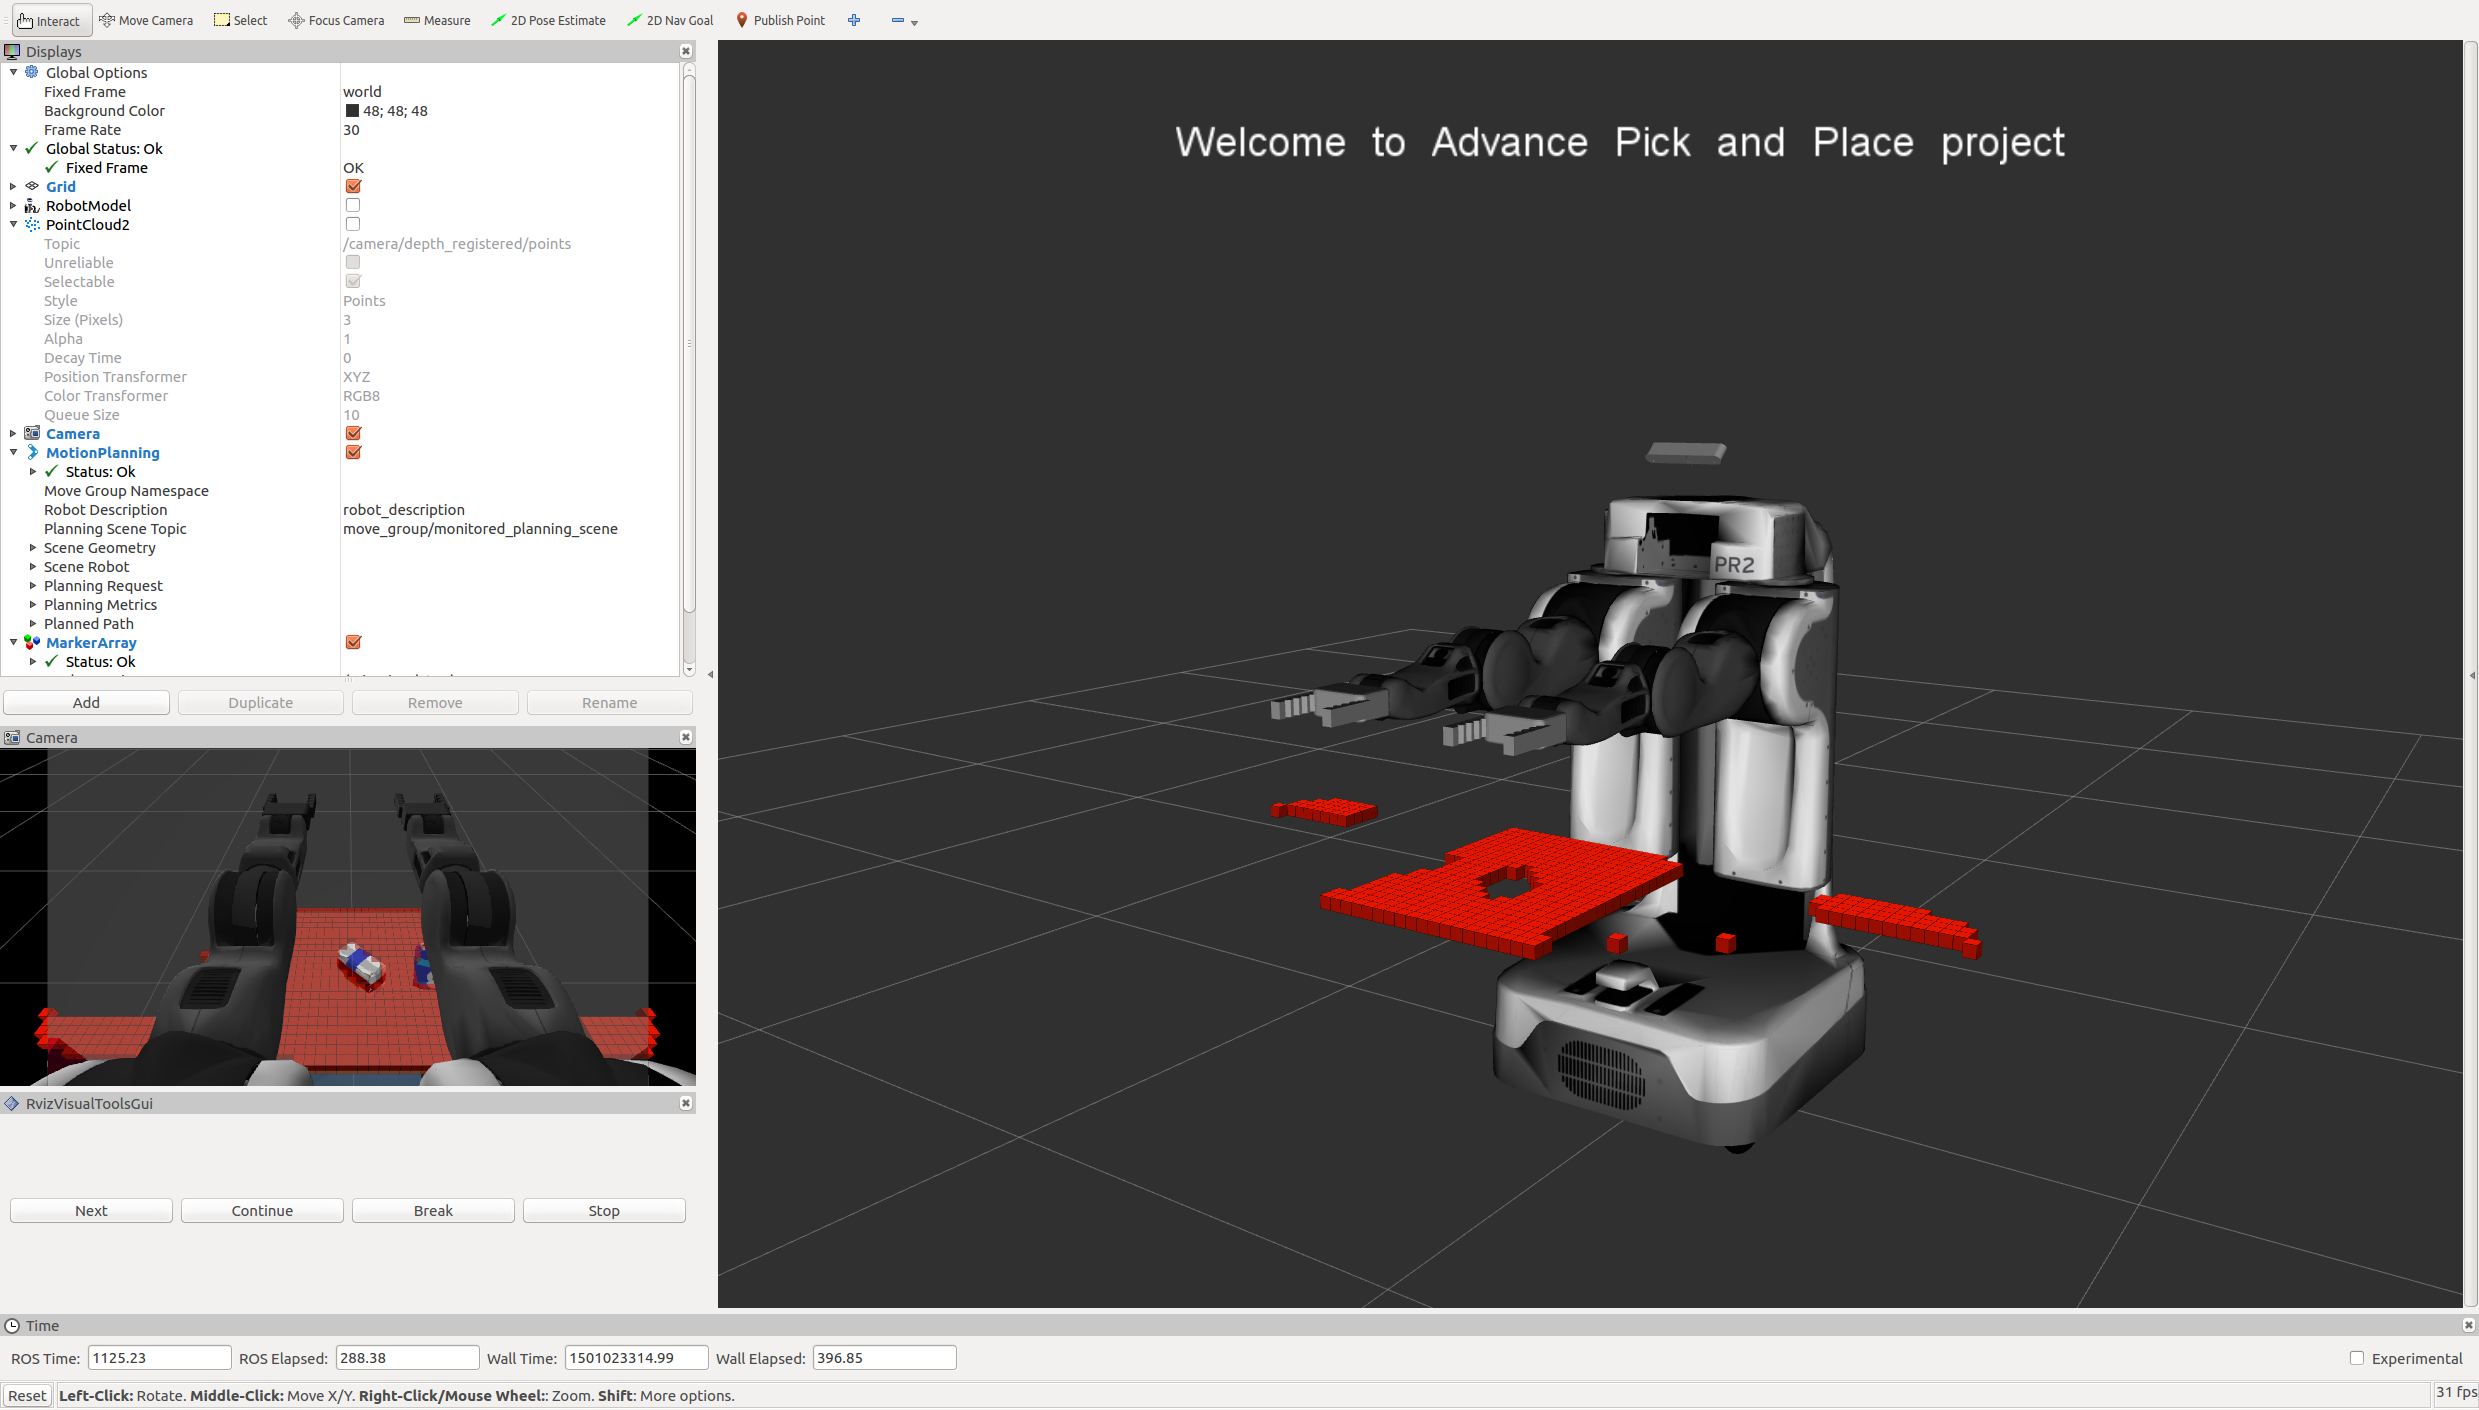
Proceed through the demo by pressing the ‘Next’ button on the RViz window when a prompt appears in your active terminal
The demo ends when the robot has successfully picked and placed all objects into respective dropboxes (though sometimes the robot gets excited and throws objects across the room!)
Close all active terminal windows using ctrl+c before restarting the demo.
You can launch the project scenario like this:
$ roslaunch pr2_robot pick_place_project.launch- Extract features and train an SVM model on new objects (see
pick_list_*.yamlin/pr2_robot/config/for the list of models you'll be trying to identify). - Write a ROS node and subscribe to
/pr2/world/pointstopic. This topic contains noisy point cloud data that you must work with. - Use filtering and RANSAC plane fitting to isolate the objects of interest from the rest of the scene.
- Apply Euclidean clustering to create separate clusters for individual items.
- Perform object recognition on these objects and assign them labels (markers in RViz).
- Calculate the centroid (average in x, y and z) of the set of points belonging to that each object.
- Create ROS messages containing the details of each object (name, pick_pose, etc.) and write these messages out to
.yamlfiles, one for each of the 3 scenarios (test1-3.worldin/pr2_robot/worlds/). See the exampleoutput.yamlfor details on what the output should look like. - Submit a link to your GitHub repo for the project or the Python code for your perception pipeline and your output
.yamlfiles (3.yamlfiles, one for each test world). You must have correctly identified 100% of objects frompick_list_1.yamlfortest1.world, 80% of items frompick_list_2.yamlfortest2.worldand 75% of items frompick_list_3.yamlintest3.world. - Congratulations! Your Done!
- To create a collision map, publish a point cloud to the
/pr2/3d_map/pointstopic and make sure you change thepoint_cloud_topicto/pr2/3d_map/pointsinsensors.yamlin the/pr2_robot/config/directory. This topic is read by Moveit!, which uses this point cloud input to generate a collision map, allowing the robot to plan its trajectory. Keep in mind that later when you go to pick up an object, you must first remove it from this point cloud so it is removed from the collision map! - Rotate the robot to generate collision map of table sides. This can be accomplished by publishing joint angle value(in radians) to
/pr2/world_joint_controller/command - Rotate the robot back to its original state.
- Create a ROS Client for the “pick_place_routine” rosservice. In the required steps above, you already created the messages you need to use this service. Checkout the PickPlace.srv file to find out what arguments you must pass to this service.
- If everything was done correctly, when you pass the appropriate messages to the
pick_place_routineservice, the selected arm will perform pick and place operation and display trajectory in the RViz window - Place all the objects from your pick list in their respective dropoff box and you have completed the challenge!
- Looking for a bigger challenge? Load up the
challenge.worldscenario and see if you can get your perception pipeline working there!
For all the step-by-step details on how to complete this project see the RoboND 3D Perception Project Lesson Note: The robot is a bit moody at times and might leave objects on the table or fling them across the room :D As long as your pipeline performs succesful recognition, your project will be considered successful even if the robot feels otherwise!