This is my Glove80 keymap featuring the Engram and Engrammer layouts with Miryoku-style layers and home row mods. Other layouts (QWERTY, Dvorak, Colemak/DH, etc.) and familiar keys (arrows, pinky shifts, function row) are also provided as "training wheels" to aid your transition to the full glory.
Version 38 (2024-10-05)
- Changes: https://github.com/sunaku/glove80-keymaps/releases/v38
- Release: https://my.glove80.com/#/layout/user/56b3ddfa-0299-4983-b66d-5101c8958452
See interactive layer map for overview and documentation.
NOTE: This is also available as a printable PDF document.
See release notes for a visual overview of recent updates.
- Guide
- Installing
- Upgrading
- Customizing
- Discussion
- License
Welcome to the Glorious Engrammer keymap! 🧑🚀🚀✨ This introductory guide will orient you to the world of custom layouts, keymaps, and firmware. 💁
Before we get started, let's talk about your escape route back to familiarity.
If you're a new user (perhaps you've just unboxed your Glove80 or you haven't customized its default keymap), you might find the Factory layer to be useful:
- Press & hold the Magic key (bottom left corner key on left half of Glove80)
- Tap the left hand's T3 key (furthest key on the upper arc of thumb cluster)
This shortcut will toggle the Factory layer on/off and allow you to experiment with this keymap while maintaining an easy escape route to the factory default.
First, let's configure this keymap to better suit your operating system by adding one of the following lines (just copy+paste whichever is appropriate) atop the "Custom Defined Behaviors" text box in your clone of this keymap:
#define OPERATING_SYSTEM 'L' // Linux
#define OPERATING_SYSTEM 'M' // macOS
#define OPERATING_SYSTEM 'W' // WindowsNext, let's become familiar with the concept of home row mods, which are
dual-function keys that either send normal keycodes (such as the letter A
or the number 1) when tapped or modifiers (such as Shift or Ctrl) when held.
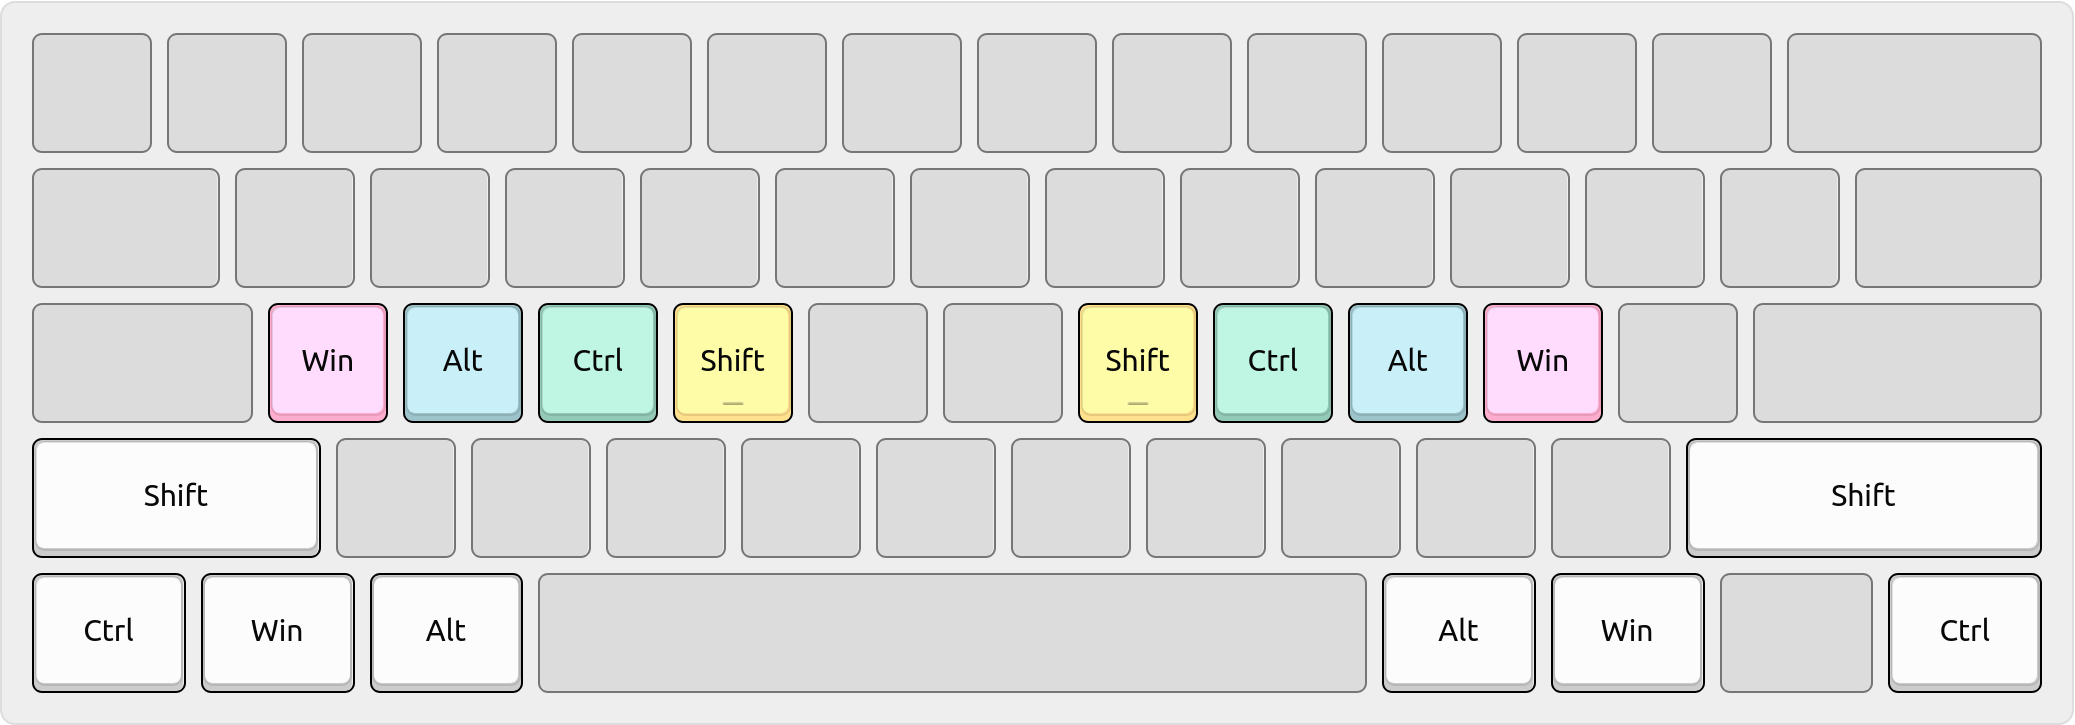
The diagram above shows the default "GACS" order of home row mods in this keymap:
- "G" means
LGUI, which is the Win key in Windows, Cmd in macOS, Super in Linux. - "A" means
LALT, which is the Alt key in Windows and Linux, Option in macOS. - "C" means
LCTL, which is the Control key in Windows, macOS, and Linux alike. - "S" means
LSFT, which is the Shift key in Windows, macOS, and Linux alike.
NOTE: If you set your operating system to macOS in the preceding section, the home row mods order will be automatically rearranged into "CAGS" because macOS shortcuts tend to use the Cmd key like Windows/Linux use the Ctrl key. However, you can inhibit the automatic rearrangement by adding this setting:
#define MACOS_USE_GACSIn order to help ease your transition to using home row mods, this keymap provides a difficulty level setting (like in a video game) that you can set:
//
// DIFFICULTY_LEVEL specifies your level of expertise with this keymap.
// It's meant to help newcomers gradually work their way up to mastery.
//
#define DIFFICULTY_LEVEL 1 // novice (500ms)
#define DIFFICULTY_LEVEL 2 // slower (400ms)
#define DIFFICULTY_LEVEL 3 // normal (300ms)
#define DIFFICULTY_LEVEL 4 // faster (200ms)
#define DIFFICULTY_LEVEL 5 // expert (100ms)
//
// You can disable this setting by omitting it or assigning a `0` zero,
// in which case it will default to my personal set of time thresholds.
//
#define DIFFICULTY_LEVEL 0 // sunaku (150ms)
//
// No matter what difficulty level you choose, you can always override
// any settings in this keymap at the beginning of this configuration.
//
Unless you're already proficient in using home row mods, you might consider choosing an appropriate difficulty level to match your current abilities and gradually increase the difficulty level as you work your way up to mastery.
On the contrary, you can disable the difficulty level feature altogether by
removing the #define DIFFICULTY_LEVEL line or by setting its value to zero.
Then, you can experience the default values of all settings (representing my
personal fine-tuned configuration) or directly override them per your taste.
The traditional pinky shift keys on the base layer are one-shot sticky shifts, whereby tapping them temporarily activates a sticky Shift that applies itself to the next key you tap. This can be useful for single letter capitalization, such as for the frequent "I" in English or when typing camel/PascalCase names.
Similarly, the combination of thumb T4 and the home row index finger key also provides the same one-shot sticky shifting for single letter capitalization.
What should happen when a home row shift is held and released without any other key having been pressed in the meantime? I've often found myself in that exact scenario for having lingered too long (slow tap) while tapping a home row shift key: instead of typing the underlying letter (per my intention), the tap would not produce any output (to my surprise) since it would hold and release shift.
Thanks to the hold-while-undecided feature in a newer ZMK release that MoErgo
has made available in the v24.08-beta1 firmware, I finally tamed this nuance:
#define SHIFT_FORGIVENESSThis setting will tap when home row shift is merely held and released, without any other key having been tapped while the shift was held down. For example, suppose you hold a home row shift key and, before pressing another key, suddenly decide that you don't want to use shift after all:
-
If this setting is enabled, the underlying tap behavior is triggered to type a single character when you release that home row shift key.
-
Otherwise, nothing happens when you release that home row shift key.
This requires the "hold-while-undecided" ZMK feature in a beta firmware: please select "v24.08-beta1" or newer from the drop-down menu located at Glove80 Layout Editor > Settings > Advanced Settings > Firmware Version.
CAUTION: This can interfere with mod-click mouse usage where you hold a home row shift key and perform mouse actions (move, click, drag & drop): when you release that home row shift key, its underlying character would be typed, potentially triggering an unexpected action on your selection! To prevent the underlying character from being typed, press another key (such as a dedicated shift key, a neighboring home row mod key, or even a layer access key) before you release the original home row shift key.
NOTE: You may potentially encounter "flashing mods" where an application or operating system action is triggered by a standalone tap of a shift, but this is unlikely as people regularly tap shift without consequence.
In order to encourage proper touch-typing technique for shortcuts (where one hand holds modifiers while the other taps keys to be modified) and for a more natural typing experience that forgives same-hand chords and lingering holds, this keymap provides bilateral combinations enforcement as an optional feature:
//
// ENFORCE_BILATERAL cancels out single-handed home row mods activation by
// releasing any currently pressed mods and replacing them with plain taps.
//
// NOTE: You may still encounter "flashing mods" where an operating system
// action is triggered by the release of mods, such as LGUI which launches
// the Windows Start Menu and LALT which opens the Microsoft Office Ribbon.
//
#define ENFORCE_BILATERAL
Why not just use one-handed shortcuts? I visualize it this way: I'm trying to reach a cookie jar that is high up on a kitchen shelf, so I place one hand on the kitchen counter (the modifier-holding hand) to stabilize myself while I reach up for the jar with my other hand (the modified-key tapping hand). 🙋✨ In contrast, one-handed shortcuts can be more strenuous as you have to contort your hand to hold a modifier and tap modified keys; plus the act of holding a modifier limits the hand's range of motion when reaching for keys to be tapped.
Nevertheless, if you still prefer using one-handed shortcuts, you can disable
bilateral combinations enforcement by removing the #define ENFORCE_BILATERAL
line and, optionally, deleting the bilateral combinations layers in the keymap.
This keymap borrows heavily from the legendary Miryoku system, featuring:
- Six specialized layers: Cursor, Number, Function, Symbol, Mouse, System
- Layer access via thumb keys: Backspace, Delete, Escape, Enter, Tab, Space
- Home row mods on the base layer and on same-hand of all layer access keys
The idea is that you can always access modifiers with the same hand as the layer access key (which your thumb is holding down) to modify keystrokes on that respective layer. This way, you don't need to lift your hands off the keyboard or your fingers away from their home position to execute shortcuts.
Since dual-function keys (such as home row mods and layer access keys) have a special effect when held, they won't auto-repeat when held like a normal key. Instead, you have two options for engaging auto-repeat on dual-function keys:
-
Use the "Tap then hold" method: first tap (press and release) and then hold (press and don't release until the desired amount of repetition is reached).
-
Using repetition access keys: first hold a
&plainlayer access key and then hold the key you want to repeat for the desired amount of repetition.

This keymap lets you dynamically switch to alpha layouts (such as QWERTY and Dvorak) other than the one you chose for your base layer during installation, by holding the Magic key and tapping the respective number key for that layer.
| Shortcut | Layer number | Alpha layout |
|---|---|---|
Magic+= |
0 | Engrammer (base layer; your choice) |
Magic+1 |
1 | Engram |
Magic+2 |
2 | Dvorak |
Magic+3 |
3 | ColemakDHm |
Magic+4 |
4 | Colemak |
Magic+5 |
5 | QWERTY |
Magic+6 |
6 | Norman |
Magic+7 |
7 | Workman |
Magic+8 |
8 | Halmak |
For the first 5 alpha layouts, the respective number key for each layout will
illuminate when you tap the Magic key. For example, suppose that we activate
the QWERTY layout by typing Magic+5 and that we've forgotten about it after
some time... 😅 how can we know which alpha layout is currently active? Well,
by simply tapping the Magic key, we'll see that number 5 illuminates in pink 🚨
thereby indicating that the QWERTY alpha layout (at layer number 5) is active.
However, note that number row illumination isn't available for layer 6 onwards. That's just how the Glove80's firmware is currently implemented today; you have the option of implementing such enhancements by editing its ZMK code if desired.
Unicode characters (including Emoji 🔥) are typed through ZMK macros (sequences
of multiple keystrokes) generated from the world.yaml and emoji.yaml files
by the rake command. However, in order for these macros to take effect, you
may need to enable support for Unicode hexadecimal character input in your OS:
- (macOS) https://uknowit.uwgb.edu/page.php?id=22623 and https://github.com/ldanet/unicode-hex-input-fix
- (Linux) https://help.ubuntu.com/stable/ubuntu-help/tips-specialchars.html.en#ctrlshiftu
- (Windows) https://github.com/samhocevar/wincompose
See also: the UNICODE_*_DELAY settings and the UNICODE_SEQ_* functions.
If you prefer using your operating system's built-in shortcuts (rather than Unicode) to type international characters in the World layer, activate this:
//
// WORLD_USE_COMPOSE uses OS-native Compose keycodes instead of Unicode
// for characters in the "localizing" section of the `world.yaml` file.
//
#define WORLD_USE_COMPOSE
See also: the COMPOSE_KEY_LINUX setting and the COMPOSE_SEQ_* functions.
Open the keymap link above and follow these instructions:
- Log in (account is required)
- Clone the keymap to customize and/or build it!
- Choose your base layout (place at top as layer number #0) via drag & drop.
- Customize the keymap behavior in this text box.
- Build the firmware and download the
*.uf2file.

Before building the firmware (step 5 above), change the version to PR23: open the "Settings" tab, choose PR23, and then go back to the "Edit" tab.

Without this change, the mouse control keys on the Mouse layer won't work.
-
For the initial flash, see "Loading new ZMK firmware onto your Glove80" and use the "Entering bootloader mass storage device mode on power-up" fail-safe on both halves. Subsequent flashes can target just the left half.
-
If you're installing a different firmware version compared to what your keyboard currently has, then
⚠️ after flashing both halves⚠️ perform a "Configuration Factory Reset and re-pair left & right halves procedure" on both halves and then turn RGB effects on, watch them illuminate, and finally turn them back off for the newly installed firmware to take effect.
-
Copy the ZMK snippet from the "Custom Defined Behaviors" text box in either keymap linked above and paste into yours. The contents of that text box are also available in the
*.dtsifiles provided in this Git repository. -
You can diff and copy changes between a JSON export of your keymap (via "Advanced Settings" > "Enable local config" then go back to "Edit" and click "Download") and the
*.jsonfiles provided in this Git repository.
You can override the various #define settings that govern this keymap by
adding them above the snippet in the "Custom Defined Behaviors" text box:
// add your overrides here, up at the very top:
#define OPERATING_SYSTEM 'W' // windows
#define EMOJI_HAIR_STYLE_PRESET 'C' // curly_hair

// ... rest of snippet goes here, unchanged ...
For your reference, the following diagram shows the default values for all settings and how they inherit from each other, so you can override them together as a group (by inheritance) or each individually (fine-grained).

The *_FINGER_MOD settings specify which modifiers are used by home row mod
keys. Miryoku's "GACS" (Win, Alt, Ctrl, Shift) order is the default -- unless
you set OPERATING_SYSTEM to macOS, in which case Win and Ctrl are swapped.
#define PINKY_FINGER_MOD LGUI
#define RING1_FINGER_MOD LALT
#define RING2_FINGER_MOD RALT
#define MIDDY_FINGER_MOD LCTL
#define INDEX_FINGER_MOD LSFT
The above settings mirror finger-mod assignments across both hands, but you can also make them different through the following additional settings if you want:
#define  LEFT_PINKY_MOD RALT
#define RIGHT_PINKY_MOD LCTL
For completeness, here are all finger-mod settings available for customization:
#define  LEFT_PINKY_MOD ...
#define RIGHT_PINKY_MOD ...
#define  LEFT_RING1_MOD ...
#define RIGHT_RING1_MOD ...
#define  LEFT_RING2_MOD ...
#define RIGHT_RING2_MOD ...
#define  LEFT_MIDDY_MOD ...
#define RIGHT_MIDDY_MOD ...
#define  LEFT_INDEX_MOD ...
#define RIGHT_INDEX_MOD ...Activate the typing layer, launch the QMK Configurator's testing tool, and then pretend to use home row mods. Note the
timing and duration of keystrokes reported by the tool and then use them to
adjust the #define time thresholds in the "Custom Defined Behaviors" snippet.
NOTE: If you're on Windows, try using Ubuntu in WSL for the following.
-
Clone or download a copy of this Git repository (if you haven't already).
-
Install dependencies OR skip this step if you have Docker on your system:
add-apt-repository universe && apt update # may be needed if using Ubuntu
apt install rake graphviz
-
In your copy of this repository, run
rakeOR./rakeif using Docker.
You can customize the predefined characters in the Emoji and World layers by
editing their respective YAML source files in this repository. Afterwards,
run the rake command and then copy the new keymap.dtsi contents back into
the "Custom Defined Behaviors" text box in the Layout Editor for your keymap.
Suppose you wanted to add a key for the copyright sign © character in your keymap.
First, open the world.yaml file and add a new entry under the codepoints section:
#
# codepoints:
#   <name>: "<string_of_unicode_characters>"
#
codepoints:
  copyright_sign: "️©"
Note that you can directly paste Unicode characters into the file, as illustrated above!
Next, compile from source to generate the &world_copyright_sign behavior for ZMK:
UNICODE(world_copyright_sign_macro, /* ️© */
#if OPERATING_SYSTEM == 'L'
UNICODE_SEQ_LINUX(&kp F &kp E &kp N0 &kp F), <¯o_wait_time UNICODE_SEQ_DELAY>, UNICODE_SEQ_LINUX(&kp A &kp N9)
#elif OPERATING_SYSTEM == 'M'
UNICODE_SEQ_MACOS(&kp F &kp E &kp N0 &kp F), <¯o_wait_time UNICODE_SEQ_DELAY>, UNICODE_SEQ_MACOS(&kp N0 &kp N0 &kp A &kp N9)
#elif OPERATING_SYSTEM == 'W'
UNICODE_SEQ_WINDOWS(&kp N0 &kp F &kp E &kp N0 &kp F), <¯o_wait_time UNICODE_SEQ_DELAY>, UNICODE_SEQ_WINDOWS(&kp N0 &kp A &kp N9)
#endif
)
world_copyright_sign: world_copyright_sign {
compatible = "zmk,behavior-mod-morph";
#binding-cells = <0>;
bindings = <&world_copyright_sign_macro>, <&world_copyright_sign_macro>;
mods = <(~(
#ifdef WORLD_USE_COMPOSE_FOR_world_copyright_sign
COMPOSE_MORPH_MODS
#else
UNICODE_MORPH_MODS
#endif
))>;
};Finally, assign &world_copyright_sign to a "Custom" key in the Glove80 Layout Editor.
Suppose you wanted a World character that changed when you press the shift key, like lowercase and uppercase letters in English. For example, consider the copyright sign © character from the previous section: let's change it into a registered sign ® character when typed with the shift key.
First, open the world.yaml file and add a new entry under the characters section:
#
# characters:
#   <group>:
#     <name>: { <without_shift>, <with_shift> }
#
characters:
  sign:
    copyright: { regular: "©", shifted: "®" }
Note that you can directly paste Unicode characters into the file, as illustrated above!
Next, compile from source to generate the &world_sign_copyright behavior for ZMK:
- The
&world_sign_copyright_regularbehavior will type the regular character: © - The
&world_sign_copyright_shiftedbehavior will type the shifted character: ® - The
&world_sign_copyrightbehavior will choose one of the above based on shift
UNICODE(world_sign_copyright_regular_macro, /* © */
  #if OPERATING_SYSTEM == 'L'
    UNICODE_SEQ_LINUX(&kp A &kp N9)
  #elif OPERATING_SYSTEM == 'M'
    UNICODE_SEQ_MACOS(&kp N0 &kp N0 &kp A &kp N9)
  #elif OPERATING_SYSTEM == 'W'
    UNICODE_SEQ_WINDOWS(&kp N0 &kp A &kp N9)
  #endif
)
world_sign_copyright_regular: world_sign_copyright_regular {
  compatible = "zmk,behavior-mod-morph";
  #binding-cells = <0>;
  bindings = <&world_sign_copyright_regular_macro>, <&world_sign_copyright_regular_macro>;
  mods = <(~(
    #ifdef WORLD_USE_COMPOSE_FOR_world_sign_copyright_regular
      COMPOSE_MORPH_MODS
    #else
      UNICODE_MORPH_MODS
    #endif
  ))>;
};
UNICODE(world_sign_copyright_shifted_macro, /* ® */
  #if OPERATING_SYSTEM == 'L'
    UNICODE_SEQ_LINUX(&kp A &kp E)
  #elif OPERATING_SYSTEM == 'M'
    UNICODE_SEQ_MACOS(&kp N0 &kp N0 &kp A &kp E)
  #elif OPERATING_SYSTEM == 'W'
    UNICODE_SEQ_WINDOWS(&kp N0 &kp A &kp E)
  #endif
)
world_sign_copyright_shifted: world_sign_copyright_shifted {
    compatible = "zmk,behavior-mod-morph";
    #binding-cells = <0>;
    bindings = <&world_sign_copyright_shifted_macro>, <&world_sign_copyright_shifted_macro>;
    mods = <(~(
    #ifdef WORLD_USE_COMPOSE_FOR_world_sign_copyright_shifted
      COMPOSE_MORPH_MODS
    #else
      UNICODE_MORPH_MODS
    #endif
  ))>;
};
world_sign_copyright: world_sign_copyright {
  compatible = "zmk,behavior-mod-morph";
  #binding-cells = <0>;
  bindings = <&world_sign_copyright_regular>, <&world_sign_copyright_shifted>;
  mods = <MOD_LSFT>;
};
Finally, assign &world_sign_copyright to a "Custom" key in the Glove80 Layout Editor.
Suppose you wanted to enhance the copyright/registered World character from the previous section so that it changes when you press the control key. For example, let's change it into a trademark sign ™ character when typed with the control key, and into a service mark sign ℠ character when typed with the control and shift keys together.
First, open the world.yaml file and add a new entry under the characters section:
#
# characters:
#   <group>:
#     <name>: { <without_shift>, <with_shift> }
#
characters:
  sign:
    copyright: { regular: "©", shifted: "®" }
    trademark: { regular: "™", shifted: "℠" }
Note that you can directly paste Unicode characters into the file, as illustrated above!
Next, add a new entry under the transforms section to specify what goes with control:
#
# transforms:
#   <group>:
#     base: <name>
#     <modifier>: <name>
#
# Where <modifier> is either LALT, RALT, LCTL, RCTL, or RSFT.
#
transforms:
  sign:
    base: copyright
    LCTL: trademark
Next, compile from source to generate the &world_sign_trademark behavior for ZMK:
- The
&world_sign_trademark_regularbehavior will type the regular character: ™ - The
&world_sign_trademark_shiftedbehavior will type the shifted character: ℠ - The
&world_sign_trademarkbehavior will choose one of the above based on shift
UNICODE(world_sign_trademark_regular_macro, /* ™ */
  #if OPERATING_SYSTEM == 'L'
    UNICODE_SEQ_LINUX(&kp N2 &kp N1 &kp N2 &kp N2)
  #elif OPERATING_SYSTEM == 'M'
    UNICODE_SEQ_MACOS(&kp N2 &kp N1 &kp N2 &kp N2)
  #elif OPERATING_SYSTEM == 'W'
    UNICODE_SEQ_WINDOWS(&kp N0 &kp N2 &kp N1 &kp N2 &kp N2)
  #endif
)
world_sign_trademark_regular: world_sign_trademark_regular {
  compatible = "zmk,behavior-mod-morph";
  #binding-cells = <0>;
  bindings = <&world_sign_trademark_regular_macro>, <&world_sign_trademark_regular_macro>;
  mods = <(~(
    #ifdef WORLD_USE_COMPOSE_FOR_world_sign_trademark_regular
      COMPOSE_MORPH_MODS
    #else
      UNICODE_MORPH_MODS
    #endif
  ))>;
};
UNICODE(world_sign_trademark_shifted_macro, /* ℠ */
  #if OPERATING_SYSTEM == 'L'
    UNICODE_SEQ_LINUX(&kp N2 &kp N1 &kp N2 &kp N0)
  #elif OPERATING_SYSTEM == 'M'
    UNICODE_SEQ_MACOS(&kp N2 &kp N1 &kp N2 &kp N0)
  #elif OPERATING_SYSTEM == 'W'
    UNICODE_SEQ_WINDOWS(&kp N0 &kp N2 &kp N1 &kp N2 &kp N0)
  #endif
)
world_sign_trademark_shifted: world_sign_trademark_shifted {
  compatible = "zmk,behavior-mod-morph";
  #binding-cells = <0>;
  bindings = <&world_sign_trademark_shifted_macro>, <&world_sign_trademark_shifted_macro>;
  mods = <(~(
    #ifdef WORLD_USE_COMPOSE_FOR_world_sign_trademark_shifted
      COMPOSE_MORPH_MODS
    #else
      UNICODE_MORPH_MODS
    #endif
  ))>;
};
world_sign_trademark: world_sign_trademark {
  compatible = "zmk,behavior-mod-morph";
  #binding-cells = <0>;
  bindings = <&world_sign_trademark_regular>, <&world_sign_trademark_shifted>;
  mods = <MOD_LSFT>;
};
Also, notice the new &world_sign_base behavior that chooses between the other two:
- The
&world_sign_copyrightbehavior will type the copyright/registered sign - The
&world_sign_trademarkbehavior will type the trade/service mark sign - The
&world_sign_basebehavior will choose one of the above based on control
world_sign_base: world_sign_base {
  compatible = "zmk,behavior-mod-morph";
  #binding-cells = <0>;
  bindings = <&world_sign_copyright>, <&world_sign_trademark>;
  mods = <(MOD_LCTL)>;
};
Finally, assign &world_sign_base to a "Custom" key in the Glove80 Layout Editor.
Suppose you wanted the copyright sign © character from the previous section to be typed using your operating system's native Compose key rather than Unicode.
First, open the world.yaml file and add a new entry under the localizing section:
#
# localizing:
#   <character>:
#     linux:   <keystrokes>
#     macos:   <keystrokes>
#     windows: <keystrokes>
#
# Where <keystrokes> is composed of ZMK keycodes with some specialities:
# - "COMPOSE" is a special keyword that is replaced by COMPOSE_KEY_LINUX
# - "ALT+" is a special prefix that is replaced by COMPOSE_SEQ_WINDOWS()
#
# For reference on Compose key shortcuts and the characters they produce:
# - linux:   https://wiki.linuxquestions.org/wiki/Accented_Characters
# - macos:   https://sites.psu.edu/symbolcodes/mac/codemac/
# - windows: https://sites.psu.edu/symbolcodes/windows/codealt/
#
localizing:
  "©":
    linux:   COMPOSE O C
    macos:   LA(G)
    windows: ALT+0169
Note that you can directly paste Unicode characters into the file, as illustrated above!
Next, compile from source to regenerate the &world_sign*macro behaviors for ZMK:
UNICODE(world_sign_copyright_regular_macro, /* © */
  #if OPERATING_SYSTEM == 'L'
    #ifdef WORLD_USE_COMPOSE
    #define WORLD_USE_COMPOSE_FOR_world_sign_copyright_regular
    COMPOSE_SEQ_LINUX(&kp O &kp C)
    #else
    UNICODE_SEQ_LINUX(&kp A &kp N9)
    #endif
  #elif OPERATING_SYSTEM == 'M'
    #ifdef WORLD_USE_COMPOSE
    #define WORLD_USE_COMPOSE_FOR_world_sign_copyright_regular
    COMPOSE_SEQ_MACOS(&kp LA(G))
    #else
    UNICODE_SEQ_MACOS(&kp N0 &kp N0 &kp A &kp N9)
    #endif
  #elif OPERATING_SYSTEM == 'W'
    #ifdef WORLD_USE_COMPOSE
    #define WORLD_USE_COMPOSE_FOR_world_sign_copyright_regular
    COMPOSE_SEQ_WINDOWS(&kp KP_N0 &kp KP_N1 &kp KP_N6 &kp KP_N9)
    #else
    UNICODE_SEQ_WINDOWS(&kp N0 &kp A &kp N9)
    #endif
  #endif
)
Notice how Compose key shortcuts will be used when WORLD_USE_COMPOSE is enabled.
Suppose you wanted to add a key for the "unamused face" 😒 emoji in your keymap.
First, open the emoji.yaml file and add a new entry under the codepoints section:
#
# codepoints:
#   <name>: "<string_of_unicode_characters>"
#
codepoints:
  unamused_face: "️😒"
Note that you can directly paste an Emoji character into the file, as illustrated above!
Next, compile from source to generate the &emoji_unamused_face behavior for ZMK:
UNICODE(emoji_unamused_face_macro, /* ️😒 */
#if OPERATING_SYSTEM == 'L'
UNICODE_SEQ_LINUX(&kp F &kp E &kp N0 &kp F), <¯o_wait_time UNICODE_SEQ_DELAY>, UNICODE_SEQ_LINUX(&kp N1 &kp F &kp N6 &kp N1 &kp N2)
#elif OPERATING_SYSTEM == 'M'
UNICODE_SEQ_MACOS(&kp F &kp E &kp N0 &kp F), <¯o_wait_time UNICODE_SEQ_DELAY>, UNICODE_SEQ_MACOS(&kp D &kp N8 &kp N3 &kp D &kp D &kp E &kp N1 &kp N2)
#elif OPERATING_SYSTEM == 'W'
UNICODE_SEQ_WINDOWS(&kp N0 &kp F &kp E &kp N0 &kp F), <¯o_wait_time UNICODE_SEQ_DELAY>, UNICODE_SEQ_WINDOWS(&kp N0 &kp N1 &kp F &kp N6 &kp N1 &kp N2)
#endif
)
emoji_unamused_face: emoji_unamused_face {
compatible = "zmk,behavior-mod-morph";
#binding-cells = <0>;
bindings = <&emoji_unamused_face_macro>, <&emoji_unamused_face_macro>;
mods = <(~(
#ifdef WORLD_USE_COMPOSE_FOR_emoji_unamused_face
COMPOSE_MORPH_MODS
#else
UNICODE_MORPH_MODS
#endif
))>;
};Finally, assign &emoji_unamused_face to a "Custom" key in the Glove80 Layout Editor.
Suppose you wanted an Emoji character that changed when you press the shift key, like lowercase and uppercase letters in English. For example, consider the "unamused face" 😒 emoji from the previous section: let's change it into a "face with rolling eyes" 🙄 emoji when typed with the shift key.
First, open the emoji.yaml file and add a new entry under the characters section:
#
# characters:
#   <group>:
#     <name>: { <without_shift>, <with_shift> }
#
characters:
  face:
    unamused: { regular: "😒", shifted: "🙄" }
Note that you can directly paste Emoji characters into the file, as illustrated above!
Next, compile from source to generate the &emoji_face_unamused behavior for ZMK:
- The
&emoji_face_unamused_regularbehavior will type the regular character: 😒 - The
&emoji_face_unamused_shiftedbehavior will type the shifted character: 🙄 - The
&emoji_face_unamusedbehavior will choose one of the above based on shift
UNICODE(emoji_face_unamused_regular_macro, /* 😒 */
  #if OPERATING_SYSTEM == 'L'
    UNICODE_SEQ_LINUX(&kp N1 &kp F &kp N6 &kp N1 &kp N2)
  #elif OPERATING_SYSTEM == 'M'
    UNICODE_SEQ_MACOS(&kp D &kp N8 &kp N3 &kp D &kp D &kp E &kp N1 &kp N2)
  #elif OPERATING_SYSTEM == 'W'
    UNICODE_SEQ_WINDOWS(&kp N0 &kp N1 &kp F &kp N6 &kp N1 &kp N2)
  #endif
)
emoji_face_unamused_regular: emoji_face_unamused_regular {
  compatible = "zmk,behavior-mod-morph";
  #binding-cells = <0>;
  bindings = <&emoji_face_unamused_regular_macro>, <&emoji_face_unamused_regular_macro>;
  mods = <(~(
    #ifdef WORLD_USE_COMPOSE_FOR_emoji_face_unamused_regular
      COMPOSE_MORPH_MODS
    #else
      UNICODE_MORPH_MODS
    #endif
  ))>;
};
UNICODE(emoji_face_unamused_shifted_macro, /* 🙄 */
  #if OPERATING_SYSTEM == 'L'
    UNICODE_SEQ_LINUX(&kp N1 &kp F &kp N6 &kp N4 &kp N4)
  #elif OPERATING_SYSTEM == 'M'
    UNICODE_SEQ_MACOS(&kp D &kp N8 &kp N3 &kp D &kp D &kp E &kp N4 &kp N4)
  #elif OPERATING_SYSTEM == 'W'
    UNICODE_SEQ_WINDOWS(&kp N0 &kp N1 &kp F &kp N6 &kp N4 &kp N4)
  #endif
)
emoji_face_unamused_shifted: emoji_face_unamused_shifted {
  compatible = "zmk,behavior-mod-morph";
  #binding-cells = <0>;
  bindings = <&emoji_face_unamused_shifted_macro>, <&emoji_face_unamused_shifted_macro>;
  mods = <(~(
    #ifdef WORLD_USE_COMPOSE_FOR_emoji_face_unamused_shifted
      COMPOSE_MORPH_MODS
    #else
      UNICODE_MORPH_MODS
    #endif
  ))>;
};
emoji_face_unamused: emoji_face_unamused {
  compatible = "zmk,behavior-mod-morph";
  #binding-cells = <0>;
  bindings = <&emoji_face_unamused_regular>, <&emoji_face_unamused_shifted>;
  mods = <MOD_LSFT>;
};
Finally, assign &emoji_face_unamused to a "Custom" key in the Glove80 Layout Editor.
The README/ directory in this repository contains sources and renderings of
layer map diagrams for all layers in this keymap, as well as a blank template
for your own customization: for example, if you use a different alpha layout.
To edit a diagram, upload its corresponding JSON file into the KLE app by drag/drop onto the canvas or clicking "Upload JSON" in the "Raw data" tab.
To render a layer diagram, use the "Screenshot node" feature in Firefox
on the #keyboard-bg element; or use your favorite screenshot capturing tool.
To assemble a PDF document with all rendered layer diagrams, run rake pdf to
convert each of them into PDF documents and then stitch them together into one.
If you rearrange the base layer (say, for a custom or alternative layout) then:
-
Export your keymap as a JSON file (via "Advanced Settings" > "Enable local config" then go back to "Edit" and click "Download") in the Layout Editor.


-
Overwrite the
keymap.jsonfile in this repository with your exported file. -
Run the
rakecommand in this repository. -
Copy the new
keymap.dtsicontents back into the "Custom Defined Behaviors" text box in the Layout Editor for your keymap.
You don't need to change the per-finger layers (such as "LeftPinky") manually.
To horizontally mirror a keymap's physical layout in the Glove80 Layout Editor:
- Activate the "Enable local config" option in the Glove80 Layout Editor's settings panel under the "Experimental Settings" section.
- Return to the editor and export your keymap to a JSON file by clicking on the "Download" button.
- Paste the contents of the exported JSON file into your Web browser's JavaScript console (found in the "Developer Tools" panel, typically activated by pressing Ctrl+F12) at the location indicated by the comment in the first line of the following code snippet.
- Right-click the result, copy to clipboard, save to file, and upload into the Glove80 Layout Editor.
- Presto! 🫰 Everything should be mirrored now.
layout = /* paste contents of exported JSON file here */;
mirroring_transformation = {
//
// |------------------------|------------------------|
// | LEFT_HAND_KEYS         |        RIGHT_HAND_KEYS |
// |                        |                        |
// |  0  1  2  3  4         |          5  6  7  8  9 |
// | 10 11 12 13 14 15      |      16 17 18 19 20 21 |
// | 22 23 24 25 26 27      |      28 29 30 31 32 33 |
// | 34 35 36 37 38 39      |      40 41 42 43 44 45 |
// | 46 47 48 49 50 51      |      58 59 60 61 62 63 |
// | 64 65 66 67 68         |         75 76 77 78 79 |
// |                69 52   |   57 74                |
// |                 70 53  |  56 73                 |
// |                  71 54 | 55 72                  |
// |------------------------|------------------------|
// | LEFT_HAND_MIRRORED     |    RIGHT_HAND_MIRRORED |
// |                        |                        |
// |  9  8  7  6  5         |          4  3  2  1  0 |
// | 21 20 19 18 17 16      |      15 14 13 12 11 10 |
// | 33 32 31 30 29 28      |      27 26 25 24 23 22 |
// | 45 44 43 42 41 40      |      39 38 37 36 35 34 |
// | 63 62 61 60 59 58      |      51 50 49 48 47 46 |
// | 79 78 77 76 75         |         68 67 66 65 64 |
// |                74 57   |   52 69                |
// |                 73 56  |  53 70                 |
// |                  71 54 | 55 72                  |
// |------------------------|------------------------|
//
   0: 9,  1: 8,  2: 7,  3: 6,  4: 5,                              5: 4,  6: 3,  7: 2,  8: 1,  9: 0,
  10:21, 11:20, 12:19, 13:18, 14:17, 15:16,               16:15, 17:14, 18:13, 19:12, 20:11, 21:10,
  22:33, 23:32, 24:31, 25:30, 26:29, 27:28,               28:27, 29:26, 30:25, 31:24, 32:23, 33:22,
  34:45, 35:44, 36:43, 37:42, 38:41, 39:40,               40:39, 41:38, 42:37, 43:36, 44:35, 45:34,
  46:63, 47:62, 48:61, 49:60, 50:59, 51:58,               58:51, 59:50, 60:49, 61:48, 62:47, 63:46,
  64:79, 65:78, 66:77, 67:76, 68:75,                             75:68, 76:67, 77:66, 78:65, 79:64,
                                     69:74, 52:57, 57:52, 74:69,
                                     70:73, 53:56, 56:53, 73:70,
                                     71:72, 54:55, 55:54, 72:71,
};
mirrored_layers = layout["layers"].map((layer) => {
  return layer.map((key,pos) => {
    return layer[mirroring_transformation[pos]];
  });
});
mirrored_layout = Object.assign({}, layout);
mirrored_layout["layers"] = mirrored_layers;
mirrored_layout; /* dumps to the console for copying */Join the #glorious-engrammer channel on MoErgo's discord server.
Like my work? 👍 Please spare a life today as thanks! 🐄🐖🐑🐔🐣🐟✨🙊✌
Why? For 💕 ethics, the 🌎 environment, and 💪 health; see link above. 🙇
(the ISC license)
Copyright 2023 Suraj N. Kurapati https://github.com/sunaku
Permission to use, copy, modify, and/or distribute this software for any purpose with or without fee is hereby granted, provided that the above copyright notice and this permission notice appear in all copies.
THE SOFTWARE IS PROVIDED "AS IS" AND THE AUTHOR DISCLAIMS ALL WARRANTIES WITH REGARD TO THIS SOFTWARE INCLUDING ALL IMPLIED WARRANTIES OF MERCHANTABILITY AND FITNESS. IN NO EVENT SHALL THE AUTHOR BE LIABLE FOR ANY SPECIAL, DIRECT, INDIRECT, OR CONSEQUENTIAL DAMAGES OR ANY DAMAGES WHATSOEVER RESULTING FROM LOSS OF USE, DATA OR PROFITS, WHETHER IN AN ACTION OF CONTRACT, NEGLIGENCE OR OTHER TORTIOUS ACTION, ARISING OUT OF OR IN CONNECTION WITH THE USE OR PERFORMANCE OF THIS SOFTWARE.