Git Workflow in Synapse
This document serves as a guide for applying new changes to a Git integrated Synapse workspace. There are various ways to work with Git, and it is desirable to have a common practice within a team of developers. The figure below displays an overview of a workflow in Git that should be used to apply changes in the Synapse workspace.

The easiest way to create a new feature branch, is directly from Synapse Studio. Before you create a new branch, you will typically want to navigate to the main branch first. This is because in most cases you will base your new code changes on the most recent version of the code base. To create a new branch in Synapse Studio you simply press the branch dropdown button in the top left corner, and then press New branch:

When naming a Git branch it is common to prefix the branch with either feat/ or fix/, depending on whether your branch will contain a new feature or a bug fix. This is not a requirement, but is a good practice in terms of branching structure. Using this convention can also be hooked up to more complex functionality in Git.
Once the appropriate artifacts have been created or fixed, the changes need to be committed. In Synapse Studio, you can easily commit changes made to artifacts through the UI. You can either commit individual changes, by pressing the Commit button within an individual artifact file, or all changes can be committed at once by pressing Commit all in the upper tool bar in Synapse Studio. A good practice is to commit individual files, such that you don't commit unwanted changes by committing everything at once.

Everytime you commit a change, Synapse will push a commit to the remote branch in Github. Although a pull request hasn't been created yet, the committed changes can be inspected if you navigate to the branch in Github.
Once all changes are committed, a pull request must be created in order to merge the code changes with the main branch. A pull request can easily be created directly from Synapse Studio, by pressing the Create pull request button found in the branch dropdown menu in the top left corner:

After pressing this button in Synapse, you will be redirected to Github, where you will get an overview of your code changes:

Before you press the Create pull request, make sure that pull request is pointing towards the main branch, as indicated in the top left corner in the figure above.
To help your fellow reviewers, please write an appropriate pull request title, and describe the feature or bug fix that is featured in the pull request. This will make the job of the reviewers much easier.
Whenever you create a pull request or commit new changes to your feature branch, a Github action is triggered that will validate your most recent code changes. This validation action is equivalent to pressing the Validate all button in Synapse Studio. This is to ensure that invalid code is never merged with the main branch.
Before the changes in the pull request can be merged with the main branch, a team member must review the code and approve the changes. Once the reviewer has approved the changes, the pull request changes can be merged from a button click in the pull request Github page. If a reviewer has commented any of the code, the comments must be resolved before the changes can be merged.
Other developers can merge changes with the main branch, and thus merge their new changes while you are working on your feature branch. In this case, the main branch will have some new changes, that will not be reflected in your feature branch, since it was based on an older version of the main branch. In most cases, it will not affect your work, and you will be able to merge your changes without issues. But if the new changes made by the other developer is affecting the same files/artifacts that you are working on in your feature branch, their might occur merge conflicts. If any merge conflicts occur, they will be clearly visualised in Github, and you will not be able to merge with main before the merge conflicts are resolved (a guide to resolve merge conflicts will be described in a separate document).
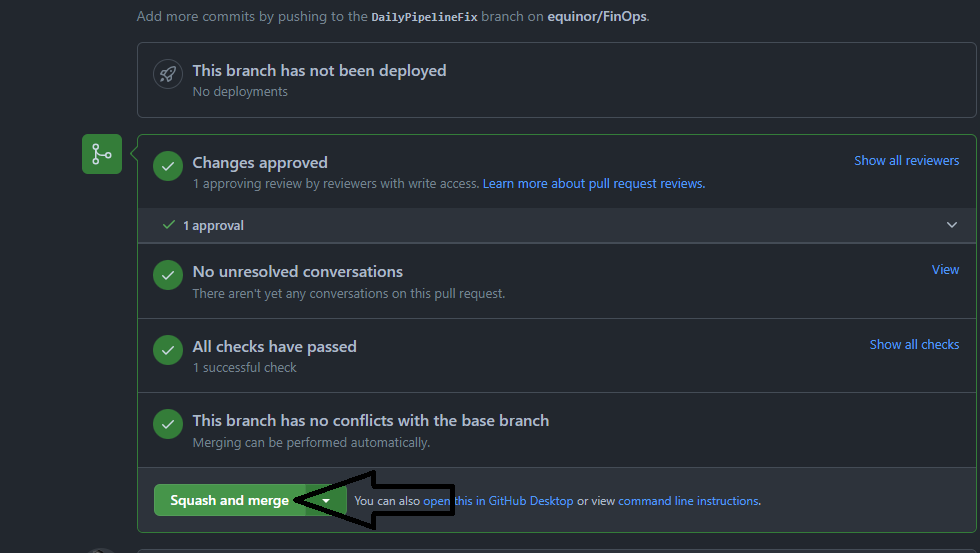
Once the pull request has been approved by at least one reviewer, the changes can be merged with main. Merge changes by pressing the Squash and merge button in the pull request Github page:
After the changes have been merge, your working branch will be automatically deleted. The changes are now part of the main branch and defines the newest version of the source code. If you navigate back to Synapse Studio, your merged changes is immediately reflected in the main branch.
After merging your changes, you should always publish your changes in Synapse Studio as a good practice. To publish the newest changes in main, navigate to Synapse Studio and then enter the main branch. Then press the Publish button in the top left toolbar (note that it is only possible to publish changes from the main branch, the button is disabled in every other branch):

When publishing changes from Synapse Studio, Synapse will generate an ARM template, and push it to the workspace_publish branch. In this branch there are defined a deployment Github action, that will redeploy the s037-cost-management workspace, and propagate the changes to the finops-synapse-dev, finops-synapse-test and finops-synapse-prod workspaces.
After publishing the changes from Synapse, you can navigate to the Github Action overview page to inspect the deployment. In order to avoid unwanted re-deployment of the Synapse environment, a manual deployment approval have been implemented. To initate the deployment of the Synapse environment, navigate to the appropriate Github action in the link above, and press Review deployments, then press Approve and deploy. Once the deployment finishes successfully, all changes made through the pull request should be properly reflected in all pipeline triggers (either manual or scheduled).
